
Larry Haun’s 10 Rules for Framing
Expert framer Larry Haun details guidelines for working efficiently and accurately.
Synopsis: Framer Larry Haun built houses for over 50 years. And having started out in the housing tracts of Southern California, he learned to be as efficient as possible about the process. Here he distilled his experience down to 10 fundamental rules.
It was a coincidence that another contractor and I began framing houses next door to one another on the same day. But by the time his house was framed, mine was shingled, wired, and plumbed. It was no coincidence that the other contractor ran out of money and had to turn the unfinished house over to the lending company, while I sold mine for a profit.
Both houses were structurally sound, plumb, level, and square, but every 2×4 in the other house was cut to perfection. Every joint looked like finish carpentry. The other contractor was building furniture, and I was framing a house.
Unlike finish carpentry, framing doesn’t have to look perfect or satisfy your desire to fit together two pieces of wood precisely. Whether you’re building a house, an addition, or a simple wall, the goals when framing are strength, efficiency, and accuracy. Following the building codes and the blueprints should take care of the strength; efficiency and accuracy are trickier. But during 50 years of framing houses, I’ve come up with the following rules to help me do good work quickly and with a minimum of effort.
1. Don’t move materials any more than you have to
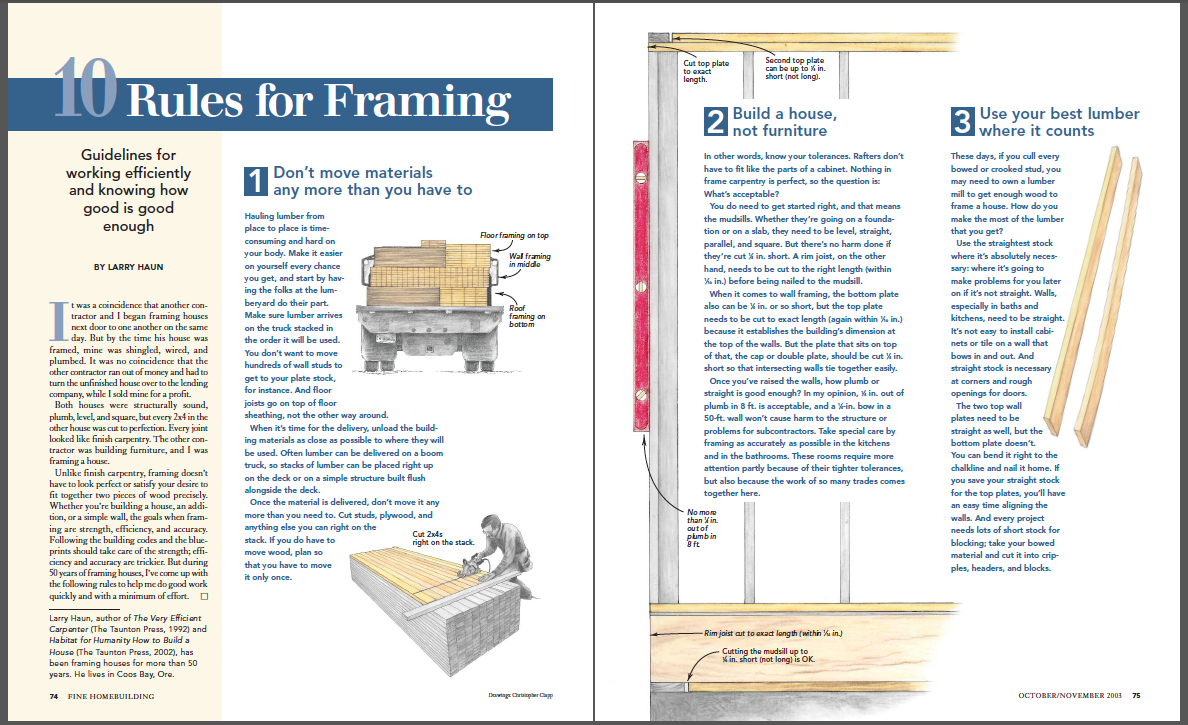
Hauling lumber from place to place is time consuming and hard on your body. Make it easier on yourself every chance you get, and start by having the folks at the lumberyard do their part. Make sure lumber arrives on the truck stacked in the order it will be used. You don’t want to move hundreds of wall studs to get to your plate stock, for instance. And floor joists go on top of floor sheathing, not the other way around.
When it’s time for the delivery, unload the building materials as close as possible to where they will be used. Often lumber can be delivered on a boom truck, so stacks of lumber can be placed right up on the deck or on a simple structure built flush alongside the deck.
Once the material is delivered, don’t move it any more than you need to. Cut studs, plywood, and anything else you can right on the stack. If you do have to move wood, plan so that you have to move it only once.
2. Build a house, not furniture
In other words, know your tolerances. Rafters don’t have to fit like the parts of a cabinet. Nothing in frame carpentry is perfect, so the question is: What’s acceptable?
You do need to get started right, and that means the mudsills. Whether they’re going on a foundation or on a slab, they need to be level, straight, parallel, and square. But there’s no harm done if they’re cut 1 ⁄4 in. short. A rim joist, on the other hand, needs to be cut to the right length (within 1 ⁄16 in.) before being nailed to the mudsill.
When it comes to wall framing, the bottom plate also can be 1⁄4 in. or so short, but the top plate needs to be cut to exact length (again within 1⁄16 in.) because it establishes the building’s dimension at the top of the walls. But the plate that sits on top of that, the cap or double plate, should be cut 1⁄4 in. short so that intersecting walls tie together easily.
Once you’ve raised the walls, how plumb or straight is good enough? In my opinion, 1⁄4 in. out of plumb in 8 ft. is acceptable, and a 1⁄4-in. bow in a 50-ft. wall won’t cause harm to the structure or problems for subcontractors. Take special care by framing as accurately as possible in the kitchens and in the bathrooms. These rooms require more attention partly because of their tighter tolerances, but also because the work of so many trades comes together here.
3. Use your best lumber where it counts
These days, if you cull every bowed or crooked stud, you may need to own a lumber mill to get enough wood to frame a house. How do you make the most of the lumber that you get?
Use the straightest stock where it’s absolutely necessary: where it’s going to make problems for you later on if it’s not straight. Walls, especially in baths and kitchens, need to be straight. It’s not easy to install cabinets or tile on a wall that bows in and out. And straight stock is necessary at corners and rough openings for doors.
The two top wall plates need to be straight as well, but the bottom plate doesn’t. You can bend it right to the chalkline and nail it home. If you save your straight stock for the top plates, you’ll have an easy time aligning the walls. And every project needs lots of short stock for blocking; take your bowed material and cut it into cripples, headers, and blocks.
4. Work in a logical order
Establish an efficient routine for each phase of work, do it the same way every time, and tackle each phase in its logical order. In the long run, having standard procedures will save time and minimize mistakes. Let’s take wall framing as an example.
First I snap all of the layout lines on the floor; then I cut the top and bottom plates and tack all of them in place on the lines. Next I lay out the plates, detailing the location of every window, door, stud, and intersecting wall.
I pry up the top plate and move it about 8 ft. away from the bottom plate, which I leave tacked to the deck. I scatter studs every 16 in. for the length of the wall. I nail the top plate to the studs and keep the bottom of the studs snug against the bottom plate. This helps to keep the wall square, straight, and in position to be raised. I try to establish a rhythm and work consistently from one end to the other. Once the top plate is completely nailed, I pry up the bottom plate and repeat the process on the bottom.
It’s worth saying that I didn’t just make up these steps; they evolved over time. Recognizing inefficiency is an important part of framing.
5. Keep the other trades in mind
If you want to waste time and money when framing, don’t think about the electrical work, the plumbing, the heat ducts, the drywall, or the finish carpentry. Whether you do them yourself or hire subcontractors, these trades come next. And unless you’re working with them in mind every step of the way, your framing can be in the way.
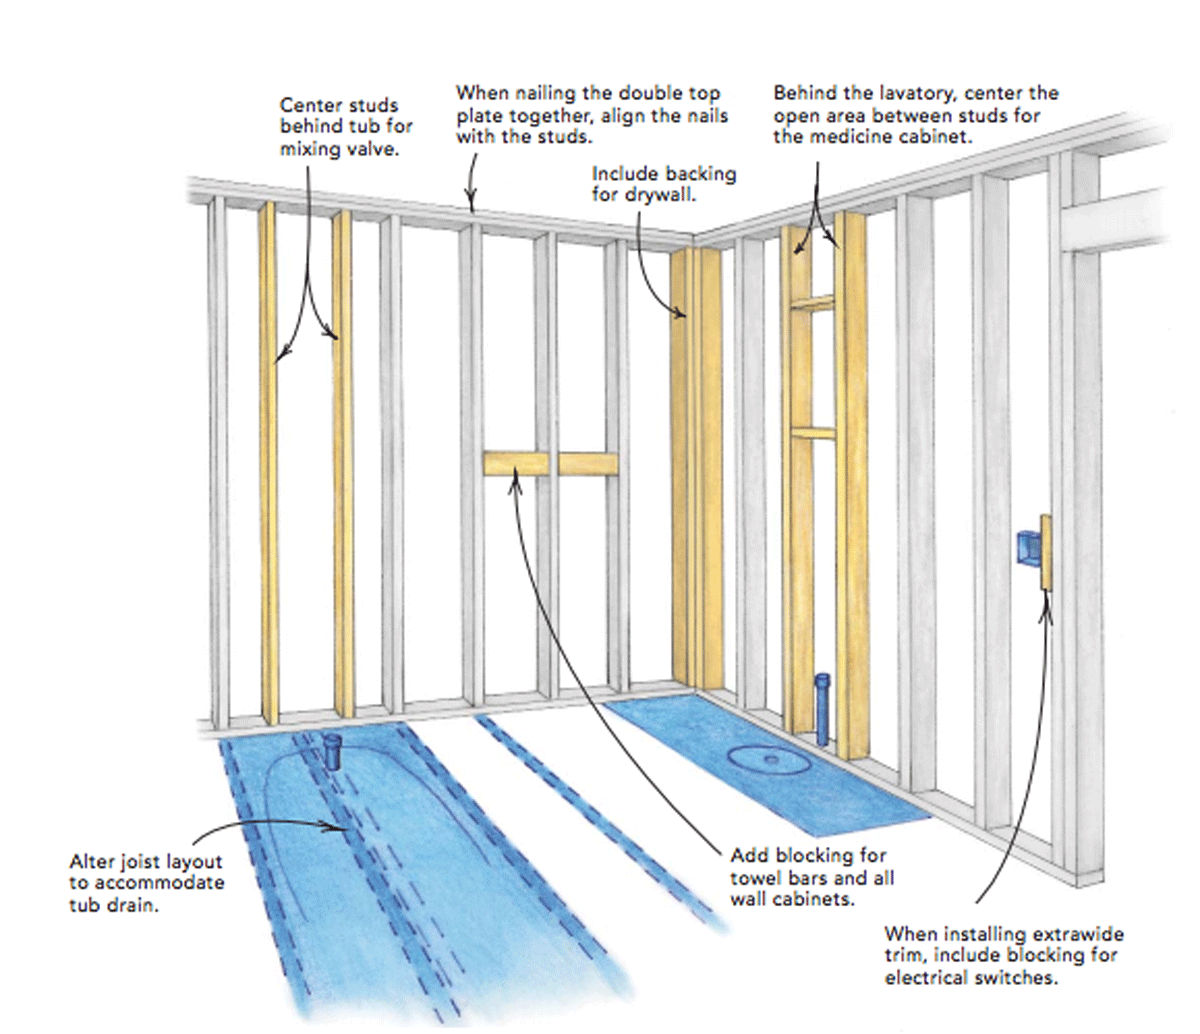
For example, when you nail on the double top plate, keep the nails located over the studs. This tip leaves the area between the studs free for the electrician or plumber to drill holes without hitting your nails.
6. Don’t measure unless you have to
The best way to save time when you’re framing a house is by keeping your tape measure, your pencil, and your square in your nail pouch as much as possible. I have to use a tape measure to lay out the wall lines accurately on the deck, but after that, I cut all of the wall plates to length by cutting to the snapped wall lines. I position the plate on the line, eyeball it, and then make the cuts at the intersecting chalkline.
Another time-saver is to make square crosscuts on 2x4s or 2x6s without using a square. Experience has shown me that with a little practice, anyone can make these square cuts by aligning the leading edge of the saw’s base, which is perpendicular to the blade, with the far side of the lumber before making the cut.
Trimming 1 ⁄4 in. from a board’s length shouldn’t require measuring. Ripping (lengthwise cuts) longer pieces also can be done by eye if you use the edge of the saw’s base as a guide. Train your eye. It’ll save time cutting, and as you develop, you’ll also be able to straighten walls as easily by eye as with a string.
7. Finish one task before going on to the next
My first framing job was with a crew that would lay out, frame, and raise one wall at a time before moving on to the next. Sometimes they would even straighten and brace the one wall before proceeding. We wasted a lot of time constantly switching gears.
If you’re installing joists, roll them all into place and nail them before sheathing the floor. Snap all layout lines on the floor before cutting any wall plates, then cut every wall plate in the house before framing. If you’re cutting studs or headers and cripples, make a cutlist for the entire project and cut them all at once. Tie all the intersecting walls together before starting to straighten and brace the walls.
Finishing before moving on is just as important when it comes to nailing and blocking. You might be tempted to skip these small jobs and do them later, but don’t. Close out each part of the job as well as you can before moving on to the next. Working in this way helps to maintain momentum, and it prevents tasks from being forgotten or overlooked.
8. Cut multiples whenever possible
You don’t need a mathematician to know that it takes less time to cut two boards at once than it does to cut each one individually.
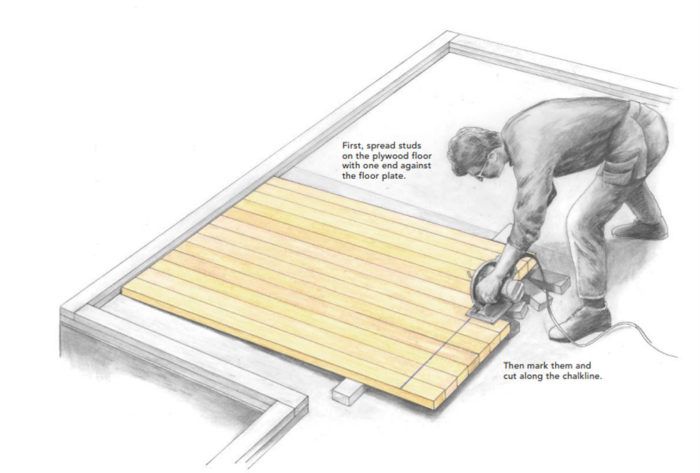
If you have a stack of studs that all need to be cut to the same length, align one end of the top row, snap a chalkline all the way across, and cut the studs to length right on the pile. Or you can spread them out on the floor, shoving one end against the floor plate, snap a chalkline, and cut them all at once.
Joists can be cut to length in a similar way by spreading them out across the foundation and shoving one end up against the rim joist on the far side. Mark them to length, snap a line, and cut the joists all at once.
Also, don’t forget to make repetitive cuts with a radial-arm or chop/miter saw outfitted with a stop block, which is more accurate and faster than measuring and marking one board at a time.

9. Don’t climb a ladder unless you have to
I don’t use a ladder much on a framing job except to get to the second floor before stairs are built. Walls can be sheathed and nailed while they’re lying flat on the deck. Waiting until the walls are raised to nail on plywood sheathing means you have to work from a ladder or a scaffold. Both are time consuming.
With a little foresight, you can do the rafter layout on a double top plate while it’s still on the floor. Otherwise, you’ll have to move the ladder around the job or climb on the walls to mark the top plate.
10. Know the building code
Building codes exist to create safe structures. Because building inspectors are not capable of monitoring all parts of every project, it’s your responsibility to know the building code and to build to it.
For instance, the code actually specifies how to nail a stud to a wall plate. You need two 16d nails if you’re nailing through a plate into the end of the stud, or four 8d nails if you’re toenailing. When you nail plywood or oriented strand board (OSB) roof sheathing, you need a nail every 6 in. along the edge of the sheathing and every 12 in. elsewhere. And if you’re using a nail gun, be careful not to overdrive the nails in the sheathing.
And a final word: If special situations arise, consult the building inspector. He or she is your ally, not your enemy. Get to know the building code for your area. Get your own copy of the IRC (International Residential Code) and build well, but build efficiently, with the understanding that perfection isn’t what is required.
 From Fine Homebuilding #158
For more photos and rules on framing, click the View PDF button below.
Fine Homebuilding Recommended Products
Fine Homebuilding receives a commission for items purchased through links on this site, including Amazon Associates and other affiliate advertising programs.

Ladder Stand Off

Speed Square

Roofing Gun

View Comments
I see an uninsulated corner where 2x's were added for drywall backing. Who proofs these articles?
Suburbanguy, it's no surprise. Fast and cheap are the only criteria here in southern CA.
This article is from 2003.
Suburbanguy,
Where do you see an uninsulated corner? The bathroom wall?
m2akita, Yes, diagram 5. Learned a lot from Matt Risinger's videos. He doesn't seem to be a contributor any longer.--kind of like Chuck.
You insulate all your corners? Why? You have no idea if that bathroom wall is an interior or exterior wall. And, if it was an exterior wall, how do you know the corner wouldn't be insulated before the blocking was added?
I find it strange that here and there gaps of a 1/4 inch are acceptable when framing. What tight and sealed envelope for the building. With those holes here and there for sure you will never pass the test for a performing sealed house. I would not promote that kind of framing.
m2akita,
Insulation is added after the framing and sheathing are finished. Those corners would be missed because they're completely inaccessible.
You are correct. That corner might not be on the outside of the house. I didn't see the continuation of either wall in the diagram and therefore assumed it was an outside wall/corner.
Interior walls do sometimes get insulated for sound reduction.
Search and watch the video by Matt Risinger on advanced framing techniques. This is Fine Homebuilding, not Throw-it-Together Homes.
What is missing from this piece is the essential role that the sheathing plays in the overall strength of a building. Without a properly assembled diaphragm walls can rack, roofs can sag, wind damage can be extensive. While the wood members carry a significant amount of the gravity loads, the real workhorse for lateral loads is the diaphragm action provided by the sheathing. Its planning (full sheets used in the right orientation, avoid simple spans, etc.) and fastening (both boundary and internal) is key.
This would be some mighty rough framing by todays standards at least where I'm from.