FHB Logo Facebook LinkedIn Email Pinterest Twitter X Instagram Tiktok YouTube Plus Icon Close Icon Navigation Search Icon Navigation Search Icon Arrow Down Icon Video Guide Icon Article Guide Icon Modal Close Icon Guide Search Icon Skip to content
Subscribe
Log In
  • How-To
  • Design
  • Tools & Materials
  • Restoration
  • Videos
  • Blogs
  • Forum
  • Magazine
  • Members
  • FHB House
  • Podcast
Log In

Fine Homebuilding Project Guides

Finish & Trim Carpentry

Guide Home
  • Trim Design
  • Tools and Materials
  • Interior Trim Basics
  • Window and Door Casings
  • Baseboard and Crown Molding
  • Wainscot and Paneling
  • Mantels and Fireplace Surrounds
  • Coffered Ceilings
Design

A Simple Approach to a Paneled Passageway

Starting with a prehung door, you can create an elegant vestibule by adding frame-and-panel jamb extensions.

By Gary Striegler Issue 188

Synopsis: Arkansas builder Gary Striegler digs in to his bag of tricks to show a way to enhance privacy and to add some variety to a room: using a prehung door to craft a vestibule. With his process, Striegler starts with a prehung door, then adds frame-and-panel jamb extensions to create the vestibule. A structure like this can create areas for built-ins like bookcases and spaces for furniture. They also can be built using a room’s existing partition walls.


Look in just about any old building, and you’ll see that the paneled passageway has been around for a long time. This trimmed-out space has a dramatic impact on the overall look of a home’s interior. Even more important, a passageway can add a sense of privacy to the room it serves. Adding this transition area can make a room feel more peaceful and sequestered. When I’m building a house, my clients often ask me to add paneled passageways to enhance privacy in certain rooms, especially master bedrooms and studies.

The good news is that you don’t need to be a furniture maker to build paneled passageways, and they don’t require expensive materials. I use simple pocket-hole joinery along with birch plywood, 1x poplar, and basic poplar moldings to build the panels. The best aspect of this approach is that everything is built off a prehung-door unit. With the door hinges already mortised, adding a paneled passageway to your next project requires only a little extra time and a few basic tools.
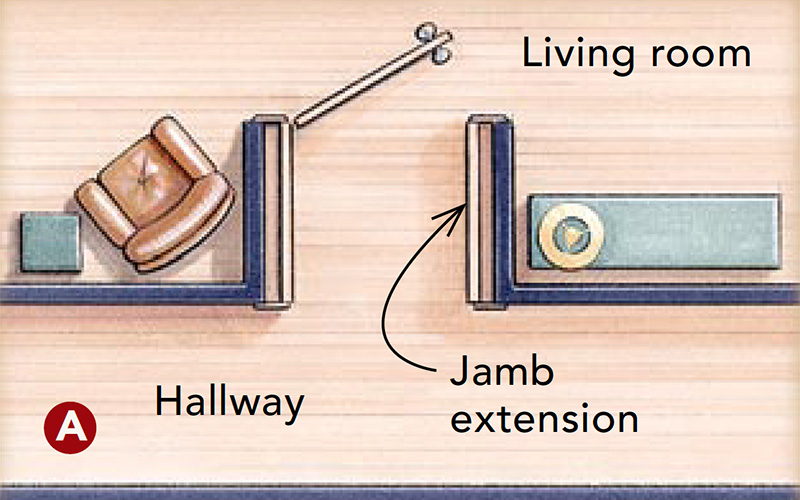
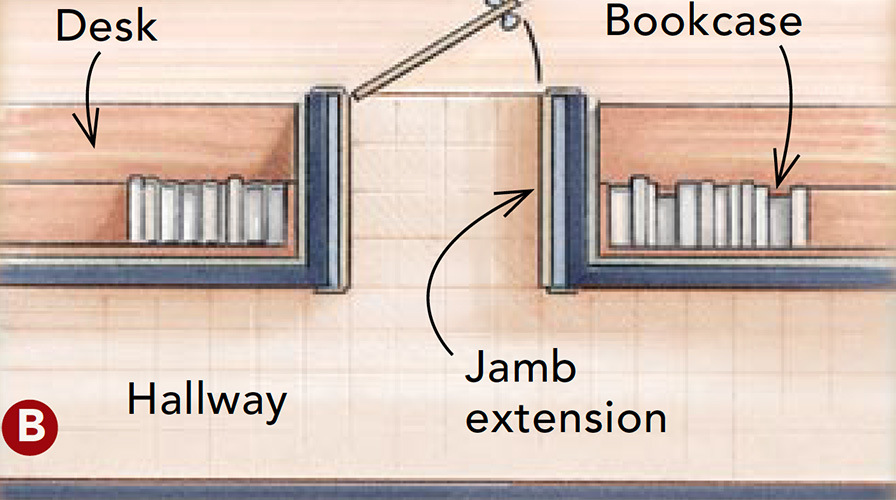
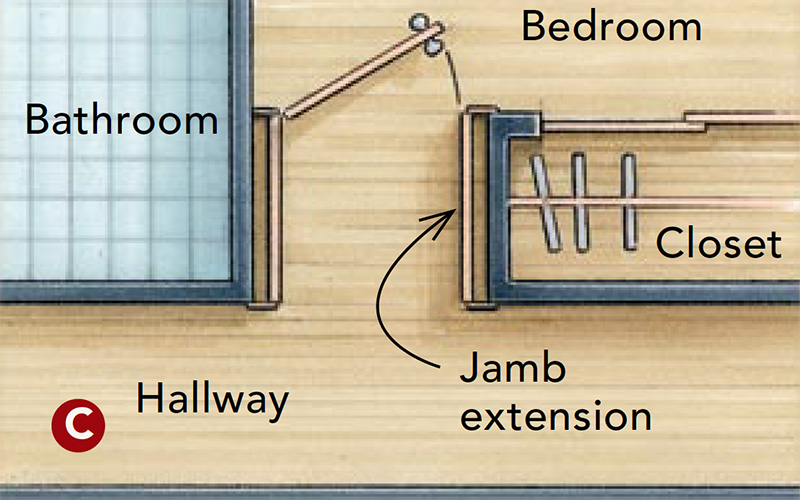
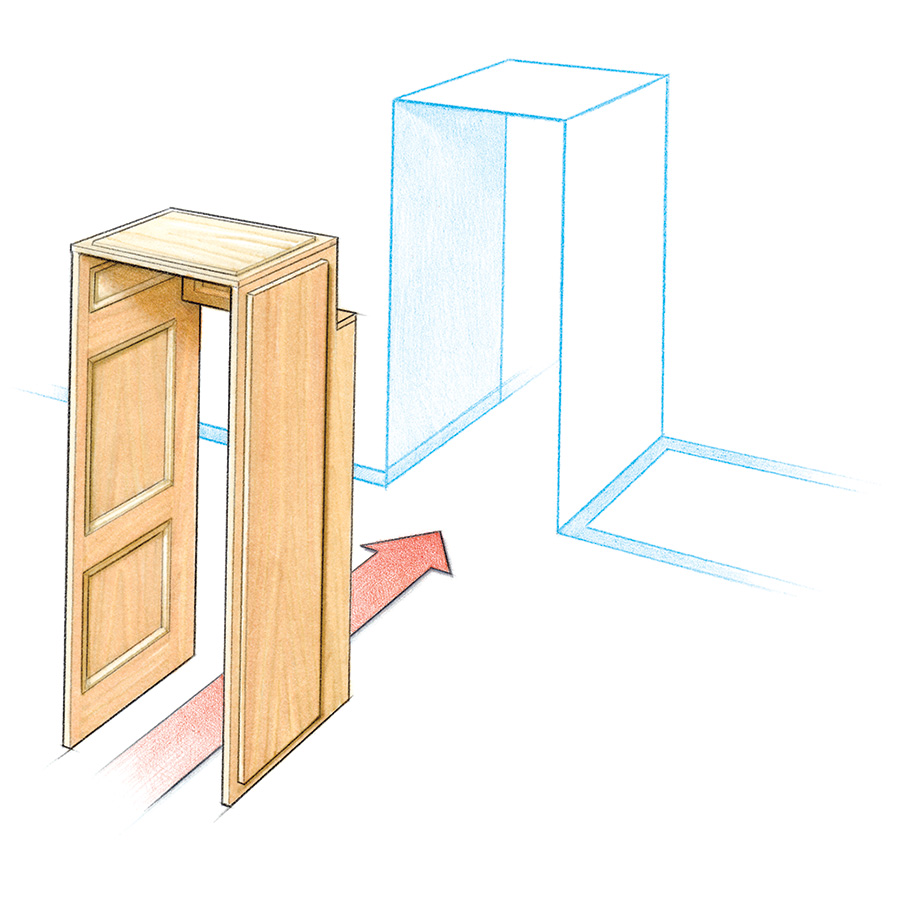
Paneled doorway

A passageway can benefit any room

Paneled passageways can do more than provide privacy. Adding a vestibule to a living-room entrance creates a niche for furniture (A). Pushing a doorway into a room creates space for built-ins like desks and bookcases (B). As shown in this article, vestibules also can incorporate existing partition walls from closets and bathrooms (C).  (drawings: Bob Lapointe)

doorway illustration doorway illustration doorway illustration

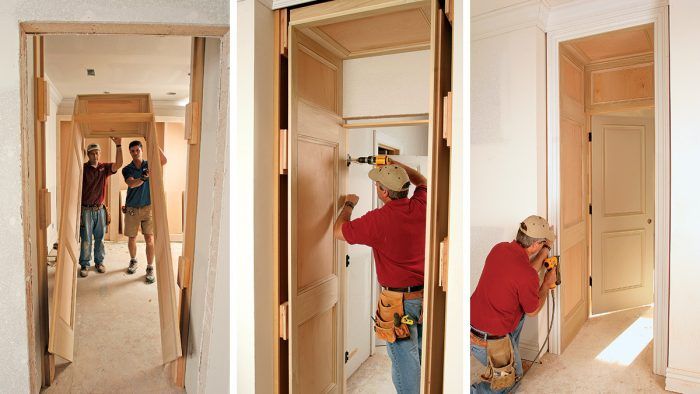
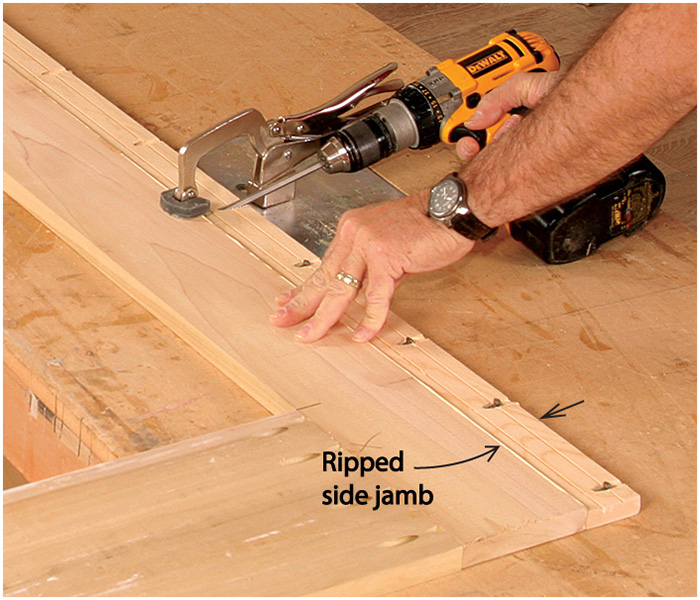
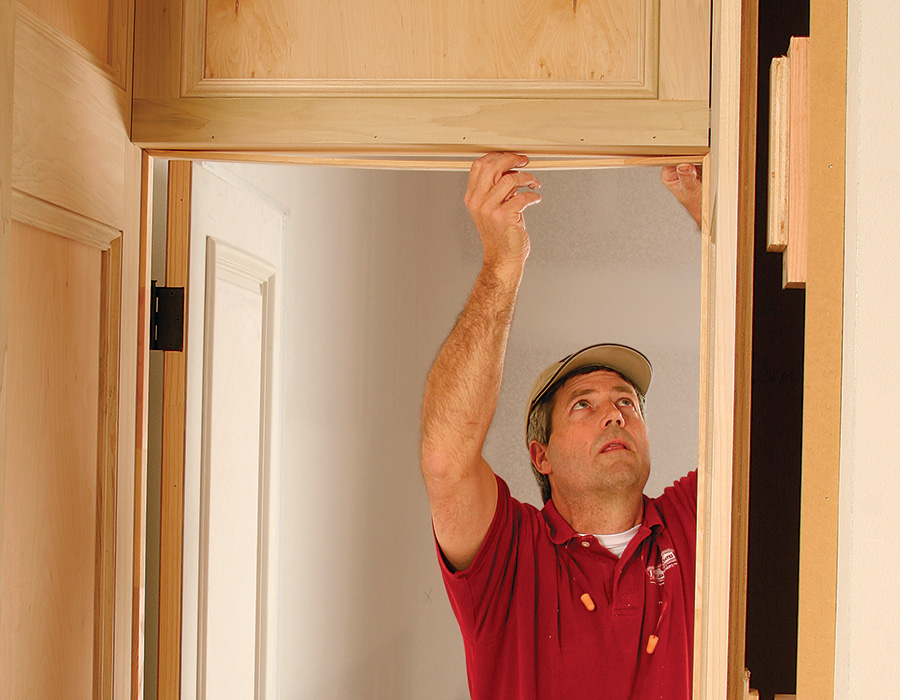
It all starts with a prehung door

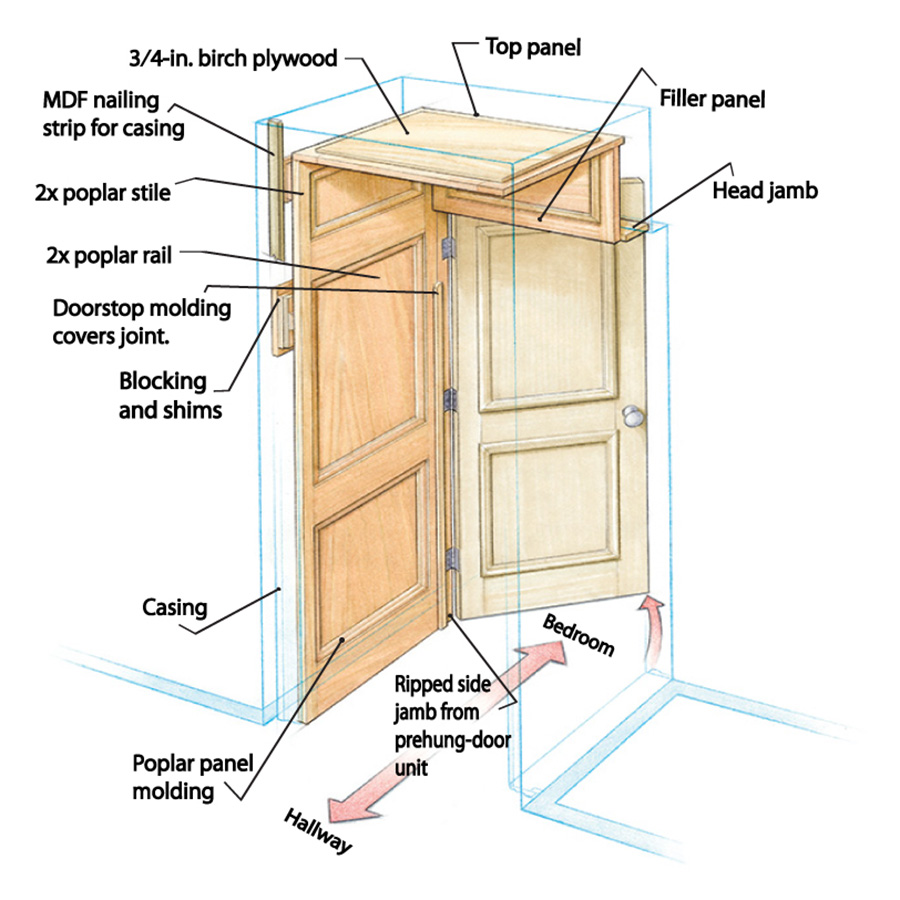
The frame-and-panel assemblies that form the sides of the vestibule are actually extensions of the side jambs from a prehung door. After removing the door and the hinges, I rip the side jambs down to 2 in. wide. Then I set aside the side jambs and head jamb and use the door’s dimensions to lay out the jamb extensions. I build the side-jamb extensions, the top panel, and the filler panel, and then assemble them near the door opening.

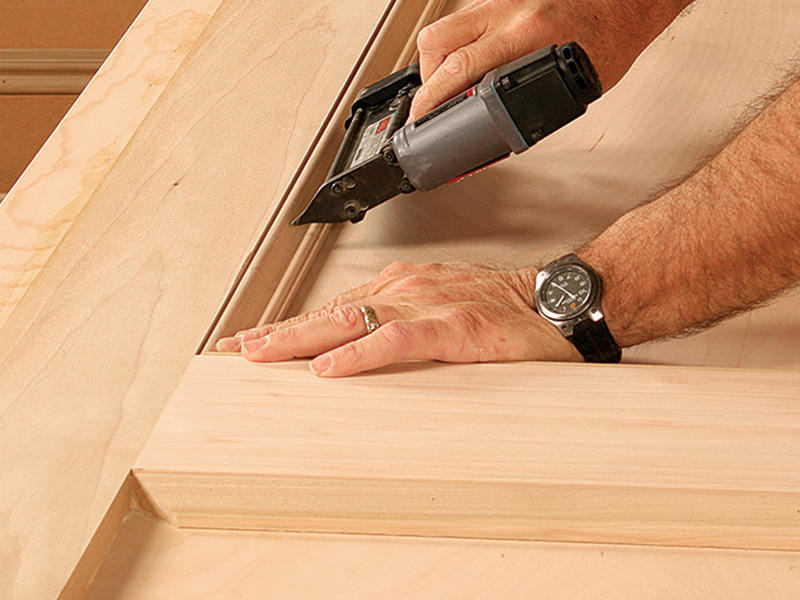
Use the door to lay out the jamb extension

The proportions of the jamb extensions should reflect the proportions of the door. I use a story pole to transfer rail heights from the door to the jamb extension. It’s important to note, however, that the extension has one more rail than the door. I make the stiles 2-1 ⁄ 2 in. wide because that dimension seems most pleasing to the eye. The jamb extension’s width is determined by the depth of the vestibule.

door panel illustration
Drawing: Bob la Pointe

door illustration
Drawing: Bob la Pointe
removing doorstop mold
Remove the doorstop molding, then rip each side jamb. After disassembling the jamb, I pry off the doorstop carefully so that it can be reinstalled later. I rip the side jamb down to 2 in. I also rip 3/4 in. off the head jamb so that the filler panel will tuck in front of the head jamb when the unit is installed later.

Join the jamb to the assembled frame. I assemble each extension’s frame with pocket screws. Once all the frames are built, I join the ripped side jamb to the frame of the extension with glue and pocket screws spaced every 6 in. When the unit is assembled and the door is hung, I reattach the doorstop over this joint.

adding plywood and panel molding
Add plywood and panel molding. After gluing and nailing 3/4-in. birch plywood to the back of the panel frame, I use a headless pinner to apply the poplar panel molding. All the vestibule panels are built the same way.

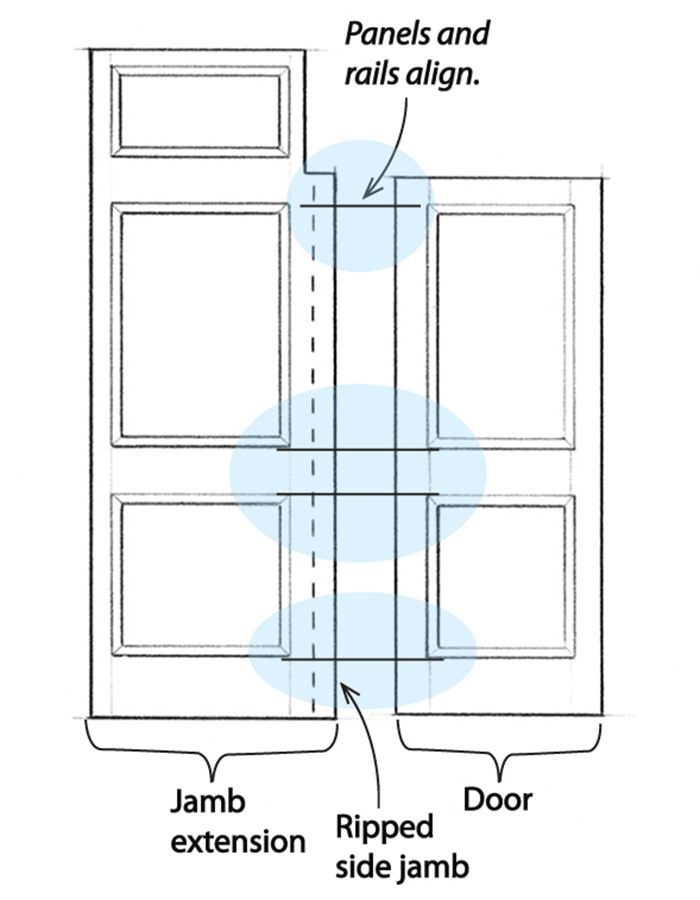
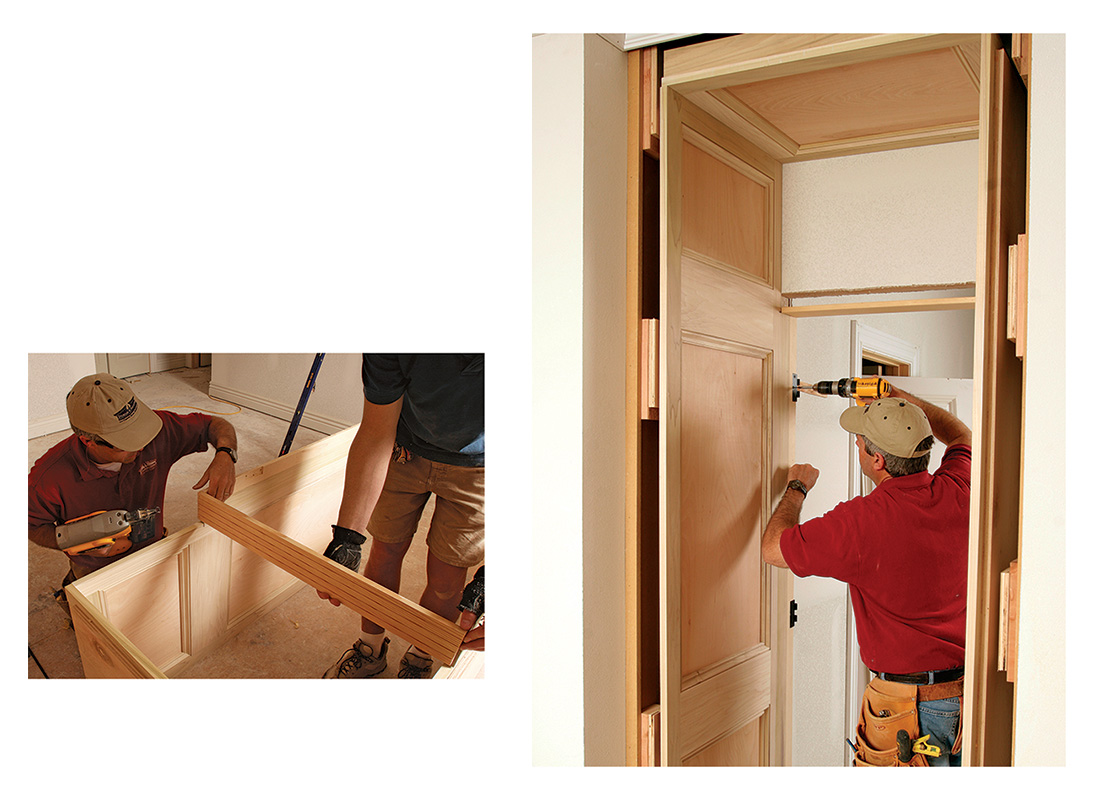
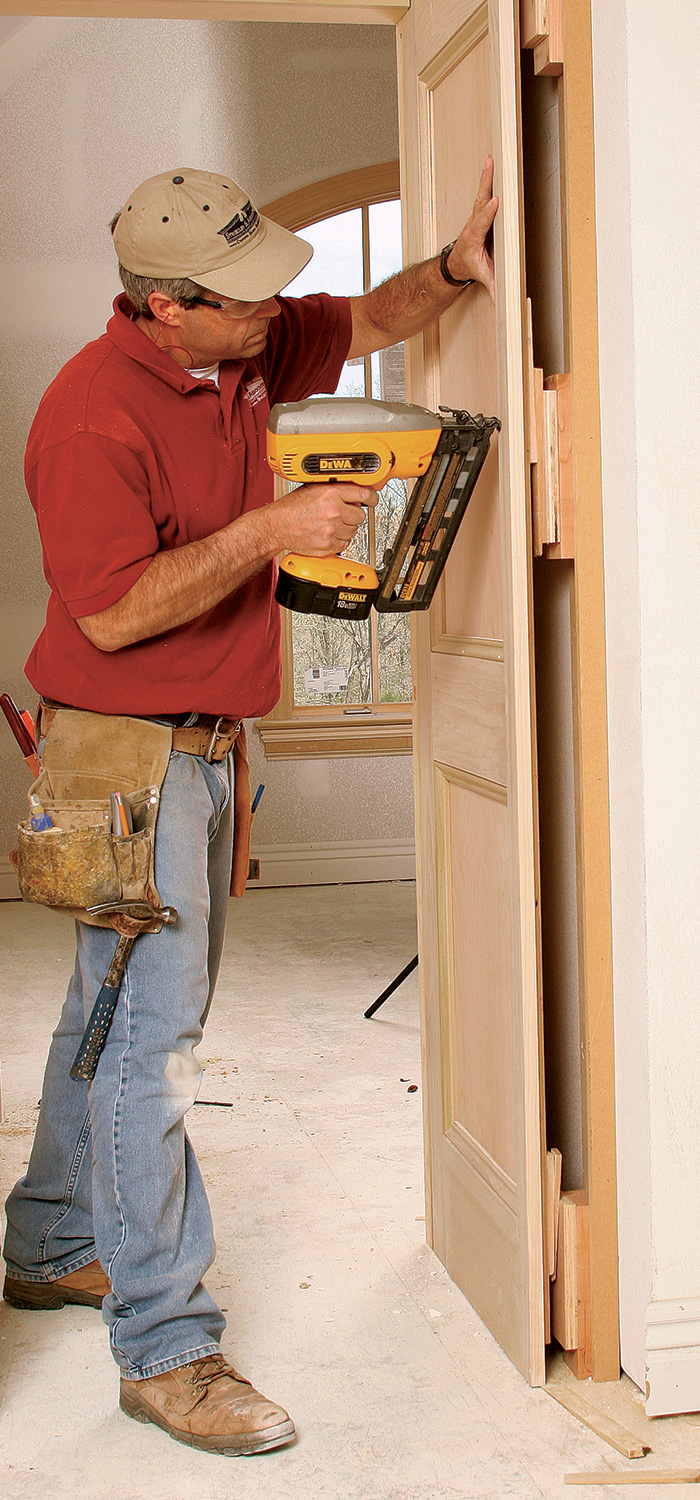
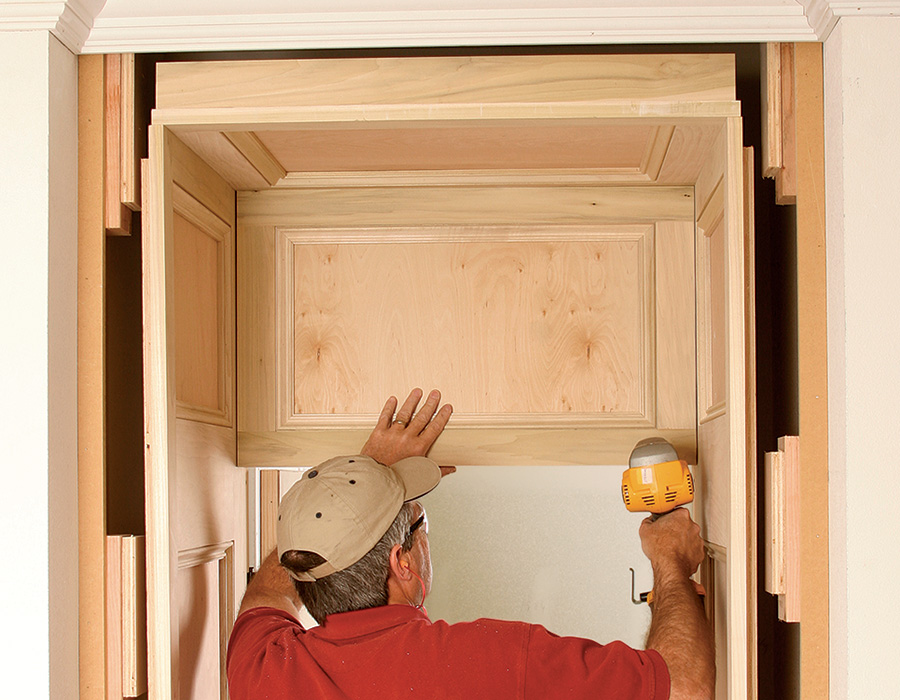
Assemble the pieces, and hang the door

The vestibule’s side panels extend above the door’s head jamb, which I install before tilting up the unit. Nailing up blocking ahead of time makes it possible to shim the panels plumb and level.

attaching top panel and head jab
Attach the top panel and head jamb. Using the length of the original head jamb as a guide, I screw the top panel and nail the original head jamb to the side panels. I ripped 3 ⁄ 4 in. off the original head jamb so that the filler panel will tuck in front of it once it’s installed.

shiming jamb plumb
Shim the jamb plumb, then tack it in place. I plumb the hinge side of the unit first, then nail it in place with 2-1 ⁄ 2-in. trim nails. I keep these nails in the area of the jamb that will be covered by the doorstop so that there are fewer holes to fill later.

installing hinges
Install the hinges, then hang the door. Once the hinge side of the jamb is nailed plumb, I install the hinges. Whether I’m hanging a hollow- or solid-core door, I run a long wood screw through the middle hole of each hinge to catch the framing by at least 1 in. I then shim and nail the other side jamb in place, maintaining an even reveal around the door once it’s closed.
tilt and slide illustration
Tilt and slide. After the original head jamb and top panel are attached to the side jambs, I tip up the unit, center it in the rough opening, and slide it in place. An extra set of hands ensures that the unit won’t rack as it’s positioned. Drawing: Bob la Pointe

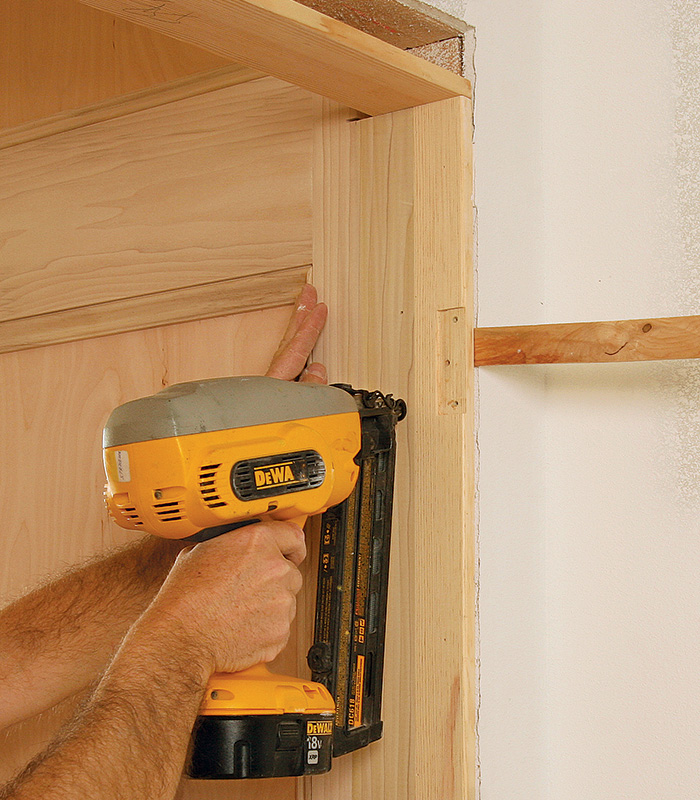
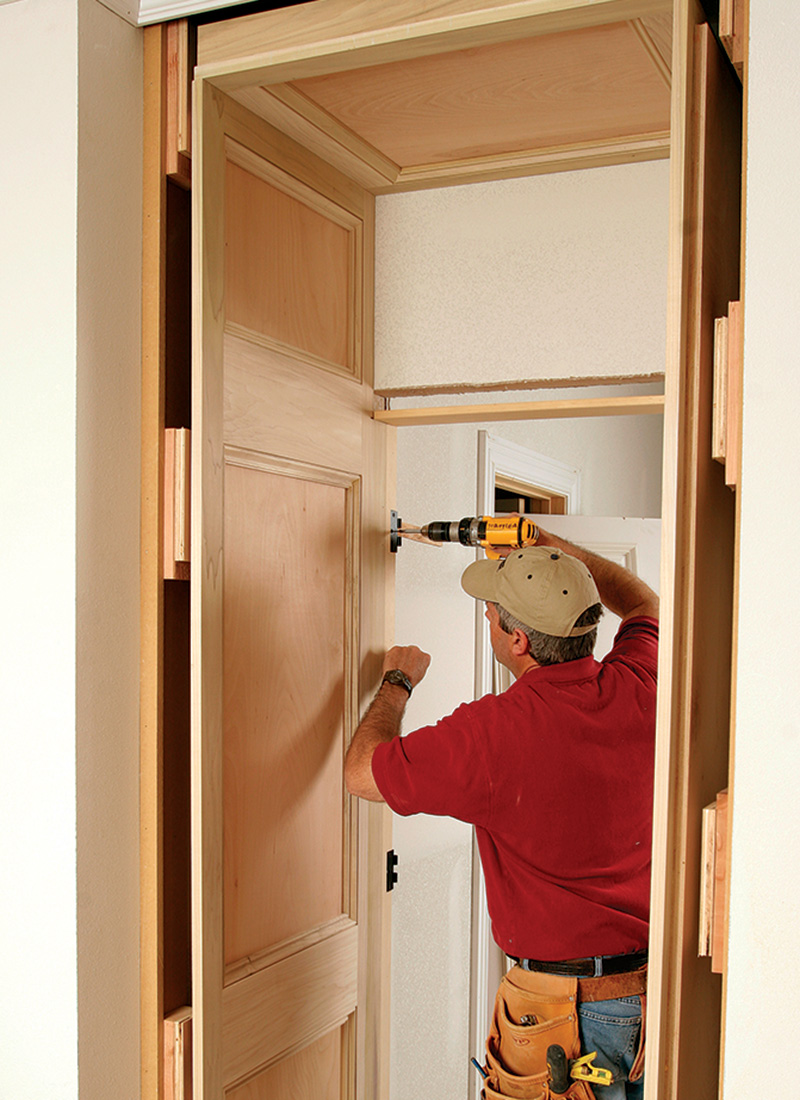
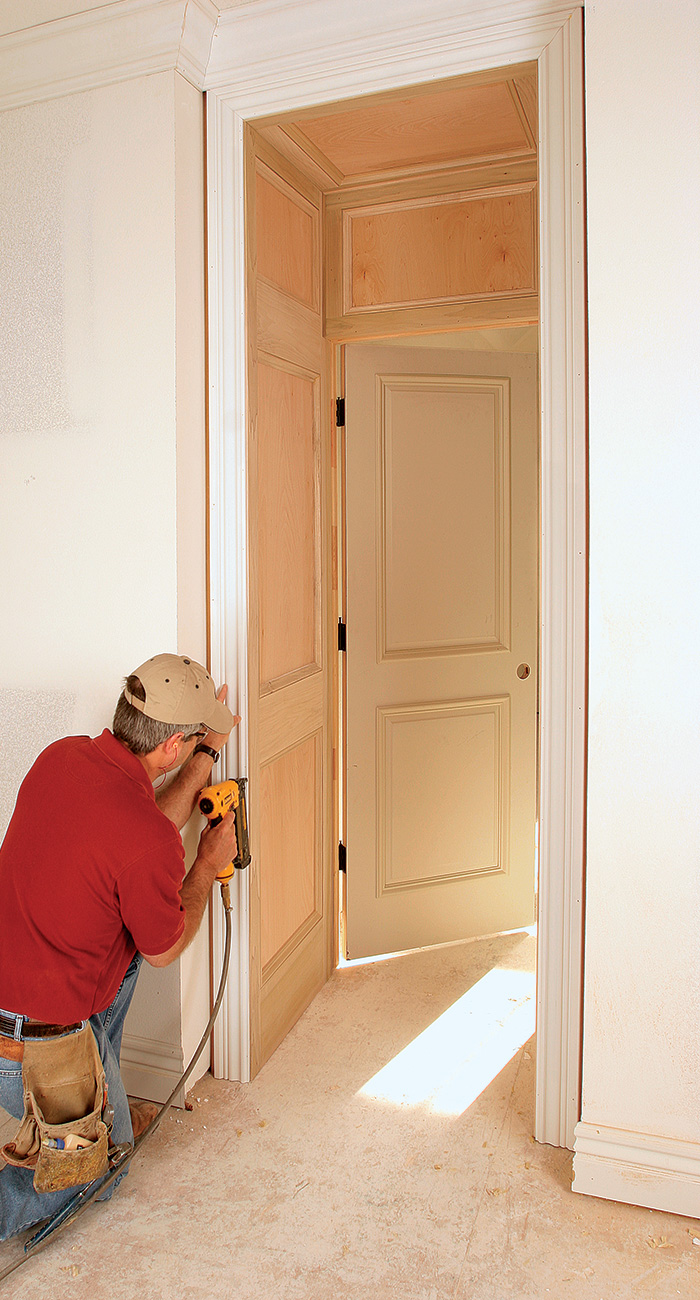
Shim the stiles plumb, then add the casing

Once the door is hung, I finish hanging the rest of the unit. Although I could install the filler panel earlier, I choose to install it once the vestibule is nailed in place so that I can fine-tune the side jambs as needed. When everything is shimmed and nailed plumb, I reinstall the doorstop and nail up the casing.

reinstalling the doorstop and nail up the casing
Shim and nail the outer stiles plumb. Before hanging the unit, I installed blocking within shimming range (1 ⁄ 2 in. to 1 in.) to sit behind the extension’s stiles. With the door jamb nailed off, I insert and adjust shims to get the jamb extension plumb before nailing it off. A piece of medium-density fiberboard (MDF) provides backing for the casing.

attaching filler panel to head jamb
Attach the filler panel to the head jamb. I nail the filler panel to the head jamb and to the studs, keeping the nails out of the panel’s field. A small cove molding will cover the gap around three sides of the filler panel.

installing doorstop molding and casing
Install the doorstop molding and casing. With the door jamb and the door hung, I reinstall the doorstop. I like to run the side pieces first and the header piece last. Finally, I add the casing to each side of the opening.

Gary Striegler is a homebuilder in Fayetteville, Ark.

Photos by Chris Ermides.

From FineHomebuilding #188

To view the entire article, please click the View PDF button below.

Sign up for eletters today and get the latest how-to from Fine Homebuilding, plus special offers.

Signing you up...

This site is protected by reCAPTCHA and the Google Privacy Policy and Terms of Service apply.
See all newsletters
See all newsletters
View PDF
Previous: Interior-Trim Transitions: Shim Trim and Fix Uneven Walls Next: How to Lay Out a Paneled Fireplace Wall

Guide

Finish & Trim Carpentry

Chapter

Wainscot and Paneling

Log in or create an account to post a comment.

Sign up Log in

Become a member and get full access to FineHomebuilding.com

Finish & Trim Carpentry

Finish & Trim Carpentry

Trusted, comprehensive guidance from the pros for creating perfect trim details in any room of the house

View Project Guide

View All Project Guides »

Become a member and get unlimited site access, including the Finish & Trim Carpentry Project Guide.

Start Free Trial

Trim Design
  • Trim Style and Design
Tools and Materials
  • Tools
  • Materials
Interior Trim Basics
  • Tips and Tricks
  • Techniques
  • Using Jigs
Window and Door Casings
  • Windows
  • Doors
Baseboard and Crown Molding
  • Baseboard
  • Crown Molding
  • Specialty Crown Situations
Wainscot and Paneling
  • Beadboard Wainscot
  • Paneled Wainscot
  • Chair Rails
  • Wall Treatments
Mantels and Fireplace Surrounds
  • Design
  • Installing Mantels and Surrounds
Coffered Ceilings

Fine Home Building

Newsletter Sign-up

  • Fine Homebuilding

    Home building tips, offers, and expert advice in your inbox.

  • Green Building Advisor

    Building science and energy efficiency advice, plus special offers, in your inbox.

  • Old House Journal

    Repair, renovation, and restoration tips, plus special offers, in your inbox.

Signing you up...

This site is protected by reCAPTCHA and the Google Privacy Policy and Terms of Service apply.
See all newsletters

Follow

  • Fine Homebuilding

    Dig into cutting-edge approaches and decades of proven solutions with total access to our experts and tradespeople.

    Start Free Trial Now
    • Facebook
    • Instagram
    • X
    • LinkedIn
  • GBA Prime

    Get instant access to the latest developments in green building, research, and reports from the field.

    Start Free Trial Now
    • Facebook
    • YouTube
  • Old House Journal

    Learn how to restore, repair, update, and decorate your home.

    Subscribe Now
    • Facebook
    • Instagram
    • X

Membership & Magazine

  • Online Archive
  • Start Free Trial
  • Magazine Subscription
  • Magazine Renewal
  • Gift a Subscription
  • Customer Support
  • Privacy Preferences
  • About
  • Contact
  • Advertise
  • Careers
  • Terms of Use
  • Site Map
  • Do not sell or share my information
  • Privacy Policy
  • Accessibility
  • California Privacy Rights

© 2025 Active Interest Media. All rights reserved.

Fine Homebuilding receives a commission for items purchased through links on this site, including Amazon Associates and other affiliate advertising programs.

X
X
This is a dialog window which overlays the main content of the page. The modal window is a 'site map' of the most critical areas of the site. Pressing the Escape (ESC) button will close the modal and bring you back to where you were on the page.

Main Menu

  • How-To
  • Design
  • Tools & Materials
  • Video
  • Blogs
  • Forum
  • Project Guides
  • Reader Projects
  • Magazine
  • Members
  • FHB House

Podcasts

  • FHB Podcast
  • ProTalk

Webinars

  • Upcoming and On-Demand

Podcasts

  • FHB Podcast
  • ProTalk

Webinars

  • Upcoming and On-Demand

Popular Topics

  • Kitchens
  • Business
  • Bedrooms
  • Roofs
  • Architecture and Design
  • Green Building
  • Decks
  • Framing
  • Safety
  • Remodeling
  • Bathrooms
  • Windows
  • Tilework
  • Ceilings
  • HVAC

Magazine

  • Current Issue
  • Past Issues
  • Magazine Index
  • Subscribe
  • Online Archive
  • Author Guidelines

All Access

  • Member Home
  • Start Free Trial
  • Gift Membership

Online Learning

  • Courses
  • Project Guides
  • Reader Projects
  • Podcast

More

  • FHB Ambassadors
  • FHB House
  • Customer Support

Account

  • Log In
  • Join

Newsletter

Get home building tips, offers, and expert advice in your inbox

Signing you up...

This site is protected by reCAPTCHA and the Google Privacy Policy and Terms of Service apply.
See all newsletters
See all newsletters

Follow

  • X
  • YouTube
  • instagram
  • facebook
  • pinterest
  • Tiktok

Join All Access

Become a member and get instant access to thousands of videos, how-tos, tool reviews, and design features.

Start Your Free Trial

Subscribe

FHB Magazine

Start your subscription today and save up to 70%

Subscribe

We hope you’ve enjoyed your free articles. To keep reading, become a member today.

Get complete site access to expert advice, how-to videos, Code Check, and more, plus the print magazine.

Start your FREE trial

Already a member? Log in