Arguments in favor of exterior air barriers
In the early 1970s, residential builders knew almost nothing about air tightness. The first residential air barriers were installed in Saskatchewan in the late 1970s, when pioneering Canadian builders began sealing the seams of interior polyethylene sheeting with Tremco acoustical sealant. The Canadian builders (and their American imitators) went to a lot of trouble to weave the interior poly around framing members at rim-joist areas and partition intersections.
A few years later, Joseph Lstiburek perfected and promoted the Airtight Drywall Approach (ADA) to air barriers. The ADA system required gaskets or caulk between drywall and wall plates on exterior walls; any electrical box in an exterior wall needed a special flange to allow it to be caulked to the drywall.
Related Articles from GreenBuildingAdvisor.com
- Questions and Answers About Air Barriers
- One Air Barrier or Two?
- Airtight Wall and Roof Sheathing
- Blower Door Basics
- Pinpointing Leaks With a Fog Machine
- Air-Sealing Tapes and Gaskets
- Air Sealing With Sprayable Caulk
- Navigating Energy Star’s Thermal Bypass Checklist
- Prevent Ice Dams With Air Sealing and Insulation
- Podcast: Air Barrier or Vapor Barrier?
- GBA Encyclopedia: Addressing Air Leaks
- Q&A: Is dense-packed cellulose an air barrier?
These days, some builders approach air sealing like all-out war, and try to make everything as airtight as possible. These are the builders who caulk their sheathing to the studs, and then install housewrap with taped seams, and then caulk their drywall to the studs for good measure. Before the blower-door contractor shows up, they run around the house like a chicken with its head cut off, squirting spray foam into every hole and crack. This approach – let’s call it “if one air barrier is good, three air barriers are even better” – works, except when it doesn’t. (Sometimes it makes more sense to have just one air barrier that is well defined rather than to wage an all-out but somewhat random war against air leakage.)
An exterior air barrier at the wall and roof sheathing
There’s a growing trend among builders concerned about air leakage to establish the air barrier at the exterior wall and roof sheathing. Typically this requires sealing the seams of the OSB or plywood sheathing with tape – either peel-and-stick tape or the proprietary Zip System tape from Huber. (If all insulation is on the exterior side of the sheathing, it’s also possible to cover all of the exterior sheathing with Ice & Water Shield – a method called PERSIST.)
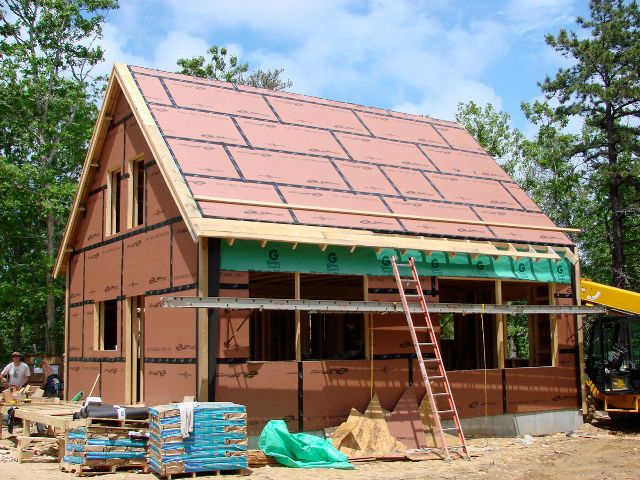
Carried to its most logical expression, this approach requires buildings to be framed without any roof overhangs at the eaves or rakes. That way it’s easy to seal the transition between the wall sheathing and the roof sheathing. After the air barrier is established and sealed, framers can build rake and eave overhangs as separate elements attached to the exterior sheathing.
Simple and verifiable
Marc Rosenbaum, an energy consultant who works in New Hampshire and Massachusetts, described the advantages of this air-barrier system at a presentation he gave on February 10 at the Better Buildings By Design conference in Burlington, Vermont.
Rosenbaum began his presentation by reminding the audience of the characteristics of a good air barrier. According to Rosenbaum, an air barrier needs to be (a) impermeable to air; (b) continuous; (c) strong enough to resist the forces acting on it; and (d) durable. Rosenbaum doesn’t use rigid foam as an air barrier; in his opinion, it’s too flimsy to pass the durability requirement.
Rosenbaum explained, “I’ve tried interior air barriers. I’ve had Tremco acoustical sealant all over my hands. Airtight drywall is not easy. The approach takes lots of careful workmanship and you can’t really test it until you’re almost done. Exterior sheathing is easier to seal, and sheathing is durable.”
Rosenbaum pointed out that, compared to an interior air barrier, an exterior air barrier:
Summing up, Rosenbaum said, “Why do I like an exterior air barrier? Because of partition walls, floors, wiring, and things that go in and out of the walls.”
Rosenbaum noted that at any sheathing edge that doesn’t abut another piece of sheathing – for example, sheathing adjoining a rough opening or sill – needs to be sealed to the framing. To tape sheathing seams, Rosenbaum has used Vycor Plus for walls and W.R. Grace Roof Detail Membrane for roofs. (Since roofs get hotter than walls, they need tape with different specifications.) However, Rosenbaum has concluded that the Huber Zip System is faster and less expensive than using peel-and-stick tape.
Although it’s possible to use closed-cell spray polyurethane foam as an air barrier on the interior of the sheathing – using the so-called “flash and batt” or “flash and cellulose” method – there are drawbacks to this approach. It’s sometimes hard to maintain perfect access to all necessary areas that need to be foamed; spray foam is tricky to apply in cold weather; and spray foam can’t address some common air leakage locations (for example, between the subfloor and bottom plates).
Memorable quotes
Rosenbaum sprinkled his presentation with interesting observations and useful advice:
- “You could have the builders caulk the sheathing when they put it up. The only problem with that is I can’t tell if they did it or not.”
- “I’m nervous about rigid foam and tape, because the foam moves.”
- “Peel-and-stick tape on OSB doesn’t work without a primer.”
- “I don’t use the Huber Zip System without a housewrap, and I don’t use foam as a WRB. I do not believe that housewrap is an air barrier.”
- “It’s hard to use spray foam in really cold weather. If it’s zero degrees out, you don’t want them spraying against your sheathing.”
- “You can always add more insulation on the outside of the sheathing to keep it warmer.”
- “Cavity fill insulation must be very resistant to air movement. I prefer dense-packed cellulose. I am nervous about interior air going through fiberglass.”
- “There are probably more infrared cameras being sold than there are people who know how to use them.”
Excellent results
Rosenbaum’s exterior air barrier details have achieved impressive results. On Martha’s Vineyard in Massachusetts, Rosenbaum specified the Huber Zip System on an 8-unit residential project designed and built by the South Mountain Company. According to Rosenbaum, the single-family homes tested “Passivhaus-tight.”
Fine Homebuilding Recommended Products
Fine Homebuilding receives a commission for items purchased through links on this site, including Amazon Associates and other affiliate advertising programs.

Affordable IR Camera
8067 All-Weather Flashing Tape

Reliable Crimp Connectors
-
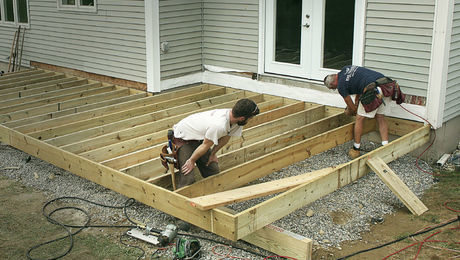
Rake and eave overhangs are tacked on later. At this affordable housing project on Martha's Vineyard, employees of the South Mountain Company framed the house without any roof overhangs. Once the framing was covered with Zip System sheathing, the seams were taped. After the integrity of the air barrier was verified, framing pieces were installed to extend the roof at the eaves and rakes.
-
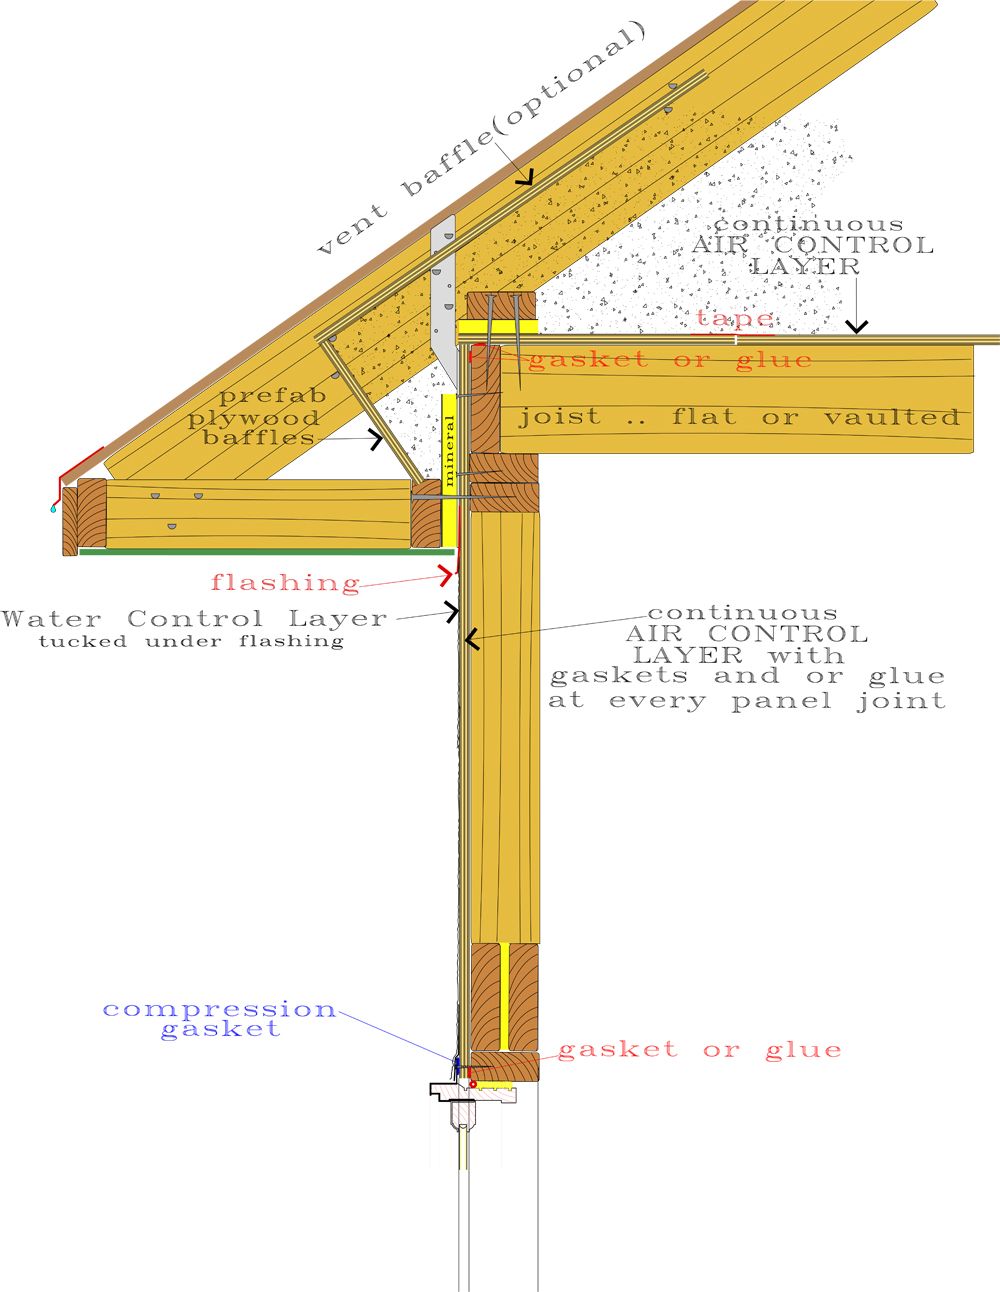
Establishing the air barrier at the attic deck instead of the roof. John Brooks, an architect from Dallas, Texas, likes the idea of using wall sheathing as an air barrier, but prefers to leave his attics unconditioned. He is working on details to connect an air barrier at the attic deck with an exterior air barrier at the wall sheathing.
-
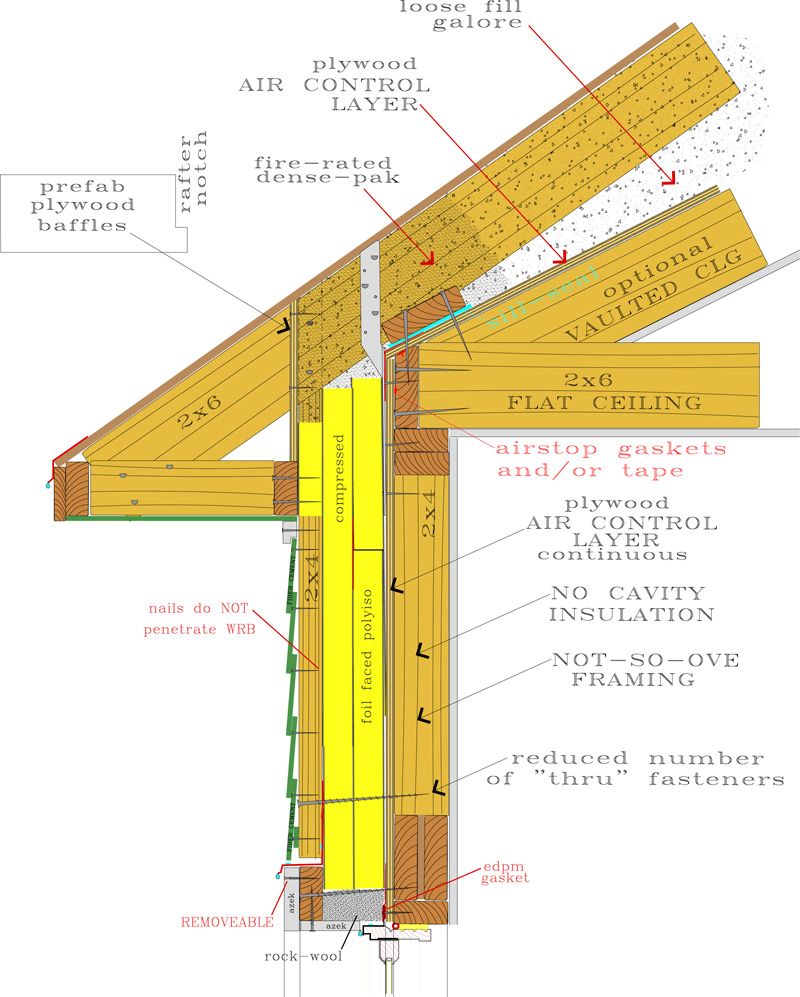
Vent channels above the insulation. Architect John Brooks calls this a "detail in progress," and suggested that it be posted "for discussion, not construction." When it was pointed out that the "prefab plywood baffles" appear to be very awkward to install, Brooks responded, "I agree."


View Comments
I've built in Ohio, Atlanta and for the past 20 years in Costa Rica. We adjust our installation materials and methods to our respective climatic conditions. The problems that I have been solving down here in the jungle are mostly moisture related resulting from driving rains and ultraviolet transmission deterioration from being less than 10 degrees from the equator.
Zinc and hot dipped galvanized steel roofing products that are frequently used in Costa Rica tend to oxidize rapidly in areas of high humidity. The result of this oxidation process, especially near the coastlines and in the rain forests, is the relatively quick formation of surface rust which can act as a barrier between metals and the environment. However, in roofing applications, the surface rust becomes dissolved by precipitation and accumulating moisture on the laminates, especially when used as an underlayment below clay and tile roofing products that absorb and maintain humidity. The zinc corrosion tends to runoff with precipitation, causing premature deterioration of the roofing laminates and other attached building components. Additionally, this zinc runoff can contaminate the adjacent soil and ground water.
I consider Thermotek MAX 7 to be one of the finest waterproofing sealers with excellent resistance to ultraviolet transmission deterioration, Two coats is the recommended application and each five-gallon bucket will cover about 20 m2 with two coats.
After trying various methods to protect my dwellings, I'm now of the opinion that Thermotek acrylic sealer http://www.grupothermotek.com/?p=148, applied to a properly installed SBS Bituminous membrane, which with heat torches, adheres well to existing metal roof laminates or cementitious underlayments, and is guaranteed for 10 to 15 years, depending on the thickness of the membrane. http://www.texsa.com/uk/productsGroup.asp?id=2
You can read an article I wrote about identifying and solving roofing problems in Costa Rica at; http://news.co.cr/costa-rica-roofing-defects-exposed-and-solved/6328/
I’m in agreement to establish the air barrier on the exterior surfaces, especially when dealing with existing construction remodeling. I’ve provided a step by step installation overview of a recently installed roof on a custom home in Costa Rica that details the roof structure, underlayment and moisture barrier installations. Select the”Project Photos” page from the left side menu at http://www.CostaRicaHomeBuilder.com
This sounds fine when you insulate on the outside of the air barrier, but what happens when interior moist air travels towards the now colder than dewpoint air barrier?
Much of the time and effort put into making a home air and heat tight may be misguided because the exterior shells of a home need to be moisture, heat and pressure adaptable. The forces of the three states of water - a liquid, a solid and a gas are naturally destructive to any barrier system. Sunlight, precipitation, humidity, air flow and pressure all act on any shell. The system must adapt to the changes in moisture, humidity pressure, and temperature.
The second factor in addition to weather forces is biological. Mold, fungus and insects will also exploit conducive conditions in any wall assembly. Many construction materials are wood composites produced from other than old growth vertical grain heartwood. Fungus and mold spores, their colonies as well as pollen, insect frass and nests will all compromise a wall assembly.
Manufacturers of construction products are primarily concerned with sales volume and market position and building scientists don't have a lot of bloody hands experience repairing moisture rot. The concept of building resistant and adaptive systems effectively rarely passes through the design, the manufacturer distribution system, installation, code - inspection steps.
How might all the homes built with OSB, a WRB, vinyl windows, wood trim and a non old growth vertical grain siding product be retrofit in an effective and economical retrofit? Are the new shell systems going to work? Can existing homes be retrofit when they fail?
Martin, Great post! I've been noodling the idea of using Huber Zip because of the airtightness, but I've not done it because I'm concerned about long term degradation & bulk water issues. His quote about "I don't use the Huber Zip System without a housewrap" makes me think I'm not the only one with this concern. Seems like a bulletproof system with Zip for airtightness then Tyvek Drainwrap for bulk water, then Exterior Rigid foam. That's basically Joe Lstiburek's "Perfect Wall". What's your take?
If one uses dense pack cellulose insulation and creates an exterior air barrier how do you prevent condensation on the barrier in cold climates like Maine?
The comments are posted in reverse chronological order. It's just wrong. Please give us the option of choosing the proper order so we can have a proper discussion.
Funny Matt you should mention that combo. I've been wanting to ask you what your opinion on it would be. Sounds like it'd be a great plan to me!
Is the exterior air barrier vapor permiable like Tyvek? Does it at all inhibit drying to the exterior by restricting air movement? Is there danger of creating a defacto double vapor barrier? I might be way behind the curve here but at the risk of sounding like a caveman, I also worry about the defacto double vapor barrier scenario with the flash and batt/flash and fill method. These days the tendancy seems to be to seal everything up like tepperware. While I don't want to go back to the bad old days of leaky houses and 1x-sheathing, I do have concerns that once there is a breach in the envelope or if condensation occurs inside the tupperware, the moisture be allowed to escape. Am I misguided or does this remind anyone else of the EIFS debacle. I sound a little alarmist and old school. Tell me I'm nuts please.
Thanks
Guess I should have looked at the detail. I was imagining a system with cavity insulation. However I'd like to hear thoughts on my concerns about flash and batt or flash and fill. I have read that in cold climates if the flash application of foam is not thick enough condensation will occurr on it's interior surface within the cavity. With a vapor barrier on the interior and a foam with a low perm rating on the exterior I envision a trapped moisture scenario. Perhaps Ive strayed of course for this discussion.
As for rigid foam on the exterior; I did it once. I hated nailing exterior sheathing and siding to that stuff. We followed the detail on the plans but I didn't like it.It seems like a tenuous attachment to the framing. Also it was combined with cavity insulation with a vapor barrier to the interior so I had similar concerns as stated above.
In the Appalachians we have the worst climate on earth for building condensation issues, cold, wet winters, hot wet summers. We NEVER use a vapor barrier. We are having great success with properly applied Tyvek over the sheathing and open cell spray foam. We also recommend inexpensive firring strips outside the Tyvek to provide a drain screen between the siding and the Tyvek. This allows vapor to pass through. We also plan exhaust fans in every shower tied to the light switch, and outside venting exhaust fans over the kitchen stove. Combined with a drain screen/ insulation system that is on the exterior of the foundation we keep the basements warm and free of condensation. We also encourage automatic dehumidification. If this can solve our condensation problems, I believe it can solve yours. https://www.facebook.com/MountainHousePlans
I think the idea here is that the location of the air barrier is not as critical to condensation issues as would be the presence and location of a vapor barrier.
A good air barrier will stop air drafts. This should stop condensation if vapor is allowed to pass (diffuse). The advantage of an air barrier at the sheathing is that it tends to be higher quality because there are less competing issues that compromise quality. With a better air barrier, there would be much less air leak drafts, which would greatly reduce the chance of condensation.
Like I wrote in my earlier post, this would be improved even futher by reducing indoor humidity in a practical manner. https://www.facebook.com/MountainHousePlans
Martin,
I like this approach, especially the part about framing with no overhangs to create a smooth transition between roof and wall. In a retrofit situation, this is where a "chainsaw retrofit" comes in, right. Cut off the old overhangs, seal and build new ones. I've never done this before and am thinking that I would try it on a rehab project.
If I am understanding this correctly, because the airtight layer is on the exterior, I will not need to get into the attic to seal the back side of the ceiling. Right?
Also, because I would have cut off the roof overhangs along with the soffit vents, this will be an unvented roof. Right?
Roger
Excellent result. thank you