FHB Logo Facebook LinkedIn Email Pinterest Twitter X Instagram Tiktok YouTube Plus Icon Close Icon Navigation Search Icon Navigation Search Icon Arrow Down Icon Video Guide Icon Article Guide Icon Modal Close Icon Guide Search Icon Skip to content
Subscribe
Log In
  • How-To
  • Design
  • Tools & Materials
  • Restoration
  • Videos
  • Blogs
  • Forum
  • Magazine
  • Members
  • FHB House
  • Podcast
Log In

Fine Homebuilding Project Guides

Tiling

Guide Home
  • Selecting Tile
  • Tools & Techniques
  • Installation Materials
  • Preparation
  • Tiling Floors
  • Tiling Walls & Backsplashes
  • Tiling Showers
  • Grouting, Sealing & Caulking
  • Maintenance & Repair
How-To

Applying Caulk

Learn how to achieve a good-looking caulking job between adjacent sections of tile or between tile and a different material.

Caulking creates a pliable, waterproof joint between adjacent sections of tile or between different materials, like granite and ceramic tile. This flexible seam is necessary because of the slight movement between surfaces: backsplashes and counters, walls and floors, and so on. Even slight movement can cause grout (an inflexible material) to crack around sinks or between tiled backsplashes and granite counters. Movement that causes substrate under the tile to move can even cause cracks in the tile itself. Tiles can expand and contract, which is why, for example, it’s imperative to caulk all seams between glass-tiled surfaces and surrounding materials.

The caulking material used for most tile jobs is a flexible, waterproof product that’s silicone based. You can buy caulks in a wide variety of textures and colors, allowing you to choose caulk that matches both the color and texture of the grout you’ve used.

Basic application method

Use a squeeze tube of caulk for small projects, but for medium and larger jobs, a caulk cartridge applied with a caulk gun is the best choice. To achieve a good-looking caulking job, you must use the gun properly. To load the gun, press and hold the plunger release button with your thumb, pull the plunger back, then slip the caulk tube in place. Push the plunger in until it contacts the inside of the cartridge and take your thumb off the release. Now cut the tip of the caulk cartridge at a slight angle with your utility knife 1. Cut near the tip, to create a small opening; you can always enlarge the opening later, if necessary. Some caulk tubes have an inner seal where the tip joins the tube. Use a small stick or large nail to break the seal.

Before you tackle the tile, practice running a bead of caulk on a piece of cardboard or scrap wood. When you’re ready to caulk, squeeze the gun’s trigger gently and move the tip of the tube along the grout joint steadily to lay down a continuous, even bead 2. It is better to use less caulk and add more on a second pass than to apply too much. After finishing a section, use a dampened finger to smooth the caulk bead along the joint 3. It’s best to run a bead that’s about 5 ft. long or less at a time, then smooth that section before starting on the next. After smoothing, take a small, damp sponge and bend it in half in your hand 4. Run the sponge along the joint line to do a little final smoothing and to clean any remaining caulk residue from the tile and/or counter surface 5. The final caulk joint should be about the same size as a grout joint. If it is too small, immediately add caulk sparingly and smooth the joint again. If the joint is too large, use a paper towel to remove the excess caulk, then smooth again. Make all repairs to your caulk joints immediately. Otherwise, the caulk will skin over and you will have to scrap it all off and start over.

Slice off the tip of the caulk tube at an angle. Cut it near the top of the tube to ensure a small opening. 
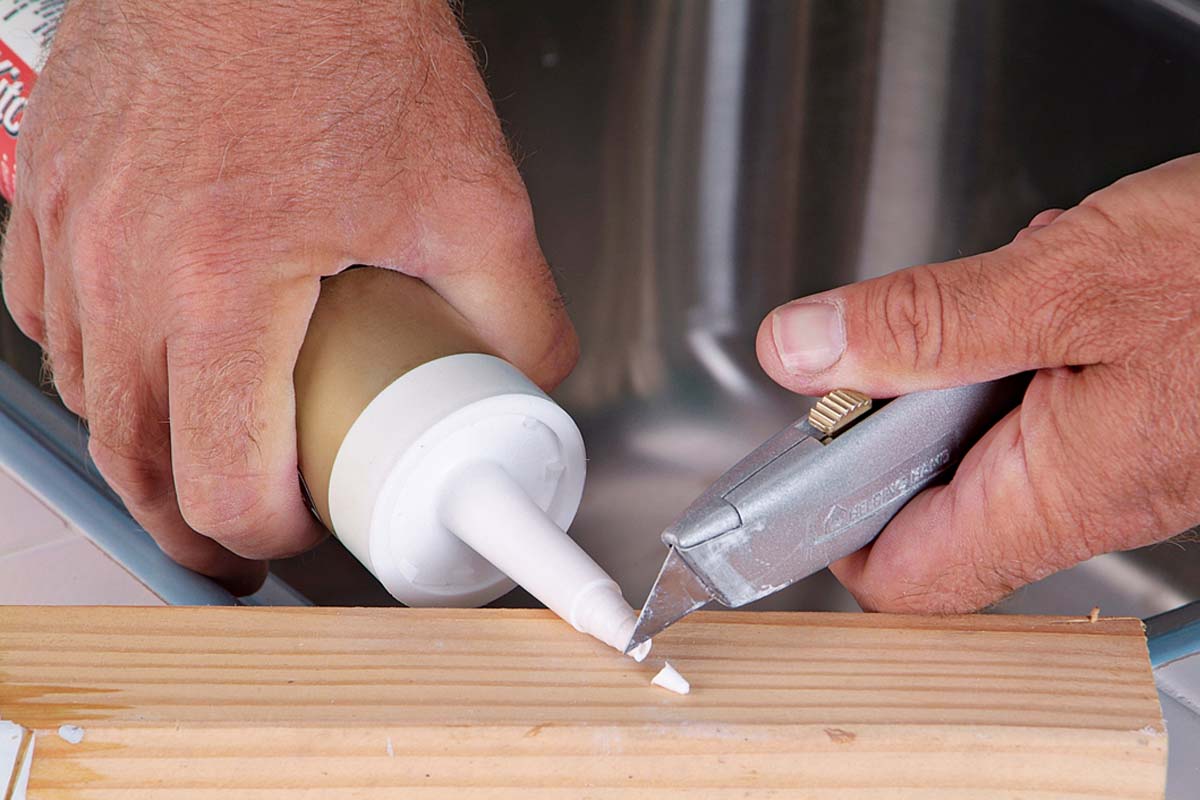
1.  Slice off the tip of the caulk tube at an angle. Cut it near the top of the tube to ensure a small opening.
Move steadily along the grout joint as you apply a continuous, smooth bead of caulk. 
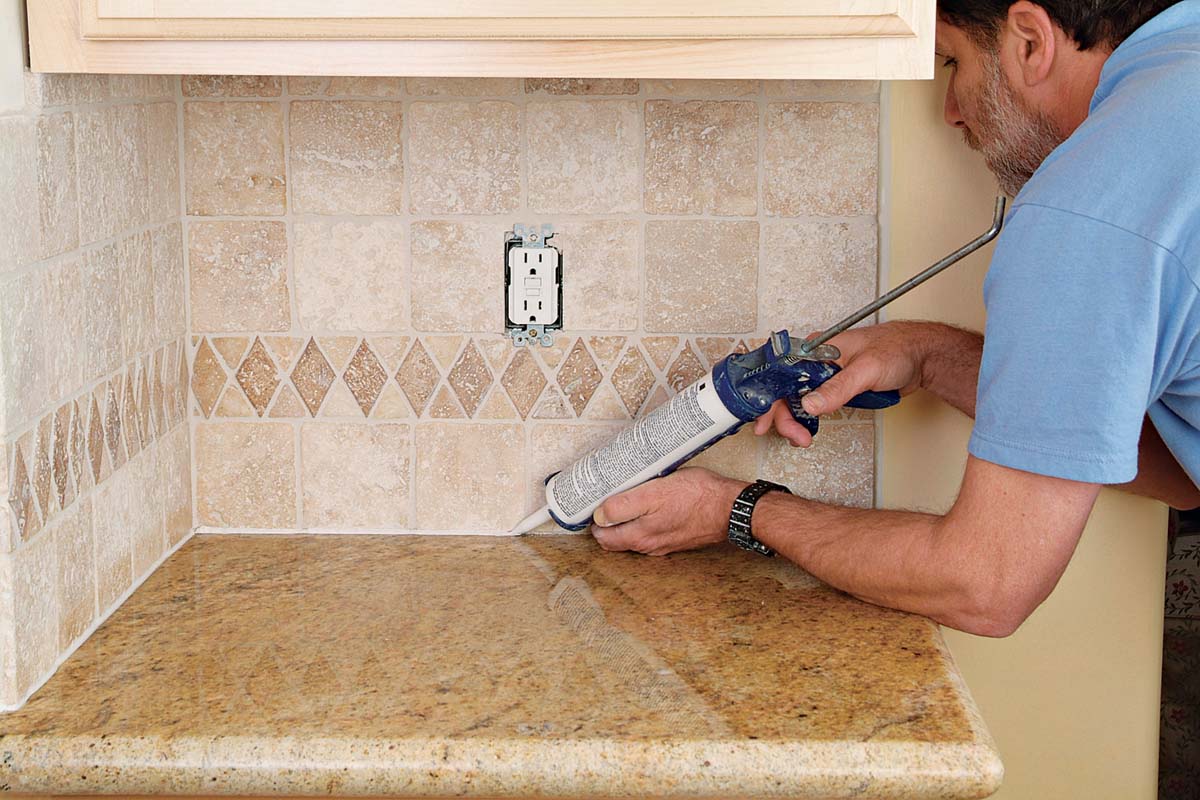
2.  Move steadily along the grout joint as you apply a continuous, smooth bead of caulk.
Use a damp finger to smooth and shape the caulk joint. 
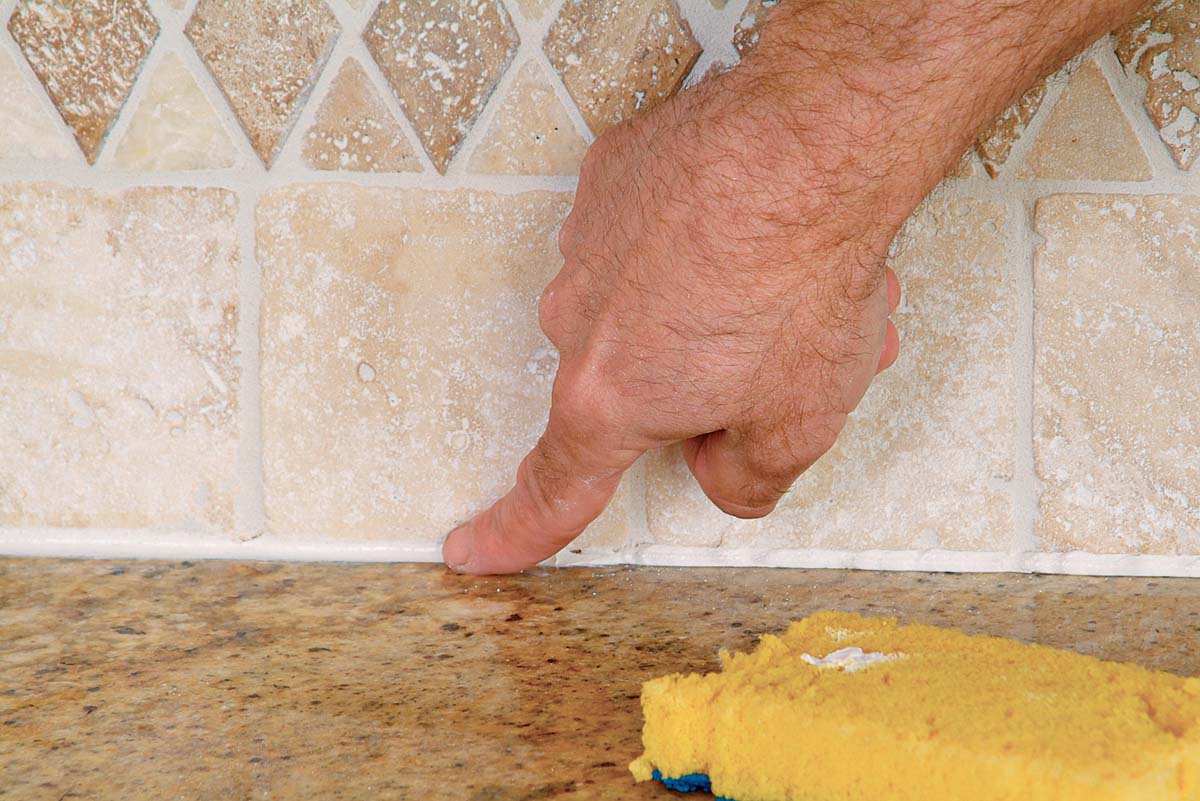
3.  Use a damp finger to smooth and shape the caulk joint.
Use a damp folded sponge to smooth the joint and remove excess caulk. 
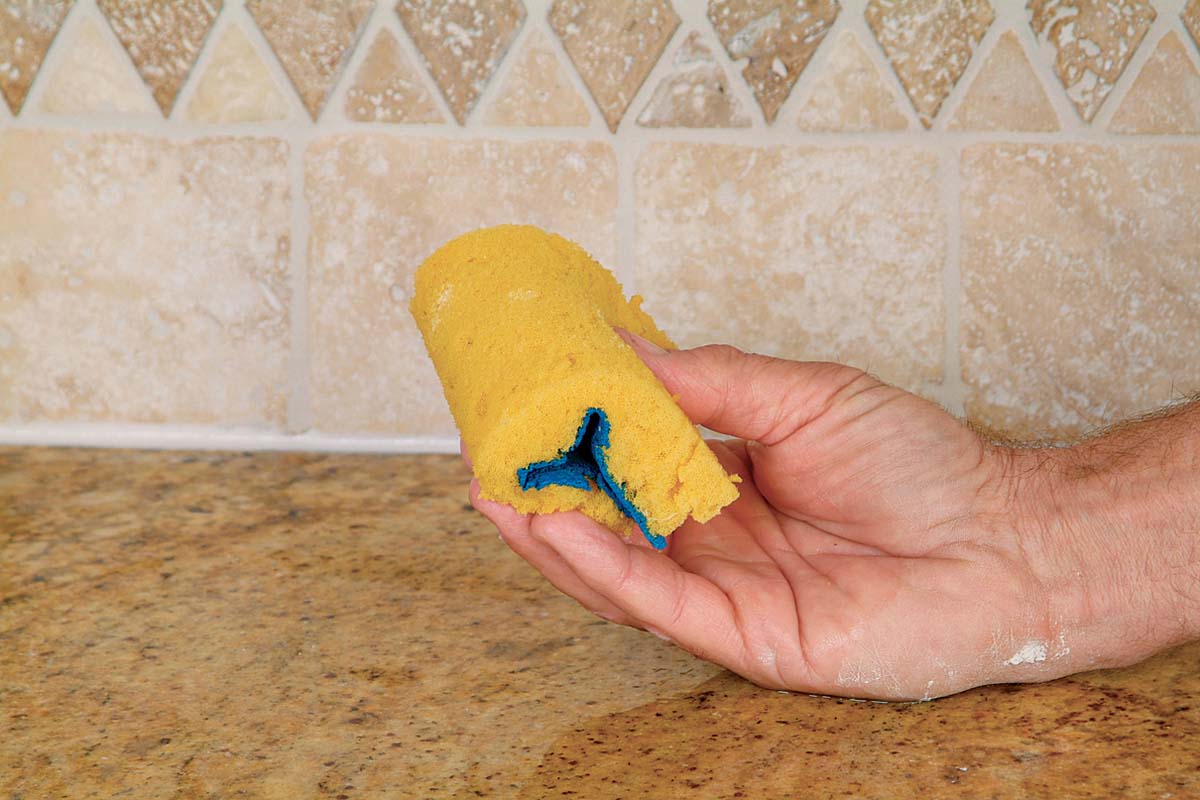
4.  Use a damp folded sponge to smooth the joint and remove excess caulk.
Use a damp noncellulose or shed-free sponge to remove caulk residue. 
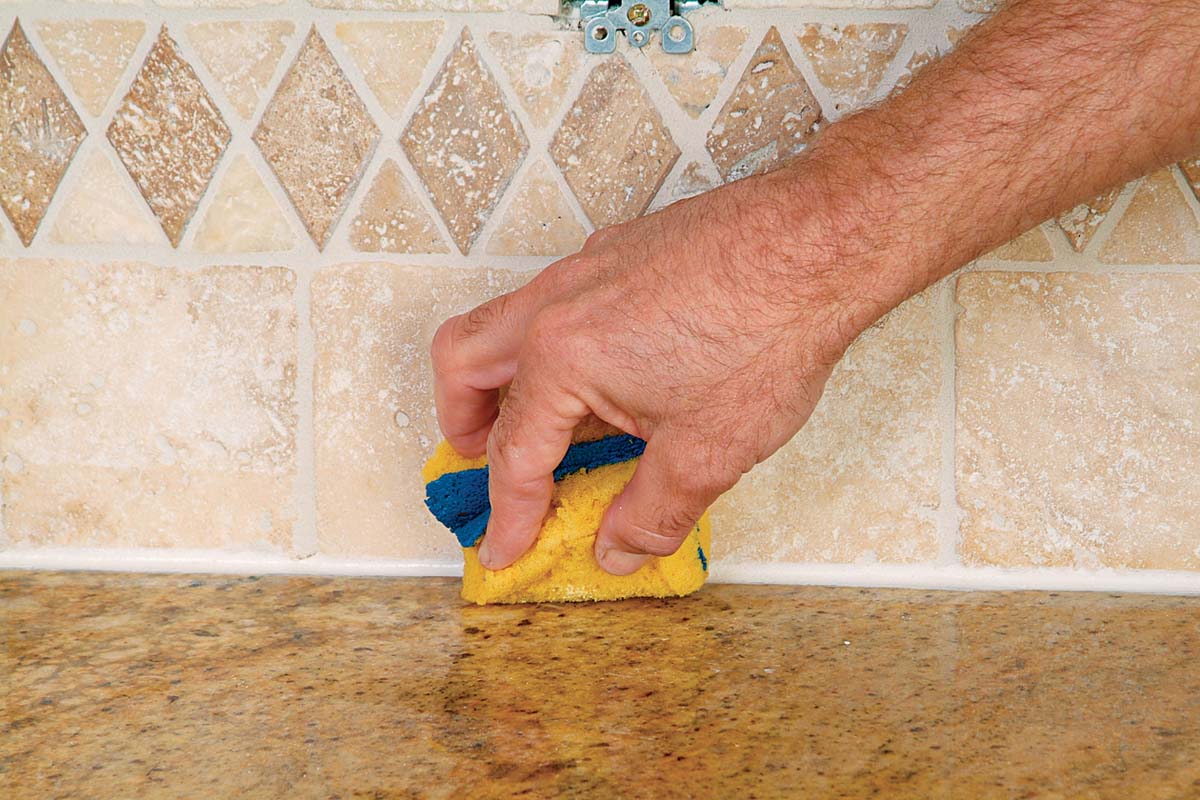
5.  Use a damp noncellulose or shed-free sponge to remove caulk residue.

Tiling Complete, 2nd EditionExcerpted from Tiling Complete, 2nd Edition by Robin Nicholas and Michael Schweit.

Available in the Taunton Store and at Amazon.com.

Sign up for eletters today and get the latest how-to from Fine Homebuilding, plus special offers.

Signing you up...

This site is protected by reCAPTCHA and the Google Privacy Policy and Terms of Service apply.
See all newsletters
See all newsletters
Previous: Tile Grout: Seal or No Seal? Next: Silicone Caulking Basics

Guide

Tiling

Chapter

Grouting, Sealing & Caulking

Log in or create an account to post a comment.

Sign up Log in

Become a member and get full access to FineHomebuilding.com

Tiling

Tiling

Trusted, comprehensive guidance from the pros for a great-looking tile job in any room of the house

View Project Guide

View All Project Guides »

Become a member and get unlimited site access, including the Tiling Project Guide.

Start Free Trial

Selecting Tile
  • The Basics
  • Tile Options
Tools & Techniques
  • Job-Preparation Tools
  • Cutting Tiles
  • Setting & Grouting Tools
Installation Materials
  • Membranes & Substrates
  • Adhesives & Mortars
  • Grout
  • Sealers & Caulk
  • Spacers, Hardware & Trim
Preparation
  • The Prep Job
  • Repairs & Surface Prep
  • Installing Backerboard
Tiling Floors
  • Layout & Installation
  • Setting Specialty Tiles
Tiling Walls & Backsplashes
  • Preparation
  • Backsplashes
  • Walls
Tiling Showers
  • Tile Shower Basics
  • Waterproofing
  • Shower Pans
  • Shower Drains
  • Shower Niches
  • Video Series: Tile a Shower
  • Video Series: Tile a Barrier-Free Bathroom
Grouting, Sealing & Caulking
  • Grouting
  • Caulking
  • Sealing
Maintenance & Repair
  • Maintenance
  • Tile Repair
  • Grout Repair

Fine Home Building

Newsletter Sign-up

  • Fine Homebuilding

    Home building tips, offers, and expert advice in your inbox.

  • Green Building Advisor

    Building science and energy efficiency advice, plus special offers, in your inbox.

  • Old House Journal

    Repair, renovation, and restoration tips, plus special offers, in your inbox.

Signing you up...

This site is protected by reCAPTCHA and the Google Privacy Policy and Terms of Service apply.
See all newsletters

Follow

  • Fine Homebuilding

    Dig into cutting-edge approaches and decades of proven solutions with total access to our experts and tradespeople.

    Start Free Trial Now
    • Facebook
    • Instagram
    • X
    • LinkedIn
  • GBA Prime

    Get instant access to the latest developments in green building, research, and reports from the field.

    Start Free Trial Now
    • Facebook
    • YouTube
  • Old House Journal

    Learn how to restore, repair, update, and decorate your home.

    Subscribe Now
    • Facebook
    • Instagram
    • X

Membership & Magazine

  • Online Archive
  • Start Free Trial
  • Magazine Subscription
  • Magazine Renewal
  • Gift a Subscription
  • Customer Support
  • Privacy Preferences
  • About
  • Contact
  • Advertise
  • Careers
  • Terms of Use
  • Site Map
  • Do not sell or share my information
  • Privacy Policy
  • Accessibility
  • California Privacy Rights

© 2025 Active Interest Media. All rights reserved.

Fine Homebuilding receives a commission for items purchased through links on this site, including Amazon Associates and other affiliate advertising programs.

X
X
This is a dialog window which overlays the main content of the page. The modal window is a 'site map' of the most critical areas of the site. Pressing the Escape (ESC) button will close the modal and bring you back to where you were on the page.

Main Menu

  • How-To
  • Design
  • Tools & Materials
  • Video
  • Blogs
  • Forum
  • Project Guides
  • Reader Projects
  • Magazine
  • Members
  • FHB House

Podcasts

  • FHB Podcast
  • ProTalk

Webinars

  • Upcoming and On-Demand

Podcasts

  • FHB Podcast
  • ProTalk

Webinars

  • Upcoming and On-Demand

Popular Topics

  • Kitchens
  • Business
  • Bedrooms
  • Roofs
  • Architecture and Design
  • Green Building
  • Decks
  • Framing
  • Safety
  • Remodeling
  • Bathrooms
  • Windows
  • Tilework
  • Ceilings
  • HVAC

Magazine

  • Current Issue
  • Past Issues
  • Magazine Index
  • Subscribe
  • Online Archive
  • Author Guidelines

All Access

  • Member Home
  • Start Free Trial
  • Gift Membership

Online Learning

  • Courses
  • Project Guides
  • Reader Projects
  • Podcast

More

  • FHB Ambassadors
  • FHB House
  • Customer Support

Account

  • Log In
  • Join

Newsletter

Get home building tips, offers, and expert advice in your inbox

Signing you up...

This site is protected by reCAPTCHA and the Google Privacy Policy and Terms of Service apply.
See all newsletters
See all newsletters

Follow

  • X
  • YouTube
  • instagram
  • facebook
  • pinterest
  • Tiktok

Join All Access

Become a member and get instant access to thousands of videos, how-tos, tool reviews, and design features.

Start Your Free Trial

Subscribe

FHB Magazine

Start your subscription today and save up to 70%

Subscribe

We hope you’ve enjoyed your free articles. To keep reading, become a member today.

Get complete site access to expert advice, how-to videos, Code Check, and more, plus the print magazine.

Start your FREE trial

Already a member? Log in