FHB Logo Facebook LinkedIn Email Pinterest Twitter X Instagram Tiktok YouTube Plus Icon Close Icon Navigation Search Icon Navigation Search Icon Arrow Down Icon Video Guide Icon Article Guide Icon Modal Close Icon Guide Search Icon Skip to content
Subscribe
Log In
  • How-To
  • Design
  • Tools & Materials
  • Restoration
  • Videos
  • Blogs
  • Forum
  • Magazine
  • Members
  • FHB House
  • Podcast
Log In

Fine Homebuilding Project Guides

Drywall

Guide Home
  • Drywall Basics
  • Tools and Materials
  • Hanging Drywall
  • Taping and Sanding
  • Special Installations
  • Drywall Repairs
  • Plaster
Tools & Materials

Drywall Taping Tools

Taping knives and trowels are the tools of choice for taping by hand, but mechanical taping tools are also making inroads.

By Myron R. Ferguson
A toolset for finishing: A quality hand taping job depends on a variety of taping tools.

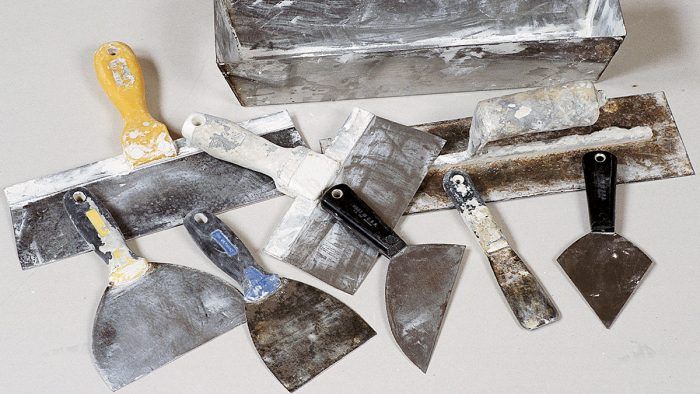
It used to be that a trowel, a couple of taping knives, a roll of paper tape, and a pail of joint compound were all that you needed to do a typical taping job. Nowadays, there are many types and sizes of trowels, various options for reinforcing seams, and so many different kinds of joint compounds that you may not know where to begin when deciding which one to use.

Hand taping tools

There are a variety of trowels and taping knives that I use for taping, all of which are available in different sizes for different applications. As I discuss each tool, I’ll mention the size that I use most often and, where appropriate, explain what features to look for when purchasing a trowel.

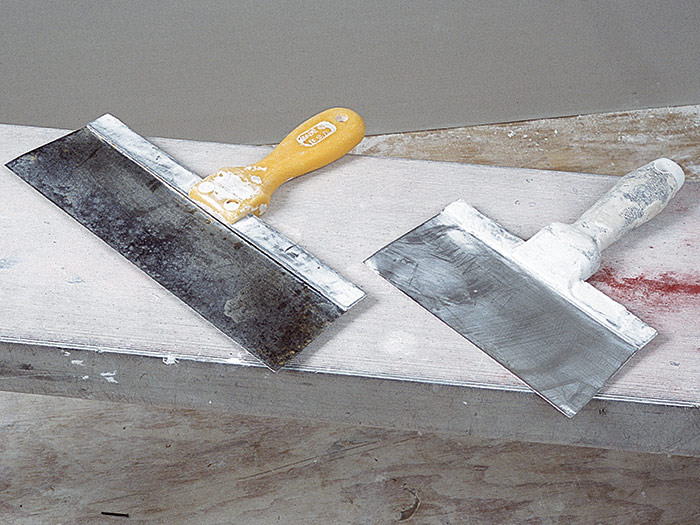
Taping knives, which are available in widths from 1 in. to 6 in. (in 1-in. increments), are used for taping seams and corners and covering fasteners. The wider widths often have a metal end on the handle for resetting nail heads. Narrower widths come in handy for taping tight areas (for example, the often-narrow space between a doorframe and a corner). I use a 6-in. knife more than any other size. Whatever the width of the knife, it should be fairly stiff (not too flexible).

WORK SMART: Cheaper, flimsier knives are harder to work with and tend to leave too much joint compound on the surface. Stiffer knives give you more control over the amount of compound left on the surface.


When buying a taping knife, look for one that has a little curve in the blade when viewed from head on. If you can’t find one, you can put a slight curve in the blade by bending it over a rounded surface, such as a pipe. I use the convex side of the blade when taping. Because the curve helps keep the corners of the blade slightly away from the taping surface, the result is a smooth surface without the tool marks created by a flat knife blade. The knife blades are available in blue steel or stainless steel. It’s a matter of personal preference, but I have used both and, if anything, I prefer the stainless steel because they seem to last longer.

Bending the knife
Bending the knife: Even a straight taping knife can be bent so that it has a crowned or convex side. With the convex side against the compound, the knife edges lift slightly off the compound surface to reduce tool marks.


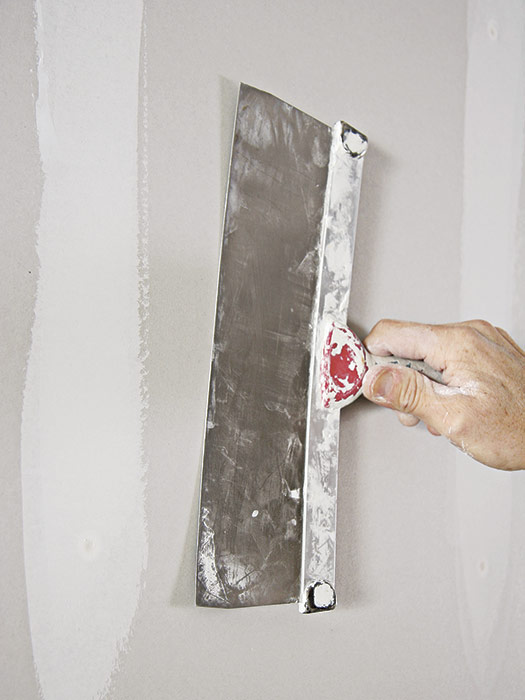
WORK SMART: I choose a taping knife or bend one so that it has a crowned or convex side. This is the side I work with. The edges of the knife are lifted slightly off the compound surface, which reduces tool marks.


A square-cornered taping knife cannot reach into a corner very well if the corner is less than 90 degrees (for example, at the intersection of a sloped ceiling and a wall or at the top of a cellar stairway). In these areas, I use a pointed trowel, which can easily be made by cutting off the sides of an old 6-in. taping knife. A small pointed mason’s trowel also works well for this purpose.

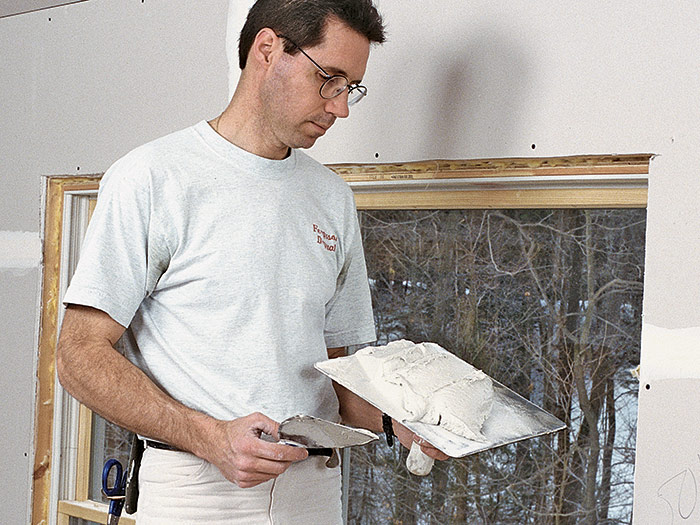
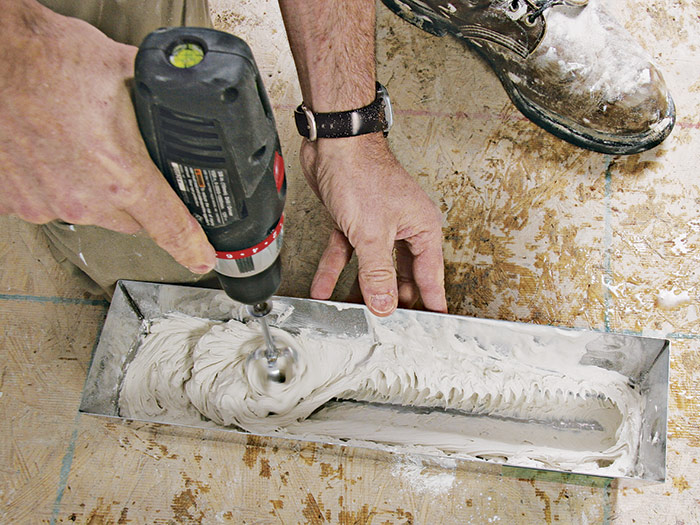
Hawks are used to hold large quantities of joint compound when working with a taping knife. These tools have a square aluminum top with circular grooves to help prevent the joint compound from sliding off, and a short, straight handle centered on the underside. Hawks are available in sizes from 8 in. to 14 in. square. I prefer to work with the largest size only because it saves a few trips back to the compound bucket. A pan is commonly used instead of a hawk—especially when compound of a thin consistency is used. A pan also comes in handy as a mixing container.

Working with compound
Working with compound: A hawk is used to hold large amounts of joint compound when you’re taping with a knife or trowel.

Keep it contained
Keep it contained: A mud pan is handy for holding compound and as a mixing container.

Curved or beveled trowels have a slight curve in the blade that is about 5/32 in. deep. They are available in lengths from 10 in. to 14 in. and in widths of 4 in. and 41/2 in. I prefer to use a curved trowel rather than a flat trowel because the curve allows more control of the amount of compound I want to leave or remove. I usually like to leave a very slight crown in the compound, which will disappear when the compound shrinks a little and is finish sanded.

Choose the right trowel
Choose the right trowel: A beveled (curved) trowel has a slight curve in the blade to make feathering and finishing seams easier.

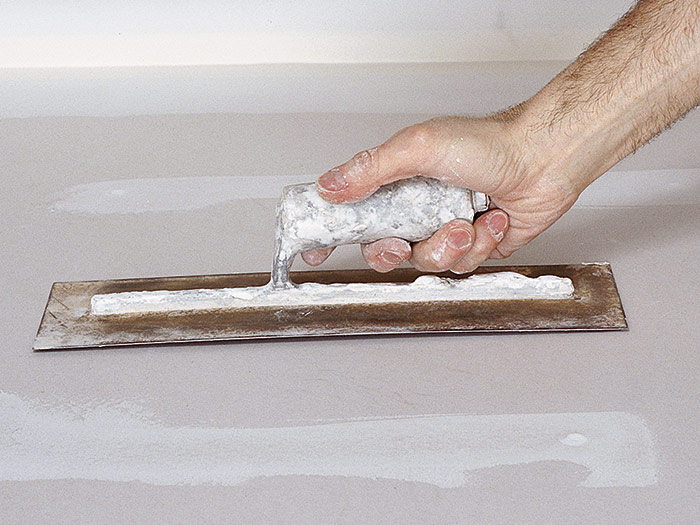
I use the 4-1/2-in. by 14-in. curved trowel for feathering and finishing most seams, as well as for holding joint compound while applying it with a taping knife. It has many uses, and I always seem to have a curved trowel and a 6-in. taping knife in my hand while taping.

WORK SMART: Use adjustable-angle knives to finish inside corners that are not 90 degrees. They work well for embedding the tape and feathering the joint compound.


Wide straight-handled taping knives are much the same as narrow taping knives, except they have a metal reinforcing strip at the back of the blade. I like to use this style knife that is 8 in. wide to embed the tape on seams when I am using automatic taping tools. I use a wider 10-in. or 12-in. version when applying and smoothing out the final coats of joint compound on seams and outside corners, as well as for smoothing out large areas and seam intersections. Straight-handled taping knives are available in widths from 10 in. to 24 in. As with regular taping knives, they should have a slight curve in the blade and the corners should be rounded with a file. I use a 12-in. knife for most applications.

Wider knives cover more ground
Wider knives cover more ground: Wider taping knives are very useful during later coats in the finishing process.


TROWEL CARE

  • While working, keep trowels free of dry compound to avoid marks or scratches when trying to smooth the compound. Use another trowel (or the edge of the hawk) to scrape off any excess compound. When you’ve finished a taping session, clean trowels with warm water.
  • Use trowels for taping only. Don’t scrape floors or apply adhesive or grout with your taping tools.
  • Protect edges from nicks or scratches; any nicks should be sanded or filed smooth.
  • Round any sharp corners on a new trowel with a file (sharp corners can rip the joint tape).


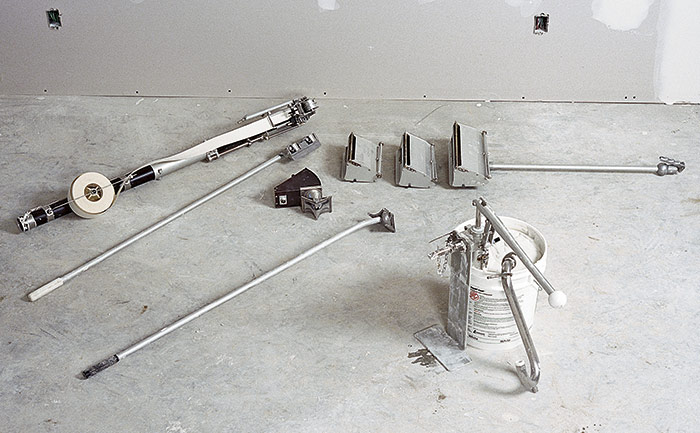
Automatic taping tools

Automatic tools are quite popular today because they cut down on labor, and there are mechanical tools available for each step in the taping process. Mechanical taping tools are expensive, but the cost of the tools is soon recouped because of the increased productivity and quite often increased quality of work. You can also rent these tools. I use them mostly when I’m taping larger jobs, but they also come in handy when I’m working on two or three smaller jobs at once.

Mechanical taping tools
Mechanical taping tools: As an alternative to hand taping, you can buy or rent a variety of mechanical taping tools. An automatic taper is shown at top left. The three boxes to the right are used to apply different widths of joint compound over seams.

Related Tip:

Custom Taping Knife for Curved Drywall Corners

Sign up for eletters today and get the latest how-to from Fine Homebuilding, plus special offers.

Signing you up...

This site is protected by reCAPTCHA and the Google Privacy Policy and Terms of Service apply.
See all newsletters
See all newsletters
Previous: Drywall Corner Beads Next: Custom Drywall Taping Tool

Guide

Drywall

Chapter

Tools and Materials

Log in or create an account to post a comment.

Sign up Log in

Become a member and get full access to FineHomebuilding.com

Drywall

Drywall

Trusted, comprehensive guidance for choosing, hanging, taping, sanding, and repairing drywall—the right way

View Project Guide

View All Project Guides »

Become a member and get unlimited site access, including the Drywall Project Guide.

Start Free Trial

Drywall Basics
  • Types and Uses of Drywall
  • Planning the Job
Tools and Materials
  • Hanging Tools
  • Taping Tools and Materials
  • Sanding and Finishing Tools and Materials
Hanging Drywall
  • Prep for Hanging
  • Measuring and Cutting Drywall
  • Guidelines for Hanging and Fastening Drywall
  • Hanging Ceilings
  • Hanging Walls
  • Hanging Airtight Drywall
  • Trim Accessories/Corner Beads
Taping and Sanding
  • Taping Basics
  • Taping Seams
  • Taping Inside and Outside Corners
  • Sanding
Special Installations
  • Tricky Transitions
  • Curved Surfaces
  • Other Special Installations
  • Decorating with Drywall
Drywall Repairs
  • Patching Holes, Cracks, and More
Plaster
  • Working with Lime Plaster
  • Plaster Repair
  • Classic Plaster Techniques

Fine Home Building

Newsletter Sign-up

  • Fine Homebuilding

    Home building tips, offers, and expert advice in your inbox.

  • Green Building Advisor

    Building science and energy efficiency advice, plus special offers, in your inbox.

  • Old House Journal

    Repair, renovation, and restoration tips, plus special offers, in your inbox.

Signing you up...

This site is protected by reCAPTCHA and the Google Privacy Policy and Terms of Service apply.
See all newsletters

Follow

  • Fine Homebuilding

    Dig into cutting-edge approaches and decades of proven solutions with total access to our experts and tradespeople.

    Start Free Trial Now
    • Facebook
    • Instagram
    • X
    • LinkedIn
  • GBA Prime

    Get instant access to the latest developments in green building, research, and reports from the field.

    Start Free Trial Now
    • Facebook
    • YouTube
  • Old House Journal

    Learn how to restore, repair, update, and decorate your home.

    Subscribe Now
    • Facebook
    • Instagram
    • X

Membership & Magazine

  • Online Archive
  • Start Free Trial
  • Magazine Subscription
  • Magazine Renewal
  • Gift a Subscription
  • Customer Support
  • Privacy Preferences
  • About
  • Contact
  • Advertise
  • Careers
  • Terms of Use
  • Site Map
  • Do not sell or share my information
  • Privacy Policy
  • Accessibility
  • California Privacy Rights

© 2025 Active Interest Media. All rights reserved.

Fine Homebuilding receives a commission for items purchased through links on this site, including Amazon Associates and other affiliate advertising programs.

X
X
This is a dialog window which overlays the main content of the page. The modal window is a 'site map' of the most critical areas of the site. Pressing the Escape (ESC) button will close the modal and bring you back to where you were on the page.

Main Menu

  • How-To
  • Design
  • Tools & Materials
  • Video
  • Blogs
  • Forum
  • Project Guides
  • Reader Projects
  • Magazine
  • Members
  • FHB House

Podcasts

  • FHB Podcast
  • ProTalk

Webinars

  • Upcoming and On-Demand

Podcasts

  • FHB Podcast
  • ProTalk

Webinars

  • Upcoming and On-Demand

Popular Topics

  • Kitchens
  • Business
  • Bedrooms
  • Roofs
  • Architecture and Design
  • Green Building
  • Decks
  • Framing
  • Safety
  • Remodeling
  • Bathrooms
  • Windows
  • Tilework
  • Ceilings
  • HVAC

Magazine

  • Current Issue
  • Past Issues
  • Magazine Index
  • Subscribe
  • Online Archive
  • Author Guidelines

All Access

  • Member Home
  • Start Free Trial
  • Gift Membership

Online Learning

  • Courses
  • Project Guides
  • Reader Projects
  • Podcast

More

  • FHB Ambassadors
  • FHB House
  • Customer Support

Account

  • Log In
  • Join

Newsletter

Get home building tips, offers, and expert advice in your inbox

Signing you up...

This site is protected by reCAPTCHA and the Google Privacy Policy and Terms of Service apply.
See all newsletters
See all newsletters

Follow

  • X
  • YouTube
  • instagram
  • facebook
  • pinterest
  • Tiktok

Join All Access

Become a member and get instant access to thousands of videos, how-tos, tool reviews, and design features.

Start Your Free Trial

Subscribe

FHB Magazine

Start your subscription today and save up to 70%

Subscribe

We hope you’ve enjoyed your free articles. To keep reading, become a member today.

Get complete site access to expert advice, how-to videos, Code Check, and more, plus the print magazine.

Start your FREE trial

Already a member? Log in