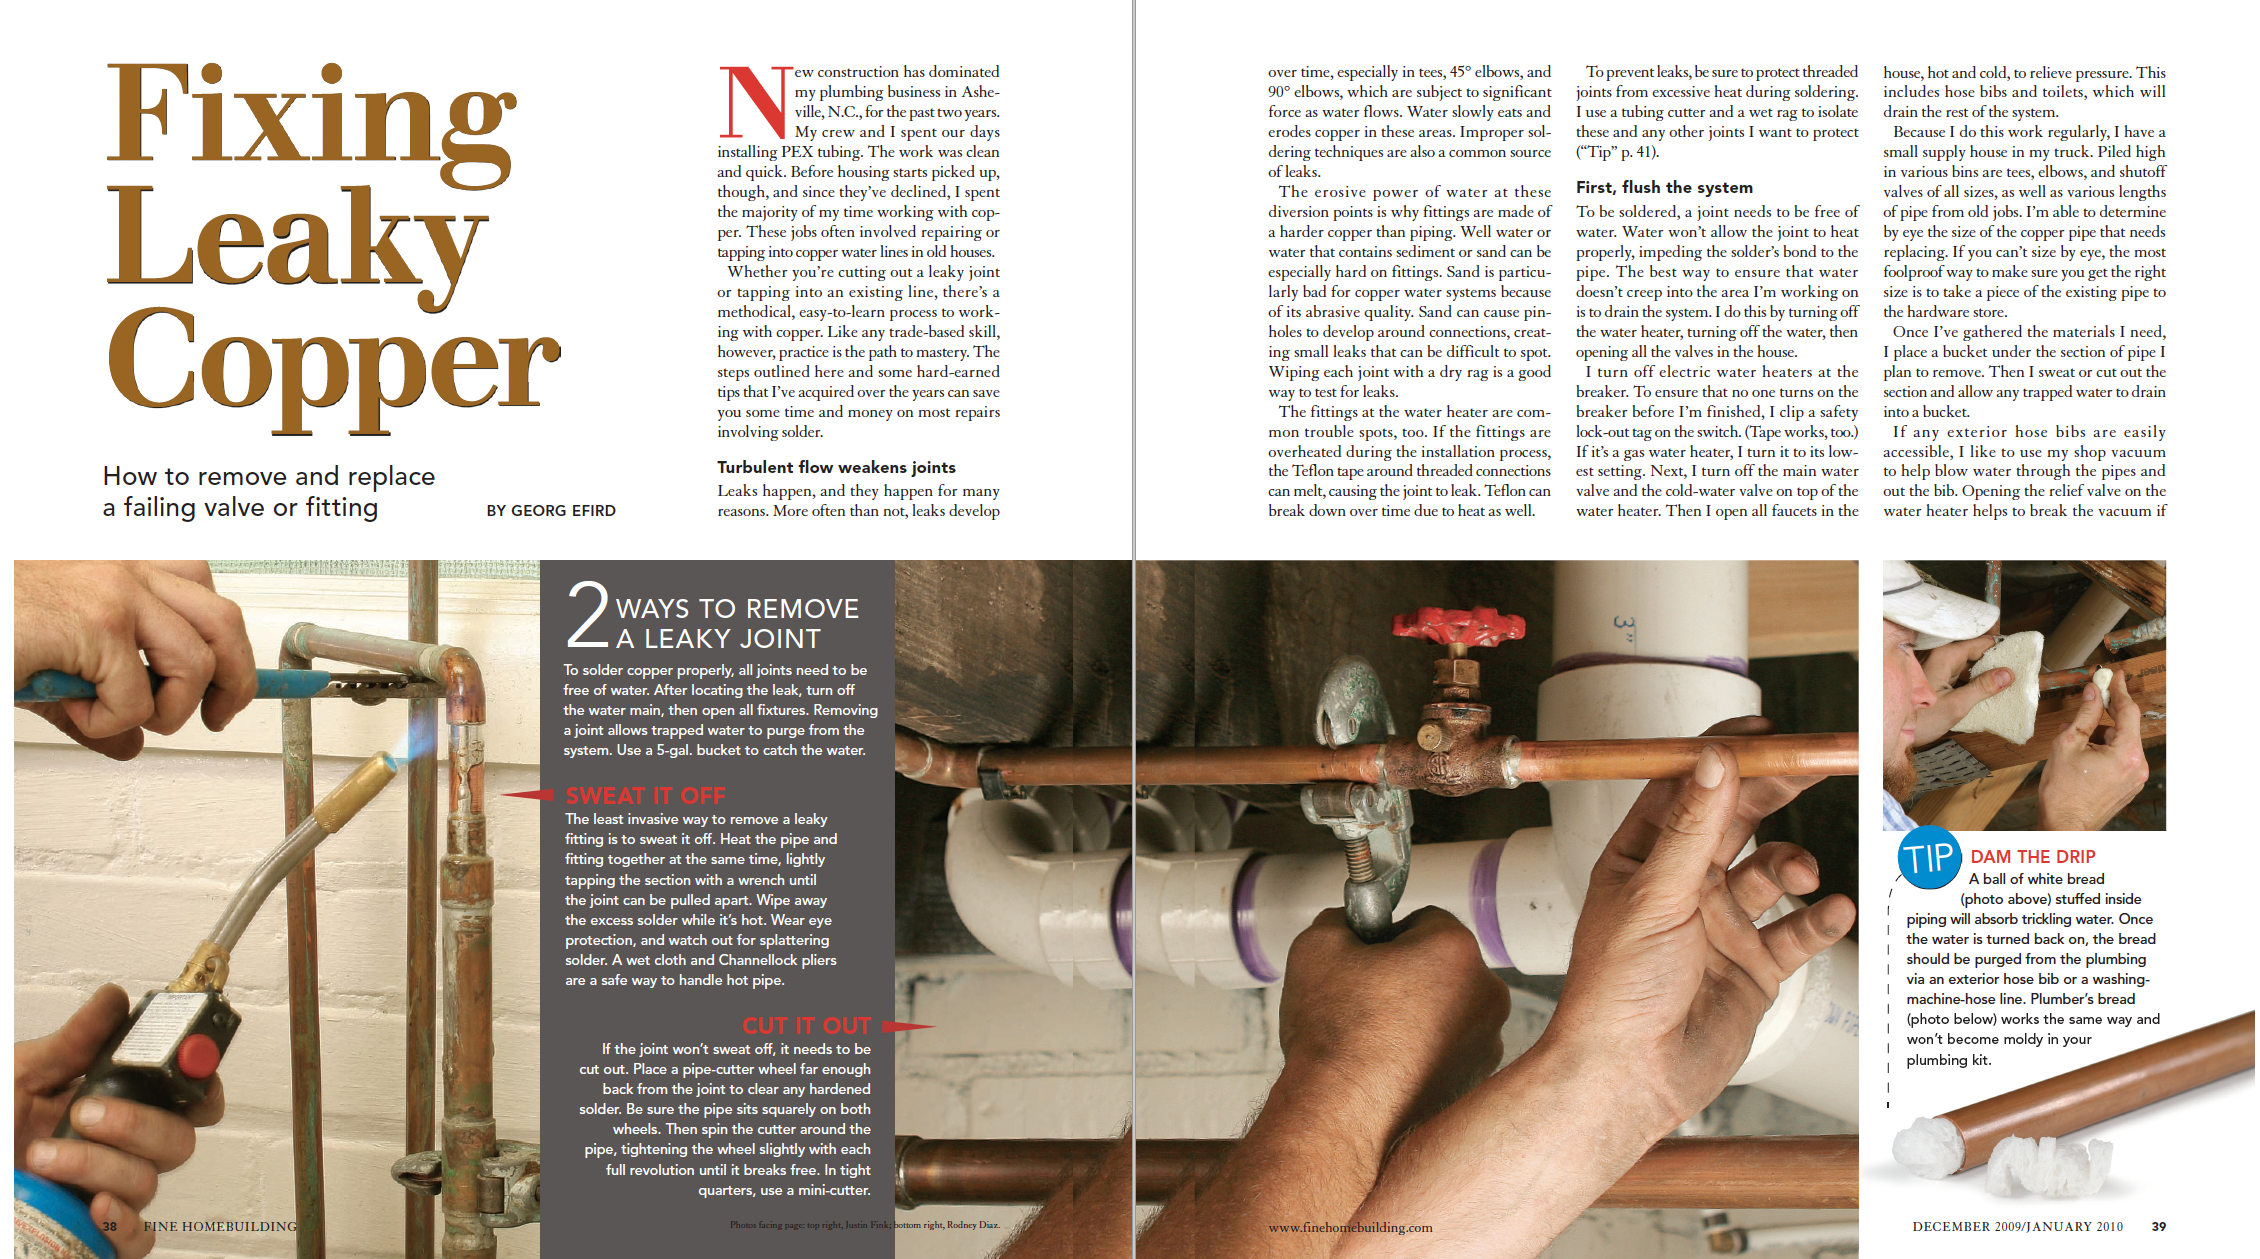
FHB Logo Facebook LinkedIn Email Pinterest Twitter X Instagram Tiktok YouTube Plus Icon Close Icon Navigation Search Icon Navigation Search Icon Arrow Down Icon Video Guide Icon Article Guide Icon Modal Close Icon Guide Search Icon Skip to content
Subscribe
Log In
  • How-To
  • Design
  • Tools & Materials
  • Restoration
  • Videos
  • Blogs
  • Forum
  • Magazine
  • Members
  • FHB House
  • Podcast
Log In

Fine Homebuilding Project Guides

Plumbing

Guide Home
  • Plumbing Basics
  • Bathrooms
  • Kitchens
  • Roughing In
  • Water Heaters, Washers, and More
  • Maintenance and Repair
How-To

Fixing Leaky Copper

Learn how to remove and replace a failing valve or fitting when working with copper pipe.

By Georg Efrid Issue 208
Featured in Old House Journal

Synopsis: Even in the best plumbing systems, leaks happen, often over time and especially at transition areas. Certified green plumber Georg Efird outlines his process for fixing leaky copper pipes. Efird removes leaky joints in two ways: sweating off the joint, which is least invasive; and cutting out the joint, which is necessary if the joint can’t be sweated off. Before a repair can be made, you must remove all water from the plumbing system. Next, ream, clean, and apply flux to the fitting. Then heat the pipe and carefully apply solder. Be sure to wipe down the pipe to remove excess flux, which is corrosive. Efird includes several tips, including advice on diverting heat to protect areas surrounding pipe, using bread to manage drips, and crimping joints to help hold unsteady work together before assembly is complete.


New construction has dominated my plumbing business in Asheville, N.C., for the past two years. My crew and I spent our days installing PEX tubing. The work was clean and quick. Before housing starts picked up, though, and since they’ve declined, I spent the majority of my time working with copper. These jobs often involved repairing or tapping into copper water lines in old houses.

Whether you’re cutting out a leaky joint or tapping into an existing line, there’s a methodical, easy-to-learn process to working with copper. Like any trade-based skill, however, practice is the path to mastery. The steps outlined here and some hard-earned tips that I’ve acquired over the years can save you some time and money on most repairs involving solder.

Turbulent flow weakens joints

Leaks happen, and they happen for many reasons. More often than not, leaks develop over time, especially in tees, 45° elbows, and 90° elbows, which are subject to significant force as water flows. Water slowly eats and erodes copper in these areas. Improper soldering techniques are also a common source of leaks.

The erosive power of water at these diversion points is why fittings are made of a harder copper than piping. Well water or water that contains sediment or sand can be especially hard on fittings. Sand is particularly bad for copper water systems because of its abrasive quality. Sand can cause pinholes to develop around connections, creating small leaks that can be difficult to spot. Wiping each joint with a dry rag is a good way to test for leaks.

The fittings at the water heater are common trouble spots, too. If the fittings are overheated during the installation process, the Teflon tape around threaded connections can melt, causing the joint to leak. Teflon can break down over time due to heat as well.

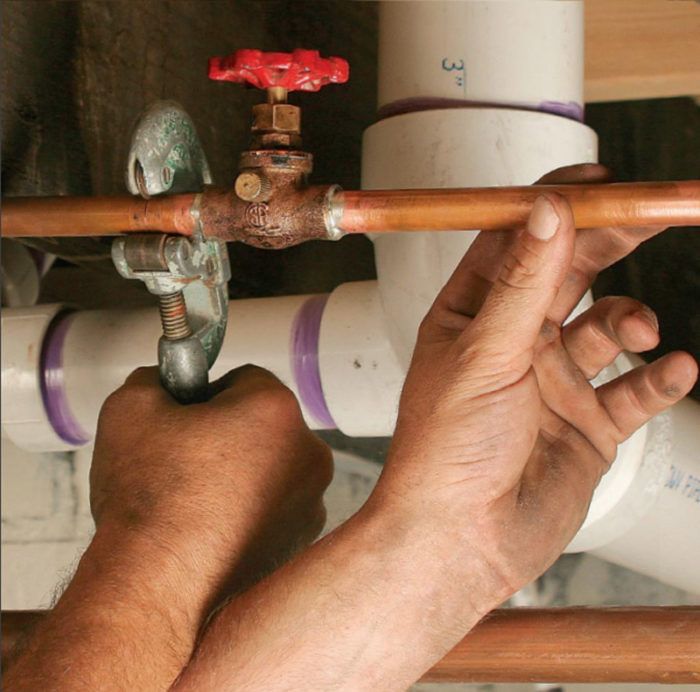
To prevent leaks, be sure to protect threaded joints from excessive heat during soldering. I use a tubing cutter and a wet rag to isolate these and any other joints I want to protect.

First, flush the system

To be soldered, a joint needs to be free of water. Water won’t allow the joint to heat properly, impeding the solder’s bond to the pipe. The best way to ensure that water doesn’t creep into the area I’m working on is to drain the system. I do this by turning off the water heater, turning off the water, then opening all the valves in the house.

I turn off electric water heaters at the breaker. To ensure that no one turns on the breaker before I’m finished, I clip a safety lock-out tag on the switch. (Tape works, too.) If it’s a gas water heater, I turn it to its lowest setting. Next, I turn off the main water valve and the cold-water valve on top of the water heater. Then I open all faucets in the house, hot and cold, to relieve pressure. This includes hose bibs and toilets, which will drain the rest of the system.

fixing leaky copper magazine spreadFrom Fine Homebuilding #208

To view the entire article, please click the View PDF button below:


Sign up for eletters today and get the latest how-to from Fine Homebuilding, plus special offers.

Signing you up...

This site is protected by reCAPTCHA and the Google Privacy Policy and Terms of Service apply.
See all newsletters
See all newsletters
View PDF
Previous: Shutoff Valve That Won’t Shut Off Next: Tying Into an Existing Drain Line

Guide

Plumbing

Chapter

Maintenance and Repair

Log in or create an account to post a comment.

Sign up Log in

Become a member and get full access to FineHomebuilding.com

Plumbing

Plumbing

Trusted, comprehensive guidance from the pros for tackling any plumbing project

View Project Guide

View All Project Guides »

Become a member and get unlimited site access, including the Plumbing Project Guide.

Start Free Trial

Plumbing Basics
  • Plumbing Systems
  • Materials
  • Plumbing Tools
Bathrooms
  • Sinks
  • Showers & Tubs
  • Toilets
Kitchens
  • Kitchen Sinks
  • Water Filtration
  • Appliances
Roughing In
  • Layout
  • Installation
  • Copper Pipe
  • PEX Tubing
  • PVC Drainpipe
Water Heaters, Washers, and More
  • Water Heaters
  • Whole-House Filters
  • Sump Pumps
  • Washers
  • Sprinkler Systems
Maintenance and Repair
  • Sinks
  • Toilets
  • Showers & Tubs
  • Systems

Fine Home Building

Newsletter Sign-up

  • Fine Homebuilding

    Home building tips, offers, and expert advice in your inbox.

  • Green Building Advisor

    Building science and energy efficiency advice, plus special offers, in your inbox.

  • Old House Journal

    Repair, renovation, and restoration tips, plus special offers, in your inbox.

Signing you up...

This site is protected by reCAPTCHA and the Google Privacy Policy and Terms of Service apply.
See all newsletters

Follow

  • Fine Homebuilding

    Dig into cutting-edge approaches and decades of proven solutions with total access to our experts and tradespeople.

    Start Free Trial Now
    • Facebook
    • Instagram
    • X
    • LinkedIn
  • GBA Prime

    Get instant access to the latest developments in green building, research, and reports from the field.

    Start Free Trial Now
    • Facebook
    • YouTube
  • Old House Journal

    Learn how to restore, repair, update, and decorate your home.

    Subscribe Now
    • Facebook
    • Instagram
    • X

Membership & Magazine

  • Online Archive
  • Start Free Trial
  • Magazine Subscription
  • Magazine Renewal
  • Gift a Subscription
  • Customer Support
  • Privacy Preferences
  • About
  • Contact
  • Advertise
  • Careers
  • Terms of Use
  • Site Map
  • Do not sell or share my information
  • Privacy Policy
  • Accessibility
  • California Privacy Rights

© 2025 Active Interest Media. All rights reserved.

Fine Homebuilding receives a commission for items purchased through links on this site, including Amazon Associates and other affiliate advertising programs.

X
X
This is a dialog window which overlays the main content of the page. The modal window is a 'site map' of the most critical areas of the site. Pressing the Escape (ESC) button will close the modal and bring you back to where you were on the page.

Main Menu

  • How-To
  • Design
  • Tools & Materials
  • Video
  • Blogs
  • Forum
  • Project Guides
  • Reader Projects
  • Magazine
  • Members
  • FHB House

Podcasts

  • FHB Podcast
  • ProTalk

Webinars

  • Upcoming and On-Demand

Podcasts

  • FHB Podcast
  • ProTalk

Webinars

  • Upcoming and On-Demand

Popular Topics

  • Kitchens
  • Business
  • Bedrooms
  • Roofs
  • Architecture and Design
  • Green Building
  • Decks
  • Framing
  • Safety
  • Remodeling
  • Bathrooms
  • Windows
  • Tilework
  • Ceilings
  • HVAC

Magazine

  • Current Issue
  • Past Issues
  • Magazine Index
  • Subscribe
  • Online Archive
  • Author Guidelines

All Access

  • Member Home
  • Start Free Trial
  • Gift Membership

Online Learning

  • Courses
  • Project Guides
  • Reader Projects
  • Podcast

More

  • FHB Ambassadors
  • FHB House
  • Customer Support

Account

  • Log In
  • Join

Newsletter

Get home building tips, offers, and expert advice in your inbox

Signing you up...

This site is protected by reCAPTCHA and the Google Privacy Policy and Terms of Service apply.
See all newsletters
See all newsletters

Follow

  • X
  • YouTube
  • instagram
  • facebook
  • pinterest
  • Tiktok

Join All Access

Become a member and get instant access to thousands of videos, how-tos, tool reviews, and design features.

Start Your Free Trial

Subscribe

FHB Magazine

Start your subscription today and save up to 70%

Subscribe

We hope you’ve enjoyed your free articles. To keep reading, become a member today.

Get complete site access to expert advice, how-to videos, Code Check, and more, plus the print magazine.

Start your FREE trial

Already a member? Log in