FHB Logo Facebook LinkedIn Email Pinterest Twitter X Instagram Tiktok YouTube Plus Icon Close Icon Navigation Search Icon Navigation Search Icon Arrow Down Icon Video Guide Icon Article Guide Icon Modal Close Icon Guide Search Icon Skip to content
Subscribe
Log In
  • How-To
  • Design
  • Tools & Materials
  • Restoration
  • Videos
  • Blogs
  • Forum
  • Magazine
  • Members
  • FHB House
  • Podcast
Log In

Fine Homebuilding Project Guides

Windows & Doors

Guide Home
  • Choosing Windows
  • Installing Windows In New Walls
  • Retrofitting Windows
  • Window Repairs
  • Door Basics
  • Interior Doors
  • Exterior Doors
Ask the Experts

Flashing a Round Window

The process is the same as for a rectangular window, but special attention should be paid to the head flashing.

By Ben Bogie Issue 301 - Aug/Sept 2021
Same idea, different shape. The materials and the order in which they’re layered are the same when flashing a round window as they are for a rectangular one, but you may have difficulty bending a metal head flashing onsite. Architectural metal fabricators can make one for you; flexible vinyl is another option.

I have to install a round wood window on an upcoming project. I know how to integrate the water-resistive barrier (WRB) and flashings on a rectangular unit, but I’m not sure how to do this with a round one. Can you help?

—Victor Gostman via email

Ben Bogie, a project manager for BPC Green Builders in Wilton, Conn., replies: Flashing a round window is pretty similar to flashing rectilinear window, but there are a few nuances to consider.

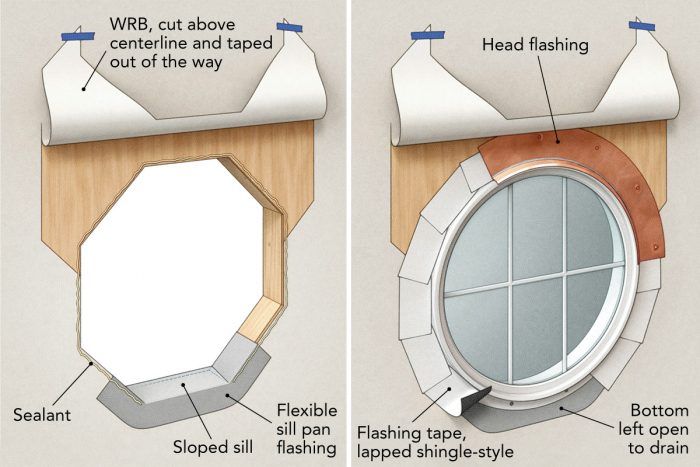
Like any other window installation, the first step is preparing the rough opening with some form of pan flashing. It’s a good idea to pitch the sill toward the outside with a scrap of clapboard siding, shimmed plywood, or a simple bevel rip of wood—a few degrees goes a long way. Most framing for round windows ends up as some kind of polygon with six or more sides, the bottom of which is horizontal. Seal the horizontal sill and a few inches up the angled sides with either a flexible flashing tape or a fluid-applied flashing. There’s no perfect way to do this with a round window, but the overarching goal is to direct any incidental leakage toward the lowest point where it can weep out.

With the rough opening prepped, install the window per the manufacturer’s recommendations. With a mechanically attached WRB (housewrap), make a horizontal cut 2 in. to 4 in. above the centerline of the window and fold the WRB up and out of the way. If the window has a nailing flange, squeeze sealant behind it except at the lowest spot—leave it out in that location so water can drain from the sill pan. From this point, we can treat flanged and cased windows essentially the same way. You can cut a nonstretchable flashing tape in short sections, applying them by working from the bottom up (leave a couple inches of the bottom untaped so the sill can drain) in shingle-lap fashion. Tape the bottom of the window flange or edge of the jamb to the WRB. At the centerline, begin taping to the sheathing. Use a roller or squeegee to firmly bed the flashing tape. Alternatively, you can use a flexible flashing tape to flash the window in far fewer pieces.

Now you can tackle the head flashing. There are a few ways to approach this, but the general idea is to flash from the centerline up. The least expensive method is to use a flexible vinyl head flashing purpose-made for the application. With this approach you’ll want to consult the manufacturer’s documents for details. Most rely on a combination of sealant and flashing tape to complete the flashing. An old-school but perfectly effective alternate option is to form sheet lead to the curve. The nicest solution, in my opinion, is to make a custom copper head flashing. This can be done by competent metal roofers or architectural metal fabricators.

With any of these head flashings complete, the final step is to fold down the WRB over the vertical leg of the head flashing, tack it in place with staples or tape, and tape the cuts.


RELATED LINKS

  • Flashing on a Curve
  • Shop Class: How to Install Nail-Fin Windows in 5 Common Wall Types
  • Windows & Doors Project Guide


Drawings: Christopher Mills

From Fine Homebuilding #301

Sign up for eletters today and get the latest how-to from Fine Homebuilding, plus special offers.

Signing you up...

This site is protected by reCAPTCHA and the Google Privacy Policy and Terms of Service apply.
See all newsletters
See all newsletters
Previous: Make New Windows Weathertight Next: A Practical Approach to Installing Windows

Guide

Windows & Doors

Chapter

Installing Windows In New Walls

Log in or create an account to post a comment.

Sign up Log in

Become a member and get full access to FineHomebuilding.com

Windows & Doors

Windows & Doors

Trusted, comprehensive guidance from the pros for choosing, installing, replacing, and repairing windows and doors on any house

View Project Guide

View All Project Guides »

Become a member and get unlimited site access, including the Windows & Doors Project Guide.

Start Free Trial

Choosing Windows
  • Window Types
  • Design and Materials
  • Energy-Efficient Windows
Installing Windows In New Walls
  • Installation, Start to Finish
  • Head Flashing for Windows
  • Video Series: Nail-Fin Window over Zip System Sheathing
  • Video Series: Nail-Fin Window over Exterior Rigid-Foam Insulation
  • Video Series: Nail-Fin Window over Housewrap
  • Video Series: Nail-Fin Window over Peel-and-Stick Housewrap
  • Video Series: Nail-Fin Window over a Fluid-Applied WRB
  • Video Series: Weatherproof Window Installation
Retrofitting Windows
  • Removing the Old, Installing the New
  • Video Series: How to Replace a Window
  • Video Series: Install a Full-Frame Replacement Window in a Brick Wall
  • Video Series: Install an Insert Replacement Window in a Brick Wall
  • Video Series: Retrofit a Flanged Window
Window Repairs
  • Restoring Old Windows
  • Repairs and Upgrades
Door Basics
  • Tools & Jigs for Door Hanging
  • How to Install Doors
  • Hinges
  • Handles, Knobs, and Locksets
  • Fixing Door Problems
Interior Doors
  • Prehung Doors
  • Pocket Doors
  • Other Types of Doors
  • Custom-Built Doors
Exterior Doors
  • Door Choices and Design
  • Installing Entry Doors
  • Building Exterior Doors
  • Installing French Doors
  • Replacing a Door
  • Adding Weatherstripping and Sweeps

Fine Home Building

Newsletter Sign-up

  • Fine Homebuilding

    Home building tips, offers, and expert advice in your inbox.

  • Green Building Advisor

    Building science and energy efficiency advice, plus special offers, in your inbox.

  • Old House Journal

    Repair, renovation, and restoration tips, plus special offers, in your inbox.

Signing you up...

This site is protected by reCAPTCHA and the Google Privacy Policy and Terms of Service apply.
See all newsletters

Follow

  • Fine Homebuilding

    Dig into cutting-edge approaches and decades of proven solutions with total access to our experts and tradespeople.

    Start Free Trial Now
    • Facebook
    • Instagram
    • X
    • LinkedIn
  • GBA Prime

    Get instant access to the latest developments in green building, research, and reports from the field.

    Start Free Trial Now
    • Facebook
    • YouTube
  • Old House Journal

    Learn how to restore, repair, update, and decorate your home.

    Subscribe Now
    • Facebook
    • Instagram
    • X

Membership & Magazine

  • Online Archive
  • Start Free Trial
  • Magazine Subscription
  • Magazine Renewal
  • Gift a Subscription
  • Customer Support
  • Privacy Preferences
  • About
  • Contact
  • Advertise
  • Careers
  • Terms of Use
  • Site Map
  • Do not sell or share my information
  • Privacy Policy
  • Accessibility
  • California Privacy Rights

© 2025 Active Interest Media. All rights reserved.

Fine Homebuilding receives a commission for items purchased through links on this site, including Amazon Associates and other affiliate advertising programs.

X
X
This is a dialog window which overlays the main content of the page. The modal window is a 'site map' of the most critical areas of the site. Pressing the Escape (ESC) button will close the modal and bring you back to where you were on the page.

Main Menu

  • How-To
  • Design
  • Tools & Materials
  • Video
  • Blogs
  • Forum
  • Project Guides
  • Reader Projects
  • Magazine
  • Members
  • FHB House

Podcasts

  • FHB Podcast
  • ProTalk

Webinars

  • Upcoming and On-Demand

Podcasts

  • FHB Podcast
  • ProTalk

Webinars

  • Upcoming and On-Demand

Popular Topics

  • Kitchens
  • Business
  • Bedrooms
  • Roofs
  • Architecture and Design
  • Green Building
  • Decks
  • Framing
  • Safety
  • Remodeling
  • Bathrooms
  • Windows
  • Tilework
  • Ceilings
  • HVAC

Magazine

  • Current Issue
  • Past Issues
  • Magazine Index
  • Subscribe
  • Online Archive
  • Author Guidelines

All Access

  • Member Home
  • Start Free Trial
  • Gift Membership

Online Learning

  • Courses
  • Project Guides
  • Reader Projects
  • Podcast

More

  • FHB Ambassadors
  • FHB House
  • Customer Support

Account

  • Log In
  • Join

Newsletter

Get home building tips, offers, and expert advice in your inbox

Signing you up...

This site is protected by reCAPTCHA and the Google Privacy Policy and Terms of Service apply.
See all newsletters
See all newsletters

Follow

  • X
  • YouTube
  • instagram
  • facebook
  • pinterest
  • Tiktok

Join All Access

Become a member and get instant access to thousands of videos, how-tos, tool reviews, and design features.

Start Your Free Trial

Subscribe

FHB Magazine

Start your subscription today and save up to 70%

Subscribe

We hope you’ve enjoyed your free articles. To keep reading, become a member today.

Get complete site access to expert advice, how-to videos, Code Check, and more, plus the print magazine.

Start your FREE trial

Already a member? Log in