FHB Logo Facebook LinkedIn Email Pinterest Twitter X Instagram Tiktok YouTube Plus Icon Close Icon Navigation Search Icon Navigation Search Icon Arrow Down Icon Video Guide Icon Article Guide Icon Modal Close Icon Guide Search Icon Skip to content
Subscribe
Log In
  • How-To
  • Design
  • Tools & Materials
  • Restoration
  • Videos
  • Blogs
  • Forum
  • Magazine
  • Members
  • FHB House
  • Podcast
Log In

Fine Homebuilding Project Guides

Windows & Doors

Guide Home
  • Choosing Windows
  • Installing Windows In New Walls
  • Retrofitting Windows
  • Window Repairs
  • Door Basics
  • Interior Doors
  • Exterior Doors
How-To

How to Install a Prehung Exterior Door

Set the door on a level sill and use shims for a consistent gap between the door and the jamb.

By Andy Engel Issue 240 - Dec 2013/Jan 2014

Entry doors are one of the more expensive single purchases we make for our homes. It’s important to choose an entry door wisely, so that you get a door that performs well in terms of durability, energy efficiency, and basic function. Our entry doors also have a lot of impact on the character of our homes. Choosing the right style, material, and color for an entry door is important, too. Finally, it is important that you install you door well. Here we’ll show you how to install an entry prehung exterior door for proper function. Make sure that you finish the job with proper air sealing, the same way you would air-seal a window.

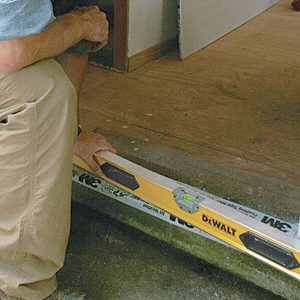
First, check the rough sill for level

Installing a prehung exterior door is straightforward. Assuming the wall is plumb and that the rough sill and opening are flashed, the first step is to check the rough sill for level. If it isn’t level, set the door unit in place, and shim the low side until it is level. Add shims about every 6 in. for solid support. Remove the door unit without disturbing the shims, then bed the shims in window and door sealant.

Before placing the door in the opening permanently, squeeze several thick beads of sealant across the top of the sill flashing to keep out wind and rain.

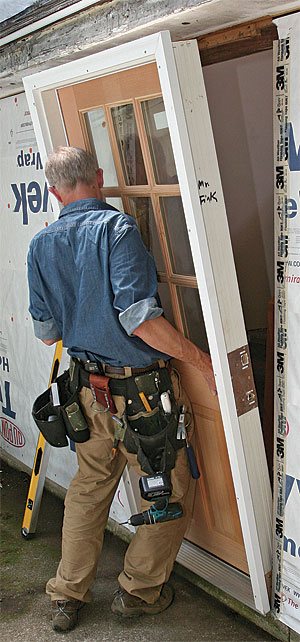
Place the door from the outside

Most prehung doors are held closed for handling with some sort of bracket that fastens from the inside. If there’s another way into the house, I leave this bracket in place for convenience. If this is the only easy way into the house, then I remove the bracket before proceeding so that I can get in the house through the new door.

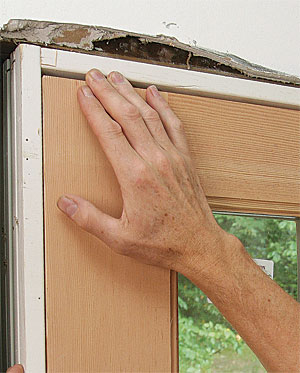
Working from the outside, guide the unit into the opening, leading with the sill. When you feel the bottom of the door trim hit the side of the house, let the unit slide down until its sill rests on the rough sill. Push the top in until the trim is tight to the house.

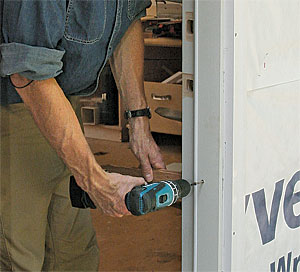
Drive one 2-1⁄2-in. deck screw through the door trim near the top hinge. This holds the door and allows adjustments while you continue working from the inside.

Shim the door plumb

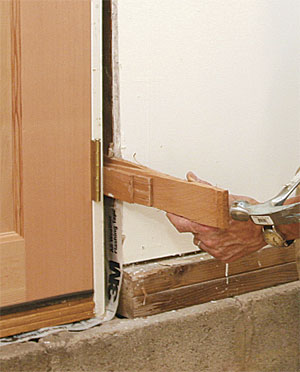
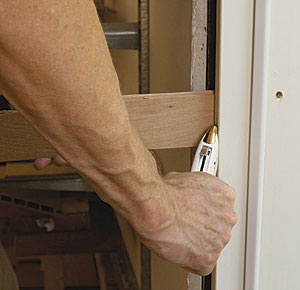
You already shimmed the door sill level, so you can pretty much put away your level. Now it’s a matter of shimming and fastening the unit so that the gaps between the door and the frame are uniform. Assuming the door is square, the unit will automatically be plumb when it’s properly shimmed. Look first at the top of the door on the latch side. If the gap here is narrow, shimming the near bottom of the door frame at the latch side should open it up. If the gap is wide, shimming behind the lower hinge should close it.

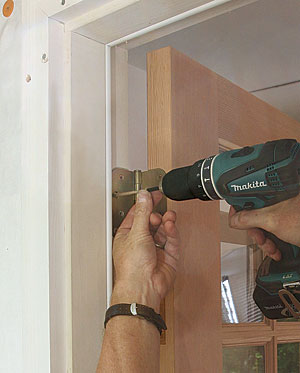
Once you’re happy with the gaps, shim behind each hinge, and replace the two innermost screws at each hinge with a 2-1⁄2-in. screw driven into the stud. Moving to the latch side, shim behind the latch and about 12 in. above and below the latch to even out the gaps. Each set of shims should get two screws, one through the inner side and one through the outer side of the jamb.

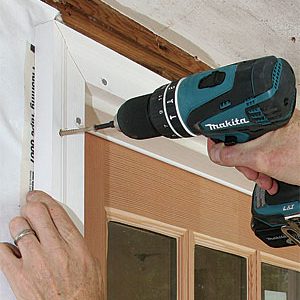
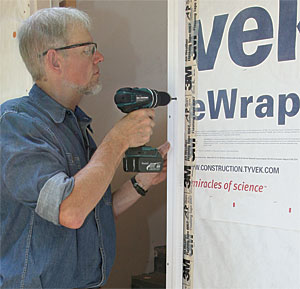
After you’ve shimmed and screwed the frame, check the door’s function. It should open and close without hitting the frame. If it hits the frame, back out the screws, adjust the shims, and rescrew. Once the door functions well, score the shims with a knife, and snap them off. Finally, go outside and use 2-1⁄2-in. deck screws spaced about every 12 in. to screw the door trim to the house.

Step By Step

Check for level. Set the door.
1. Check for level. With the wall plumb and the opening flashed, check the sill for level. Use wood shims spaced every 6 in. as needed. Bed the shims in window and door sealant. 2. Set the door. After placing three continuous beads of sealant across the length of the rough sill, insert the door in the opening.
Drive one screw. Mind the gap.
3. Drive the first screw. Install one screw through the door trim near the top hinge. This keeps the unit from toppling while still allowing it to be shimmed plumb. 4. Mind the gap. Check the space between the top of the door and the head jamb on the latch side so that you know where to shim first.
Shim the hinges. Fasten the hinges.
 5. Shim the hinges. To open the gap above the latch side, add shims behind the bottom hinge. To close the gap, reduce the shim thickness or shim the other side.  6. Fasten the hinges. With each hinge shimmed so that the top gap is even, replace the two short inner screws with 2-1⁄2-in. screws driven into the framing.
Adjust the latch jamb. Fasten the jambs.
7. Adjust the latch jamb. Once the hinge side jamb is fastened, shim behind the latch-side jamb to even the gap. 8. Fasten the jambs. Double-check the gap around the door, then drive two screws through each set of shims and into the framing.
Score and snap. Screw the door trim.
 9. Score and snap. After screwing through the shims, score them deeply with a sharp utility knife, then snap them off flush with the jamb.  10. Screw the door trim. After you’ve secured the jamb, screw the exterior trim to the framing. Use 2-1⁄2-in. deck screws spaced about every 12 in.
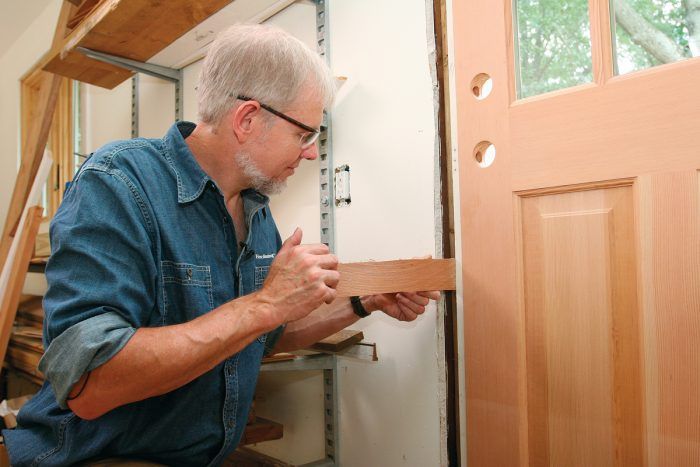
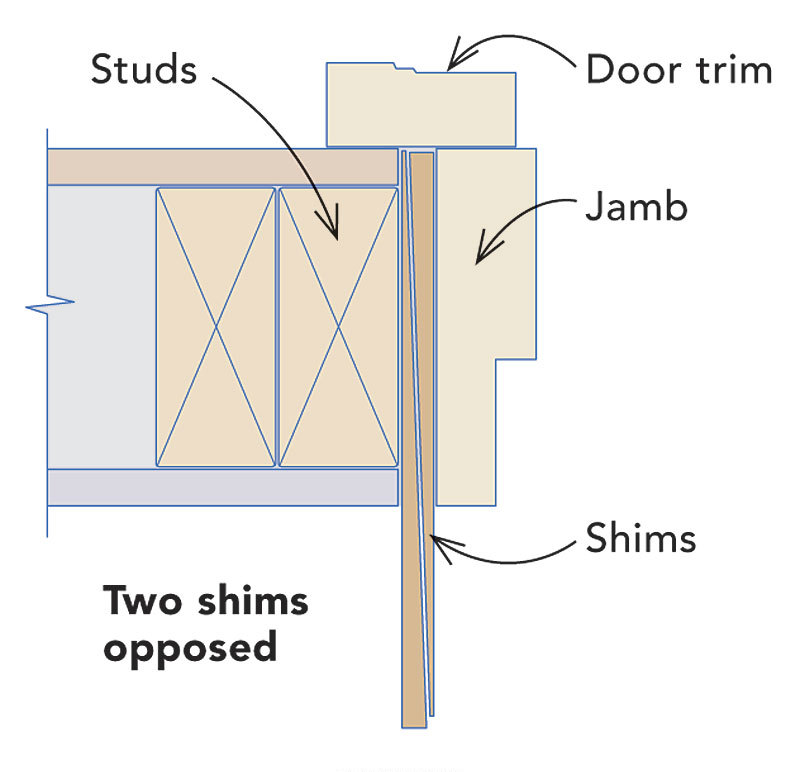
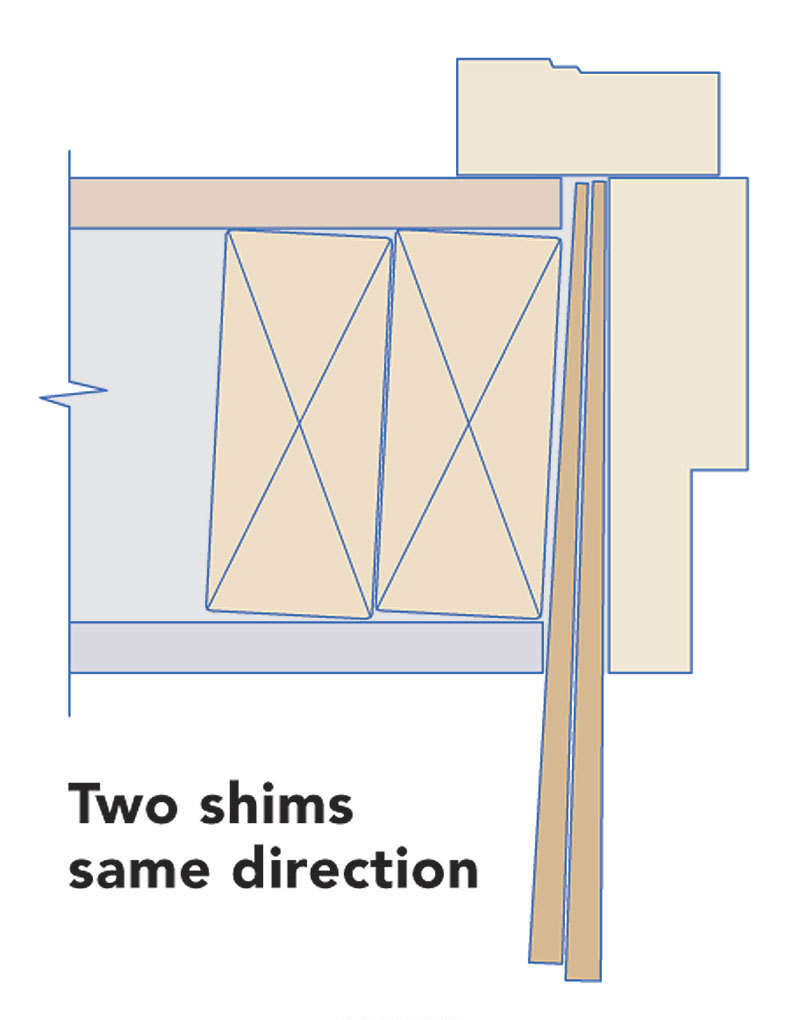
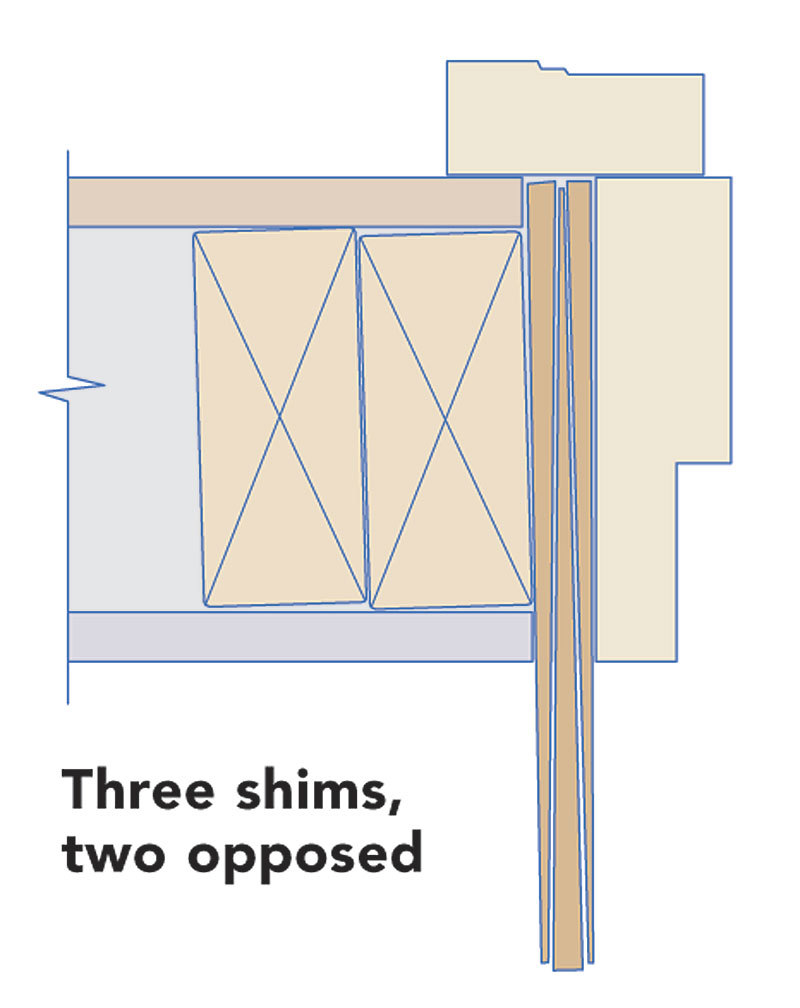
Shimming

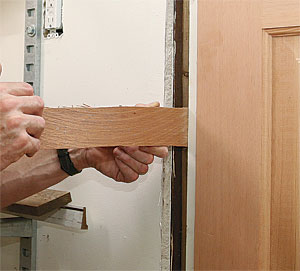
Start with two shims made from cedar shingles. Insert one thick end first, then insert the second so that the tapers oppose each other. Sometimes there’s room for only one shim. At other times, the studs will have warped, and you’ll need to insert shims with their tapers running in the same direction. Cut the shims as needed so that the fat end is the right thickness.

two shims opposed Two shims same direction Three shims, two opposed

Photos: Patrick McCombe; Drawings: Dan Thornton


RELATED STORIES

  • Setting Prehung Doors
  • Troubleshooting a Prehung Door Installation
  • Fitting Out-of-Level Prehung Doors

Sign up for eletters today and get the latest how-to from Fine Homebuilding, plus special offers.

Signing you up...

This site is protected by reCAPTCHA and the Google Privacy Policy and Terms of Service apply.
See all newsletters
See all newsletters
Previous: Ordering Doors Next: How to Install a Prehung Exterior Door

Guide

Windows & Doors

Chapter

Exterior Doors

Log in or create an account to post a comment.

Sign up Log in

Become a member and get full access to FineHomebuilding.com

Windows & Doors

Windows & Doors

Trusted, comprehensive guidance from the pros for choosing, installing, replacing, and repairing windows and doors on any house

View Project Guide

View All Project Guides »

Become a member and get unlimited site access, including the Windows & Doors Project Guide.

Start Free Trial

Choosing Windows
  • Window Types
  • Design and Materials
  • Energy-Efficient Windows
Installing Windows In New Walls
  • Installation, Start to Finish
  • Head Flashing for Windows
  • Video Series: Nail-Fin Window over Zip System Sheathing
  • Video Series: Nail-Fin Window over Exterior Rigid-Foam Insulation
  • Video Series: Nail-Fin Window over Housewrap
  • Video Series: Nail-Fin Window over Peel-and-Stick Housewrap
  • Video Series: Nail-Fin Window over a Fluid-Applied WRB
  • Video Series: Weatherproof Window Installation
Retrofitting Windows
  • Removing the Old, Installing the New
  • Video Series: How to Replace a Window
  • Video Series: Install a Full-Frame Replacement Window in a Brick Wall
  • Video Series: Install an Insert Replacement Window in a Brick Wall
  • Video Series: Retrofit a Flanged Window
Window Repairs
  • Restoring Old Windows
  • Repairs and Upgrades
Door Basics
  • Tools & Jigs for Door Hanging
  • How to Install Doors
  • Hinges
  • Handles, Knobs, and Locksets
  • Fixing Door Problems
Interior Doors
  • Prehung Doors
  • Pocket Doors
  • Other Types of Doors
  • Custom-Built Doors
Exterior Doors
  • Door Choices and Design
  • Installing Entry Doors
  • Building Exterior Doors
  • Installing French Doors
  • Replacing a Door
  • Adding Weatherstripping and Sweeps

Fine Home Building

Newsletter Sign-up

  • Fine Homebuilding

    Home building tips, offers, and expert advice in your inbox.

  • Green Building Advisor

    Building science and energy efficiency advice, plus special offers, in your inbox.

  • Old House Journal

    Repair, renovation, and restoration tips, plus special offers, in your inbox.

Signing you up...

This site is protected by reCAPTCHA and the Google Privacy Policy and Terms of Service apply.
See all newsletters

Follow

  • Fine Homebuilding

    Dig into cutting-edge approaches and decades of proven solutions with total access to our experts and tradespeople.

    Start Free Trial Now
    • Facebook
    • Instagram
    • X
    • LinkedIn
  • GBA Prime

    Get instant access to the latest developments in green building, research, and reports from the field.

    Start Free Trial Now
    • Facebook
    • YouTube
  • Old House Journal

    Learn how to restore, repair, update, and decorate your home.

    Subscribe Now
    • Facebook
    • Instagram
    • X

Membership & Magazine

  • Online Archive
  • Start Free Trial
  • Magazine Subscription
  • Magazine Renewal
  • Gift a Subscription
  • Customer Support
  • Privacy Preferences
  • About
  • Contact
  • Advertise
  • Careers
  • Terms of Use
  • Site Map
  • Do not sell or share my information
  • Privacy Policy
  • Accessibility
  • California Privacy Rights

© 2025 Active Interest Media. All rights reserved.

Fine Homebuilding receives a commission for items purchased through links on this site, including Amazon Associates and other affiliate advertising programs.

X
X
This is a dialog window which overlays the main content of the page. The modal window is a 'site map' of the most critical areas of the site. Pressing the Escape (ESC) button will close the modal and bring you back to where you were on the page.

Main Menu

  • How-To
  • Design
  • Tools & Materials
  • Video
  • Blogs
  • Forum
  • Project Guides
  • Reader Projects
  • Magazine
  • Members
  • FHB House

Podcasts

  • FHB Podcast
  • ProTalk

Webinars

  • Upcoming and On-Demand

Podcasts

  • FHB Podcast
  • ProTalk

Webinars

  • Upcoming and On-Demand

Popular Topics

  • Kitchens
  • Business
  • Bedrooms
  • Roofs
  • Architecture and Design
  • Green Building
  • Decks
  • Framing
  • Safety
  • Remodeling
  • Bathrooms
  • Windows
  • Tilework
  • Ceilings
  • HVAC

Magazine

  • Current Issue
  • Past Issues
  • Magazine Index
  • Subscribe
  • Online Archive
  • Author Guidelines

All Access

  • Member Home
  • Start Free Trial
  • Gift Membership

Online Learning

  • Courses
  • Project Guides
  • Reader Projects
  • Podcast

More

  • FHB Ambassadors
  • FHB House
  • Customer Support

Account

  • Log In
  • Join

Newsletter

Get home building tips, offers, and expert advice in your inbox

Signing you up...

This site is protected by reCAPTCHA and the Google Privacy Policy and Terms of Service apply.
See all newsletters
See all newsletters

Follow

  • X
  • YouTube
  • instagram
  • facebook
  • pinterest
  • Tiktok

Join All Access

Become a member and get instant access to thousands of videos, how-tos, tool reviews, and design features.

Start Your Free Trial

Subscribe

FHB Magazine

Start your subscription today and save up to 70%

Subscribe

We hope you’ve enjoyed your free articles. To keep reading, become a member today.

Get complete site access to expert advice, how-to videos, Code Check, and more, plus the print magazine.

Start your FREE trial

Already a member? Log in