FHB Logo Facebook LinkedIn Email Pinterest Twitter X Instagram Tiktok YouTube Plus Icon Close Icon Navigation Search Icon Navigation Search Icon Arrow Down Icon Video Guide Icon Article Guide Icon Modal Close Icon Guide Search Icon Skip to content
Subscribe
Log In
  • How-To
  • Design
  • Tools & Materials
  • Restoration
  • Videos
  • Blogs
  • Forum
  • Magazine
  • Members
  • FHB House
  • Podcast
Log In

Fine Homebuilding Project Guides

Windows & Doors

Guide Home
  • Choosing Windows
  • Installing Windows In New Walls
  • Retrofitting Windows
  • Window Repairs
  • Door Basics
  • Interior Doors
  • Exterior Doors
How-To

Installing a Mortise Lockset

Mortise locksets combine security and convenience; follow these guidelines to install one.

By Mike Litchfield, Chip Harley
A door-boring jig will keep boring devices perpendicular to the door edge or face. This is crucial when boring the edge because there will be no more than 7⁄16 in. of wood on each side of the mortise casing. Moreover, a lockset set askew may not work correctly.

Mortise locksets house latch bolts and dead bolts in a single casing, so the door stile must be solid wood to receive this type of lock. If possible, order the door machined specifically for the lockset. If you intend to make the holes yourself, a door-boring jig will be a big help.
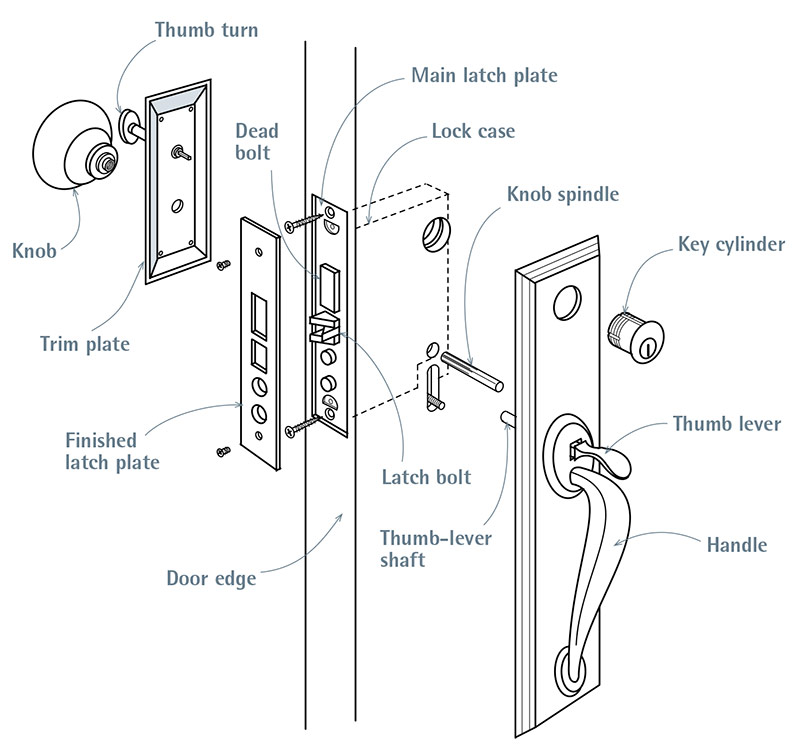
Mortise Lockset

Mortise Lockset
Mortise locksets combine security and convenience, because you can use a single key to operate both a latch bolt and a dead bolt.


PRO TIP: Because manufacturers often create a general hardware template for several different door styles, the template provided may be inaccurate. You may not need all the holes indicated, or you may need to reposition the template to accommodate a door edge bevel. So examine the door hardware and think things through before you mark or drill the door.


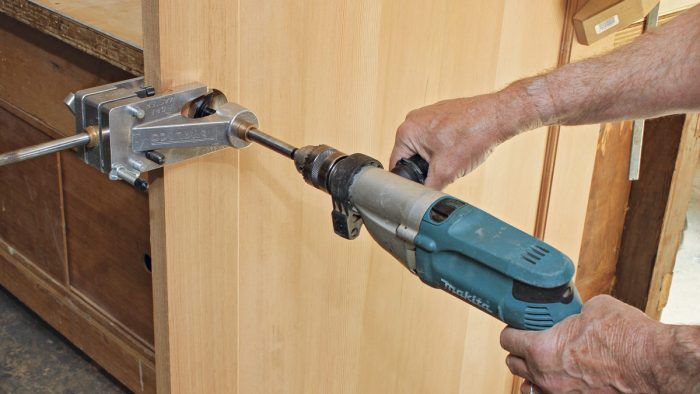
1. Using the template, mark the outline of the lock case on the edge of the door. Then mark a line in the exact center of the edge. Along this line, use a 7⁄8-in. spade bit to drill holes to the depth of the lock case. Overlap holes slightly.

Use an awl to mark the hole centers
Use the paper template supplied with your lockset to center face bores on the door stile and edge bores on the door edge. The template gives the exact setback and hole sizes. Use an awl to mark the hole centers. Prehung doors often come with lock cases prebored.

Drill the face bores
Drill the face bores, which are positioned with a paper template. Use a hole saw for the larger, key/cylinder hole and a Forstner bit for the spindle or thumb-lever hole. The small, round level taped to the top of the drill helps the installer drill perpendicular to the door face.

2. Use a chisel to square up the edges of the lock-case mortise. As you chisel, test-fit the lock case periodically to avoid chiseling away any more wood than necessary. When the lock case fits all the way into the hole, trace the outline of the main latch plate onto the edge of the door. Use a router to mortise the latch plate. If the door edge is beveled, adjust the tilt of the main latch plate to match the bevel beforehand.

Use a router and a template to mortise the latch plate into the edge.

Holes in the lock case should align with the holes drilled into the door face
Holes in the lock case should align with the holes drilled into the door face. If they don’t, use a rat-tail file to enlarge the face bores gradually.

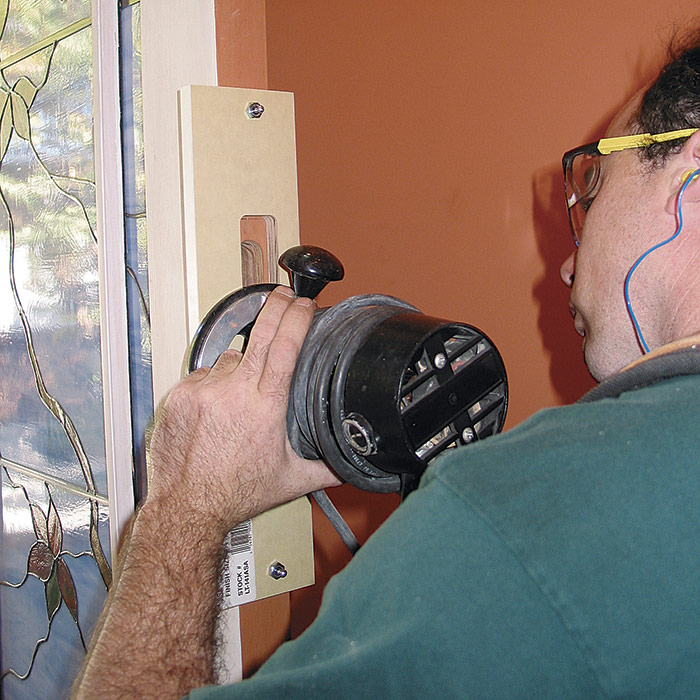
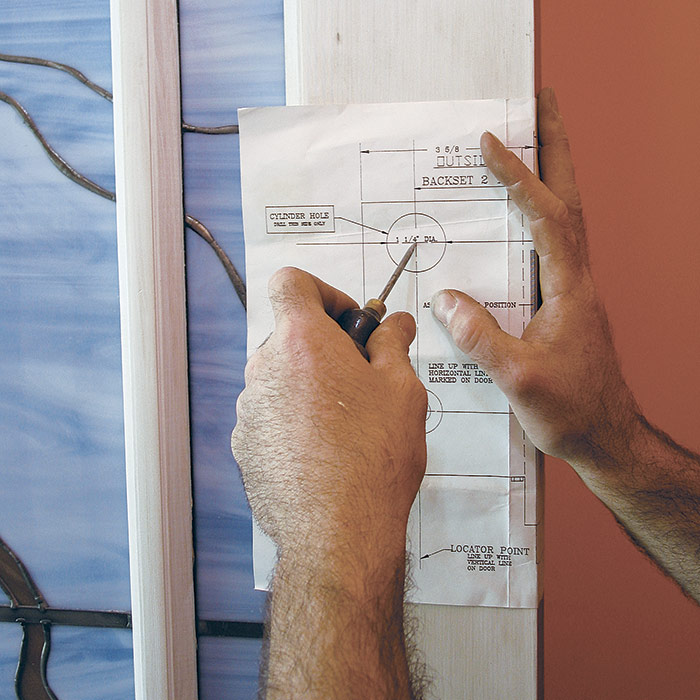
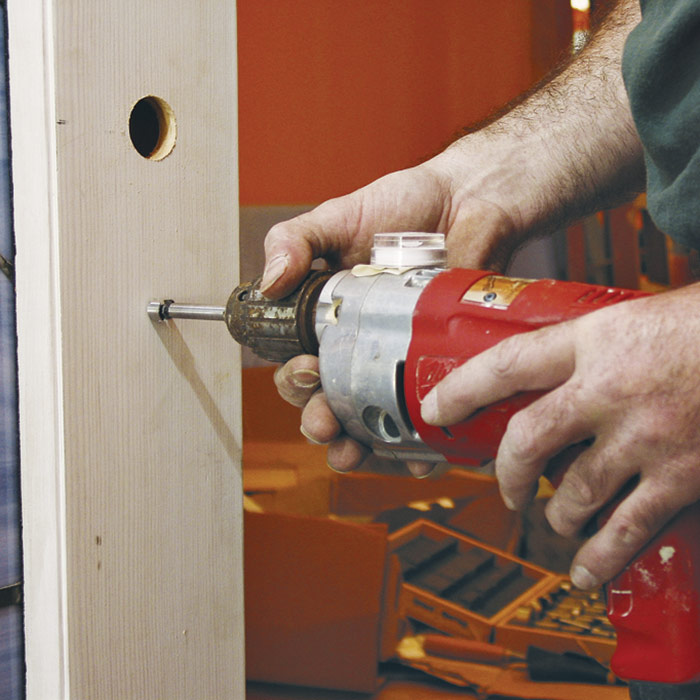
3. Remove the lock case. Using the template, mark knob/spindle and key/cylinder holes on the face of the door stile. Use a hole saw to cut the cylinder hole and a Forstner bit or spade bit to cut the smaller spindle hole, holding drill bits perpendicular to the stile. Drill the holes until the point of the bit just starts through the other side. To prevent splintering of the stile face, back the drill out and finish drilling from the other side.

Use a chisel to square up the rounded corners
Use a chisel to square up the rounded corners of the latch-plate mortise.

For added strength and security, use 3-in. screws that will reach framing.
Strike plates are closely matched to the locksets they’re supplied with. Typically, the larger opening receives the dead bolt. For added strength and security, use 3-in. screws that will reach framing.

4. Reinsert the lock case, and screw it to the edge of the door. Then insert the spindles, slide the escutcheons over the spindles, attach the handles or knobs to the spindles, and see if they turn freely. Once they do, screw on all the trim hardware. Typically, door handles or thumb levers are 34 in. to 38 in. high.

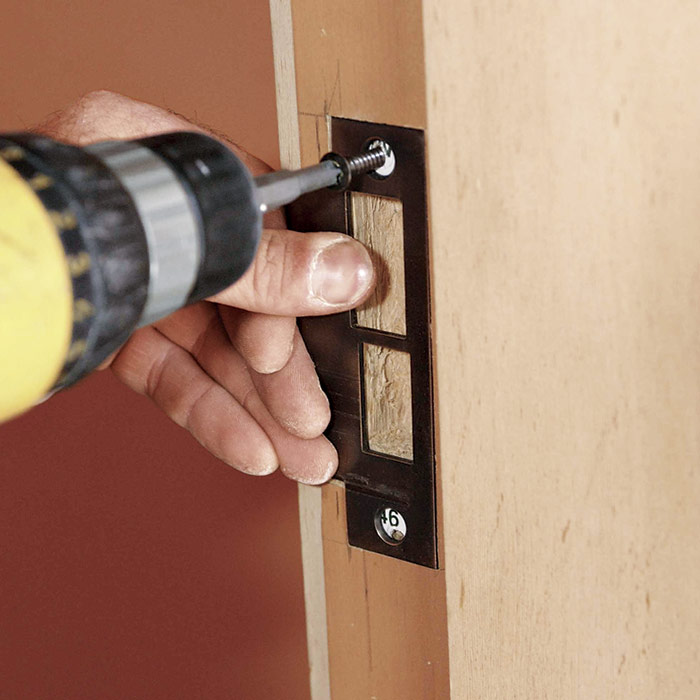
5. You also will find a strike-plate template. Depending upon the depth of the strike-plate assembly, use a router or a combination of drill and chisel to mortise the plate into the jamb. To more accurately position the leading edge of the strike plate, rub pencil lead on the latch edge; when the latch is released against the jamb, it will leave a pencil mark. For greater security, buy a unit with a strike-plate reinforcer and 3-in. mounting screws.

Reinforced Strike-Plate Assembly

Reinforced Strike-Plate Assembly
Because 3-in. screws anchor this assembly to framing behind the door
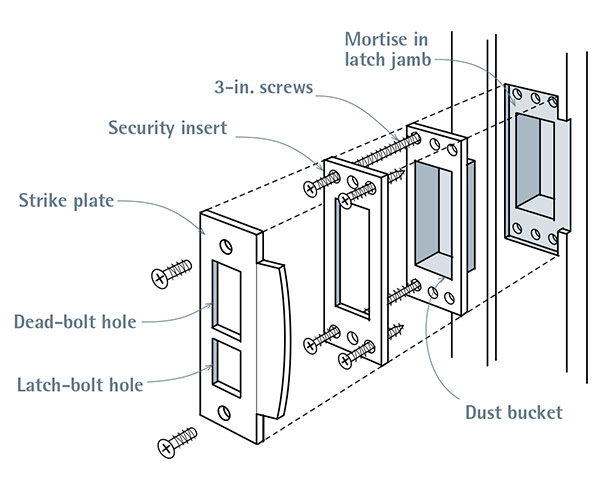
frame, this strike plate can’t be dislodged by a kick.

Renovation 5th Edition

Excerpted from Renovation, 5th Edition (The Taunton Press, 2019) by Michael Litchfield and Chip Harley

Available in the Taunton Store and at Amazon.com.

Sign up for eletters today and get the latest how-to from Fine Homebuilding, plus special offers.

Signing you up...

This site is protected by reCAPTCHA and the Google Privacy Policy and Terms of Service apply.
See all newsletters
See all newsletters
Previous: How to Drill a Lockset on a New Door Next: Quick Door Fixes

Guide

Windows & Doors

Chapter

Door Basics

Log in or create an account to post a comment.

Sign up Log in

Become a member and get full access to FineHomebuilding.com

Windows & Doors

Windows & Doors

Trusted, comprehensive guidance from the pros for choosing, installing, replacing, and repairing windows and doors on any house

View Project Guide

View All Project Guides »

Become a member and get unlimited site access, including the Windows & Doors Project Guide.

Start Free Trial

Choosing Windows
  • Window Types
  • Design and Materials
  • Energy-Efficient Windows
Installing Windows In New Walls
  • Installation, Start to Finish
  • Head Flashing for Windows
  • Video Series: Nail-Fin Window over Zip System Sheathing
  • Video Series: Nail-Fin Window over Exterior Rigid-Foam Insulation
  • Video Series: Nail-Fin Window over Housewrap
  • Video Series: Nail-Fin Window over Peel-and-Stick Housewrap
  • Video Series: Nail-Fin Window over a Fluid-Applied WRB
  • Video Series: Weatherproof Window Installation
Retrofitting Windows
  • Removing the Old, Installing the New
  • Video Series: How to Replace a Window
  • Video Series: Install a Full-Frame Replacement Window in a Brick Wall
  • Video Series: Install an Insert Replacement Window in a Brick Wall
  • Video Series: Retrofit a Flanged Window
Window Repairs
  • Restoring Old Windows
  • Repairs and Upgrades
Door Basics
  • Tools & Jigs for Door Hanging
  • How to Install Doors
  • Hinges
  • Handles, Knobs, and Locksets
  • Fixing Door Problems
Interior Doors
  • Prehung Doors
  • Pocket Doors
  • Other Types of Doors
  • Custom-Built Doors
Exterior Doors
  • Door Choices and Design
  • Installing Entry Doors
  • Building Exterior Doors
  • Installing French Doors
  • Replacing a Door
  • Adding Weatherstripping and Sweeps

Fine Home Building

Newsletter Sign-up

  • Fine Homebuilding

    Home building tips, offers, and expert advice in your inbox.

  • Green Building Advisor

    Building science and energy efficiency advice, plus special offers, in your inbox.

  • Old House Journal

    Repair, renovation, and restoration tips, plus special offers, in your inbox.

Signing you up...

This site is protected by reCAPTCHA and the Google Privacy Policy and Terms of Service apply.
See all newsletters

Follow

  • Fine Homebuilding

    Dig into cutting-edge approaches and decades of proven solutions with total access to our experts and tradespeople.

    Start Free Trial Now
    • Facebook
    • Instagram
    • X
    • LinkedIn
  • GBA Prime

    Get instant access to the latest developments in green building, research, and reports from the field.

    Start Free Trial Now
    • Facebook
    • YouTube
  • Old House Journal

    Learn how to restore, repair, update, and decorate your home.

    Subscribe Now
    • Facebook
    • Instagram
    • X

Membership & Magazine

  • Online Archive
  • Start Free Trial
  • Magazine Subscription
  • Magazine Renewal
  • Gift a Subscription
  • Customer Support
  • Privacy Preferences
  • About
  • Contact
  • Advertise
  • Careers
  • Terms of Use
  • Site Map
  • Do not sell or share my information
  • Privacy Policy
  • Accessibility
  • California Privacy Rights

© 2025 Active Interest Media. All rights reserved.

Fine Homebuilding receives a commission for items purchased through links on this site, including Amazon Associates and other affiliate advertising programs.

X
X
This is a dialog window which overlays the main content of the page. The modal window is a 'site map' of the most critical areas of the site. Pressing the Escape (ESC) button will close the modal and bring you back to where you were on the page.

Main Menu

  • How-To
  • Design
  • Tools & Materials
  • Video
  • Blogs
  • Forum
  • Project Guides
  • Reader Projects
  • Magazine
  • Members
  • FHB House

Podcasts

  • FHB Podcast
  • ProTalk

Webinars

  • Upcoming and On-Demand

Podcasts

  • FHB Podcast
  • ProTalk

Webinars

  • Upcoming and On-Demand

Popular Topics

  • Kitchens
  • Business
  • Bedrooms
  • Roofs
  • Architecture and Design
  • Green Building
  • Decks
  • Framing
  • Safety
  • Remodeling
  • Bathrooms
  • Windows
  • Tilework
  • Ceilings
  • HVAC

Magazine

  • Current Issue
  • Past Issues
  • Magazine Index
  • Subscribe
  • Online Archive
  • Author Guidelines

All Access

  • Member Home
  • Start Free Trial
  • Gift Membership

Online Learning

  • Courses
  • Project Guides
  • Reader Projects
  • Podcast

More

  • FHB Ambassadors
  • FHB House
  • Customer Support

Account

  • Log In
  • Join

Newsletter

Get home building tips, offers, and expert advice in your inbox

Signing you up...

This site is protected by reCAPTCHA and the Google Privacy Policy and Terms of Service apply.
See all newsletters
See all newsletters

Follow

  • X
  • YouTube
  • instagram
  • facebook
  • pinterest
  • Tiktok

Join All Access

Become a member and get instant access to thousands of videos, how-tos, tool reviews, and design features.

Start Your Free Trial

Subscribe

FHB Magazine

Start your subscription today and save up to 70%

Subscribe

We hope you’ve enjoyed your free articles. To keep reading, become a member today.

Get complete site access to expert advice, how-to videos, Code Check, and more, plus the print magazine.

Start your FREE trial

Already a member? Log in