FHB Logo Facebook LinkedIn Email Pinterest Twitter X Instagram Tiktok YouTube Plus Icon Close Icon Navigation Search Icon Navigation Search Icon Arrow Down Icon Video Guide Icon Article Guide Icon Modal Close Icon Guide Search Icon Skip to content
Subscribe
Log In
  • How-To
  • Design
  • Tools & Materials
  • Restoration
  • Videos
  • Blogs
  • Forum
  • Magazine
  • Members
  • FHB House
  • Podcast
Log In

Fine Homebuilding Project Guides

Windows & Doors

Guide Home
  • Choosing Windows
  • Installing Windows In New Walls
  • Retrofitting Windows
  • Window Repairs
  • Door Basics
  • Interior Doors
  • Exterior Doors
How-To

Installing and Flashing Skylights

Getting the flashing right is the key to a leak-free installation.

By Mike Litchfield, Chip Harley

By letting in light, skylights can transform a room, making a bathroom seem larger, a kitchen warm and cheery, or a bedroom a place to watch the stars. And because of marked improvements in flashing and quality control, skylights can be installed without fear of leaks from the outside or of excessive heat loss from within.

Follow the manufacturer’s instructions when installing your skylight so the warranty will be honored. Here, a Velux deck-mounted skylight is being installed.

directional-flashing-kit
Velux units have integral curbs and proprietary flashing kits. This one is “directional”—that is, with a top and bottom. Having slipped head flashing under shingles above, the installers will slip the unit’s head underneath. Small L-shaped brackets along the curb will mount to the sheathing.

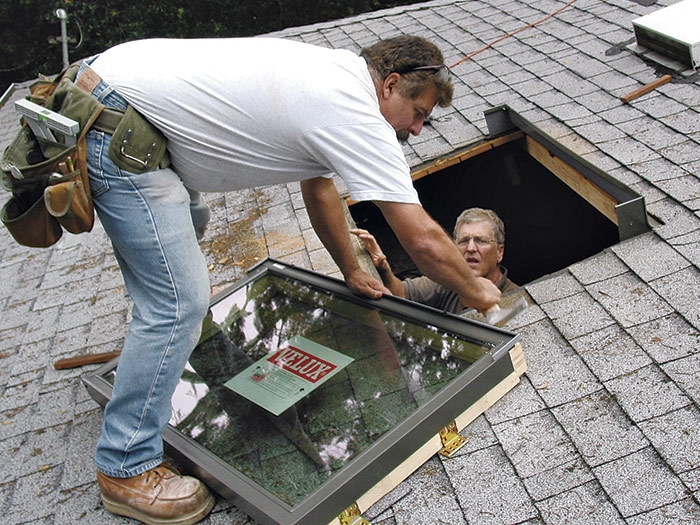
Screw the mounting brackets to the sides of the skylight curb; most brackets are adjustable. Then, with one worker on the roof and one in the attic, pass the skylight out through the opening. As the worker outside raises or lowers the brackets until the top and bottom of the unit are level, the worker inside centers the unit in the opening. That done, the outside installer screws the bottom legs of the brackets to the sheathing.

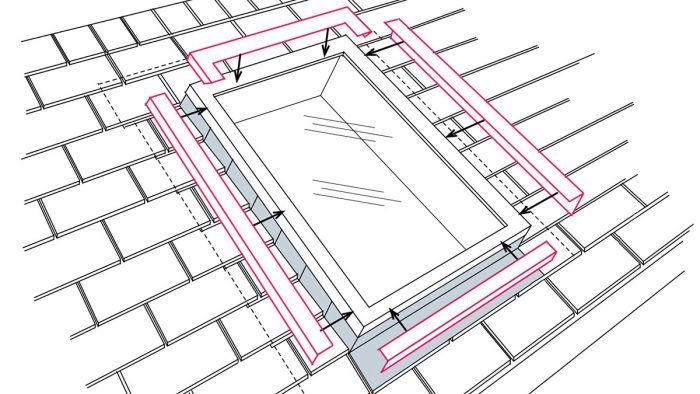
Wrapping the curb with building paper or self-adhering membrane underlayment gives you an extra layer of protection before installing the unit’s apron, side flashing, and head flashing. Apply 12-in.-wide strips of underlayment, one on each side, folding each so that it runs up onto the curb about 2 in. Apply the bottom piece first, which overlaps the shingles below, then place the side pieces and, finally, the top piece. If possible, slide the top piece of self-adhering membrane up under the building paper so you adhere it directly to the sheathing. Slit the folded strips where they overlap the curb corners so the strips lie flat, and apply a dab of roofing cement to adhere the slit pieces.

Head flashing
Head flashing has two pieces, a base and a cap. Slip the base piece under the course of shingles above as shown, then hold the base snug to the curb and attach it with a single screw or nail at each corner.


flange overlays the shingles
Once the unit’s mounting brackets are screwed to the sheathing, wrap the curb with building paper or self-adhering membrane as described in the text. Here, the apron’s bottom flange overlays the shingles below.


Install the apron flashing first. It runs along the lower edge of the skylight and overlaps the shingles below it. Holding the apron snugly against the curb, attach it to the curb—not the roof—using a single screw (or nail) on each side. Although it’s usually not necessary to caulk under the apron’s lower flange, follow the manufacturer’s advice. Ideally, the apron will line up with a course of shingles, but in renovation work that’s not always possible.

Install step-flashing along the sides, weaving the L-shaped flashing between shingle courses. Ideally, shingle courses should stop 1⁄4 in. shy of the curb so that water can run freely along the sides. The vertical leg of each piece of step-flashing should extend up high enough so it will be protected from rain by curb caps; the horizontal leg should extend under the shingles at least 4 in. As with all flashing, avoid nailing in the channel where water will run. Rather, nail overlapping pieces of step-flashing to the curb only and high enough so the nails will also be protected by curb caps. If necessary, trim the last (uppermost) -pieces of step-flashing so they don’t extend beyond the curb.

apply L-shaped step-flashing
Working from the bottom up, apply L-shaped step-flashing along the side. Each overlaps the one below and is nailed with a single nail to the side of the curb. The uppermost pieces of step-flashing slide up under the head flashing. When these individual pieces of step-flashing are in place, a continuous cap piece will cover each side.


Install the head flashing by slipping its upper flange under the next full course of shingles above and pressing the head flashing snugly to the curb. Attach the head flashing to the curb with one screw or nail at each corner. Then install a strip of building paper—or a second strip of self-adhering membrane—over the head flashing’s flange before shingling over it. Note: Stop the flashing strip and shingles 21⁄2 in. to 4 in. above the skylight curb so there is a clear expanse of metal to clear leaves and accelerate runoff.

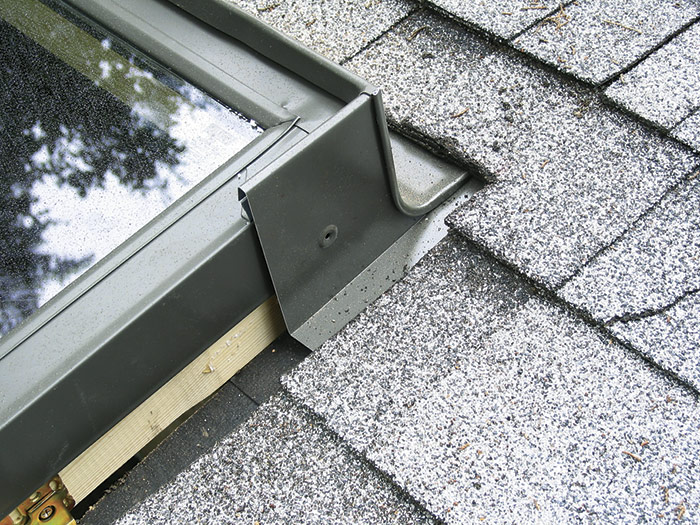
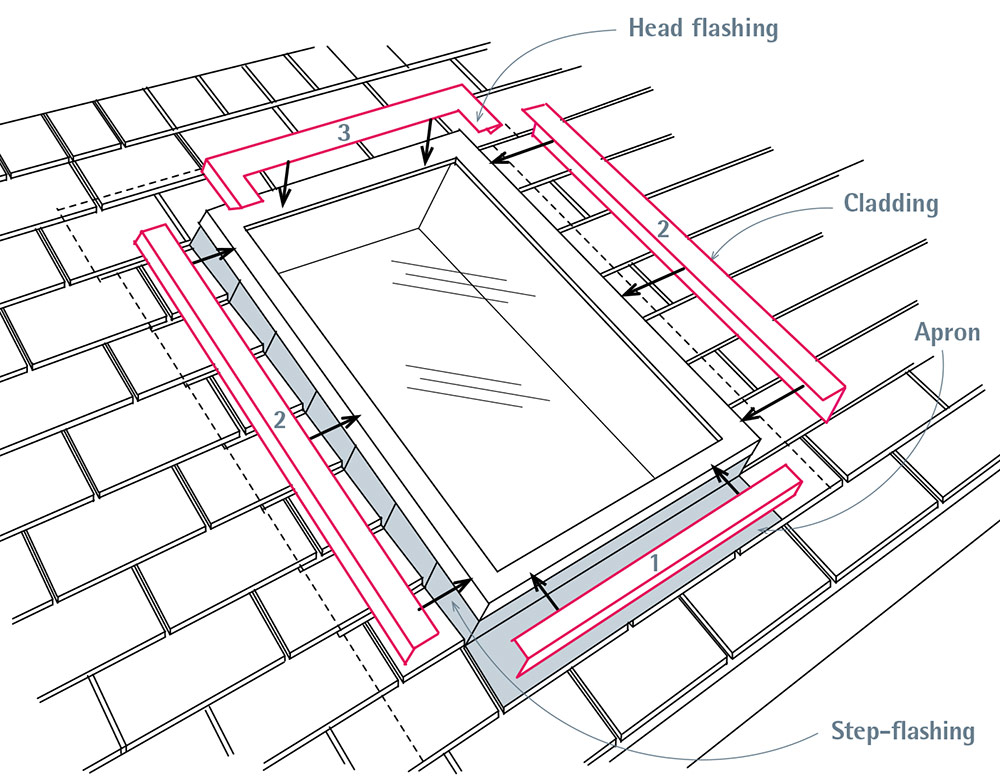
Installing cladding (curb caps) is the last step. These pieces cover and seal the tops of apron and side (step-) flashing and, on some models, the top of the head flashing as well. Follow your skylight’s installation guide religiously. In some fixed models, the head flashing is the last piece to go on, covering the upper ends of the side cladding pieces. Details vary, but caps snap or screw on. Better-quality units have self-sticking foam gaskets that are applied to the top of the curb before the caps are installed, which reduces air and dust infiltration.

Cladding for a Deck-Mounted Skylight

Cladding for a Deck-Mounted Skylight
Cladding covers and seals the top legs of apron and step-flashing and—on some operable models—it covers the head flashing as well. Read installation instructions closely. Numbers on the cladding indicate the installation sequence.

Finish off with a couple more tasks. To reflect light, light wells should be covered with drywall and painted a light color. Insulate around the light wells to reduce heat loss and condensation. Because condensation is common around skylights, cover the light well with water-resistant (WR) drywall, often called greenboard for its color. Stiffen the well’s outside corners with metal corner beads.


Renovation 5th Edition

Excerpted from Renovation, 5th Edition (The Taunton Press, 2019) by Michael Litchfield and Chip Harley

Available at Amazon.com.

Sign up for eletters today and get the latest how-to from Fine Homebuilding, plus special offers.

Signing you up...

This site is protected by reCAPTCHA and the Google Privacy Policy and Terms of Service apply.
See all newsletters
See all newsletters
Previous: How to Install a Bay Window: Part 2 Next: Waterproof Your Windows with Liquid Flashing

Guide

Windows & Doors

Chapter

Installing Windows In New Walls

Log in or create an account to post a comment.

Sign up Log in

Become a member and get full access to FineHomebuilding.com

Windows & Doors

Windows & Doors

Trusted, comprehensive guidance from the pros for choosing, installing, replacing, and repairing windows and doors on any house

View Project Guide

View All Project Guides »

Become a member and get unlimited site access, including the Windows & Doors Project Guide.

Start Free Trial

Choosing Windows
  • Window Types
  • Design and Materials
  • Energy-Efficient Windows
Installing Windows In New Walls
  • Installation, Start to Finish
  • Head Flashing for Windows
  • Video Series: Nail-Fin Window over Zip System Sheathing
  • Video Series: Nail-Fin Window over Exterior Rigid-Foam Insulation
  • Video Series: Nail-Fin Window over Housewrap
  • Video Series: Nail-Fin Window over Peel-and-Stick Housewrap
  • Video Series: Nail-Fin Window over a Fluid-Applied WRB
  • Video Series: Weatherproof Window Installation
Retrofitting Windows
  • Removing the Old, Installing the New
  • Video Series: How to Replace a Window
  • Video Series: Install a Full-Frame Replacement Window in a Brick Wall
  • Video Series: Install an Insert Replacement Window in a Brick Wall
  • Video Series: Retrofit a Flanged Window
Window Repairs
  • Restoring Old Windows
  • Repairs and Upgrades
Door Basics
  • Tools & Jigs for Door Hanging
  • How to Install Doors
  • Hinges
  • Handles, Knobs, and Locksets
  • Fixing Door Problems
Interior Doors
  • Prehung Doors
  • Pocket Doors
  • Other Types of Doors
  • Custom-Built Doors
Exterior Doors
  • Door Choices and Design
  • Installing Entry Doors
  • Building Exterior Doors
  • Installing French Doors
  • Replacing a Door
  • Adding Weatherstripping and Sweeps

Fine Home Building

Newsletter Sign-up

  • Fine Homebuilding

    Home building tips, offers, and expert advice in your inbox.

  • Green Building Advisor

    Building science and energy efficiency advice, plus special offers, in your inbox.

  • Old House Journal

    Repair, renovation, and restoration tips, plus special offers, in your inbox.

Signing you up...

This site is protected by reCAPTCHA and the Google Privacy Policy and Terms of Service apply.
See all newsletters

Follow

  • Fine Homebuilding

    Dig into cutting-edge approaches and decades of proven solutions with total access to our experts and tradespeople.

    Start Free Trial Now
    • Facebook
    • Instagram
    • X
    • LinkedIn
  • GBA Prime

    Get instant access to the latest developments in green building, research, and reports from the field.

    Start Free Trial Now
    • Facebook
    • YouTube
  • Old House Journal

    Learn how to restore, repair, update, and decorate your home.

    Subscribe Now
    • Facebook
    • Instagram
    • X

Membership & Magazine

  • Online Archive
  • Start Free Trial
  • Magazine Subscription
  • Magazine Renewal
  • Gift a Subscription
  • Customer Support
  • Privacy Preferences
  • About
  • Contact
  • Advertise
  • Careers
  • Terms of Use
  • Site Map
  • Do not sell or share my information
  • Privacy Policy
  • Accessibility
  • California Privacy Rights

© 2025 Active Interest Media. All rights reserved.

Fine Homebuilding receives a commission for items purchased through links on this site, including Amazon Associates and other affiliate advertising programs.

X
X
This is a dialog window which overlays the main content of the page. The modal window is a 'site map' of the most critical areas of the site. Pressing the Escape (ESC) button will close the modal and bring you back to where you were on the page.

Main Menu

  • How-To
  • Design
  • Tools & Materials
  • Video
  • Blogs
  • Forum
  • Project Guides
  • Reader Projects
  • Magazine
  • Members
  • FHB House

Podcasts

  • FHB Podcast
  • ProTalk

Webinars

  • Upcoming and On-Demand

Podcasts

  • FHB Podcast
  • ProTalk

Webinars

  • Upcoming and On-Demand

Popular Topics

  • Kitchens
  • Business
  • Bedrooms
  • Roofs
  • Architecture and Design
  • Green Building
  • Decks
  • Framing
  • Safety
  • Remodeling
  • Bathrooms
  • Windows
  • Tilework
  • Ceilings
  • HVAC

Magazine

  • Current Issue
  • Past Issues
  • Magazine Index
  • Subscribe
  • Online Archive
  • Author Guidelines

All Access

  • Member Home
  • Start Free Trial
  • Gift Membership

Online Learning

  • Courses
  • Project Guides
  • Reader Projects
  • Podcast

More

  • FHB Ambassadors
  • FHB House
  • Customer Support

Account

  • Log In
  • Join

Newsletter

Get home building tips, offers, and expert advice in your inbox

Signing you up...

This site is protected by reCAPTCHA and the Google Privacy Policy and Terms of Service apply.
See all newsletters
See all newsletters

Follow

  • X
  • YouTube
  • instagram
  • facebook
  • pinterest
  • Tiktok

Join All Access

Become a member and get instant access to thousands of videos, how-tos, tool reviews, and design features.

Start Your Free Trial

Subscribe

FHB Magazine

Start your subscription today and save up to 70%

Subscribe

We hope you’ve enjoyed your free articles. To keep reading, become a member today.

Get complete site access to expert advice, how-to videos, Code Check, and more, plus the print magazine.

Start your FREE trial

Already a member? Log in