FHB Logo Facebook LinkedIn Email Pinterest Twitter X Instagram Tiktok YouTube Plus Icon Close Icon Navigation Search Icon Navigation Search Icon Arrow Down Icon Video Guide Icon Article Guide Icon Modal Close Icon Guide Search Icon Skip to content
Subscribe
Log In
  • How-To
  • Design
  • Tools & Materials
  • Restoration
  • Videos
  • Blogs
  • Forum
  • Magazine
  • Members
  • FHB House
  • Podcast
Log In

Fine Homebuilding Project Guides

Siding & Exterior Trim

Guide Home
  • Choosing Siding
  • Installing Siding
  • Choosing Exterior Trim
  • Installing Exterior Trim
  • Repairing Siding & Trim
How-To

Installing Cedar Shingles

Cedar shingles are the most labor-intensive siding choice; builder Andy Engel shares his tips and techniques for a trouble-free installation.

By Andy Engel
Use a rack to hold shingles at the right height and to arrange them to offset joints from one course to another.

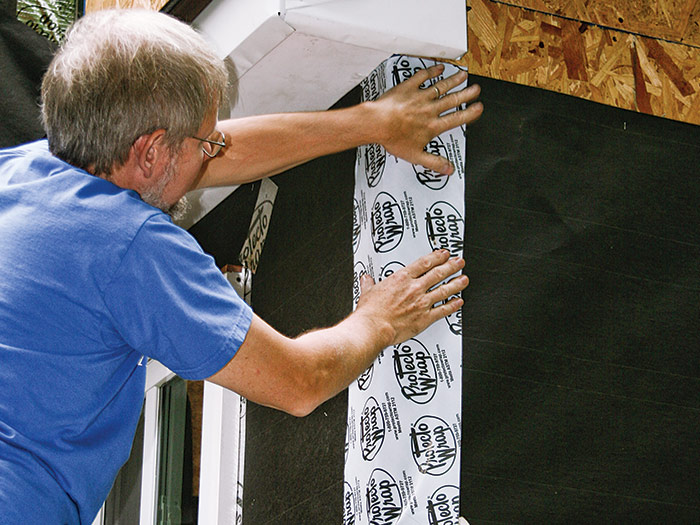
Like clapboards, cedar shingles can be installed with varying exposures to align with windows or doors. They are often, but not always, installed with the same kind of trim details as clapboards, and they must be installed over properly flashed housewrap or building paper. As with clapboards, I add a layer of adhesive membrane to the corners. But that’s where the similarities end.

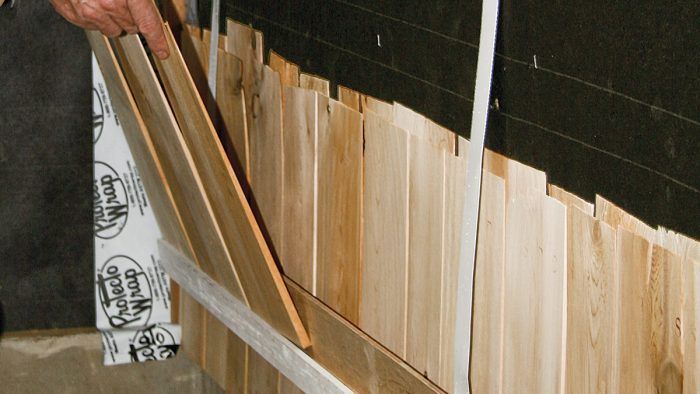
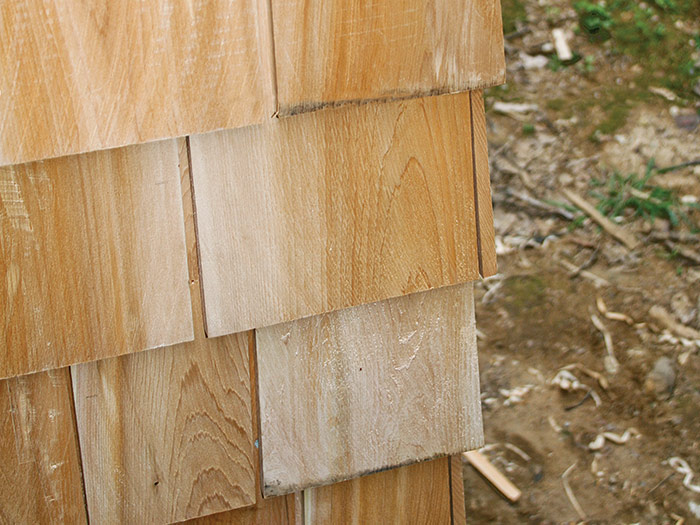
At the very least, shingles or shakes are far more labor intensive than any other kind of siding. That’s because shingles have to be installed so their joints are offset from course to course by at least 11⁄2 in. In any three courses, no joints should align. It takes time and care to get this right. I build racks to hold the shingles in place while I’m nailing them up so I can fiddle with their placement. Usually, I make an 8-ft. and a 4-ft. rack of 1⁄4-in. plywood and a rabbeted 1×2.


WHAT CAN GO WRONG: The same compounds that make cedar rot-resistant also give it its wonderful smell. But not everyone finds that smell wonderful. Some develop severe allergy symptoms, and worse is possible (all wood dust is considered a carcinogen). Wear dust protection when working with cedar.
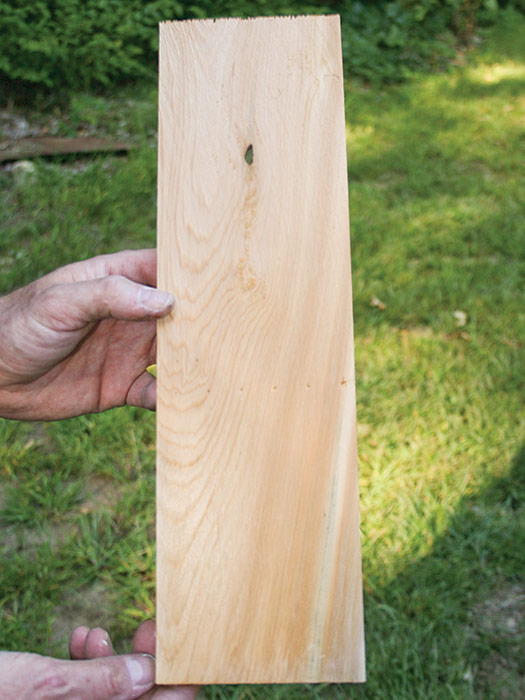
 

Shakes? Shingles?

Shakes are split from cedar logs and are thicker and rougher than shingles. Shingles are sawn and are thinner, more uniform, and tapered.

There are several grades of each, and the grades vary depending on whether the material is western red cedar or eastern white cedar. Additionally, shingles and shakes come in different lengths, and their permitted exposure depends on a combination of the grade, species, and length. Like cedar clapboards, cedar shakes and shingles can be installed painted, stained, sealed, or raw. Sound complicated? It’s not, really. Just check with the manufacturer or the Cedar Shingle and Shake Bureau (www.cedar bureau.org).


Building a Shingle Rack

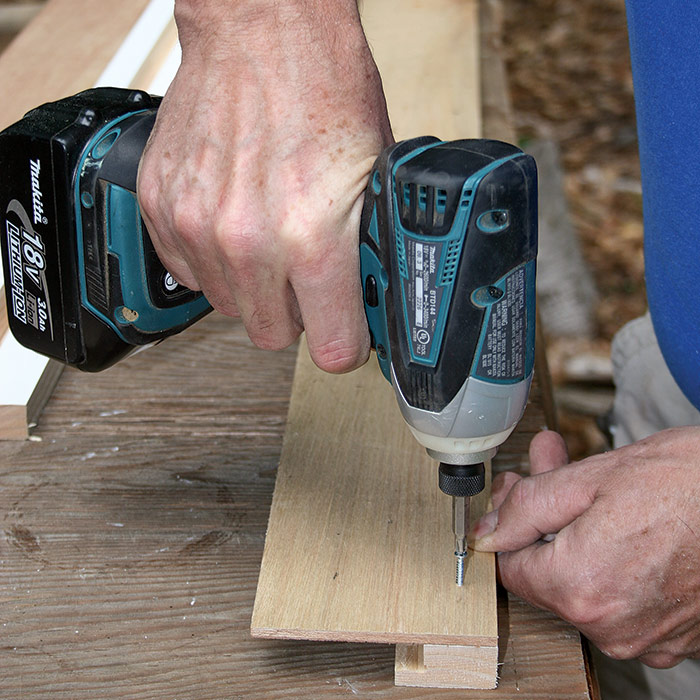
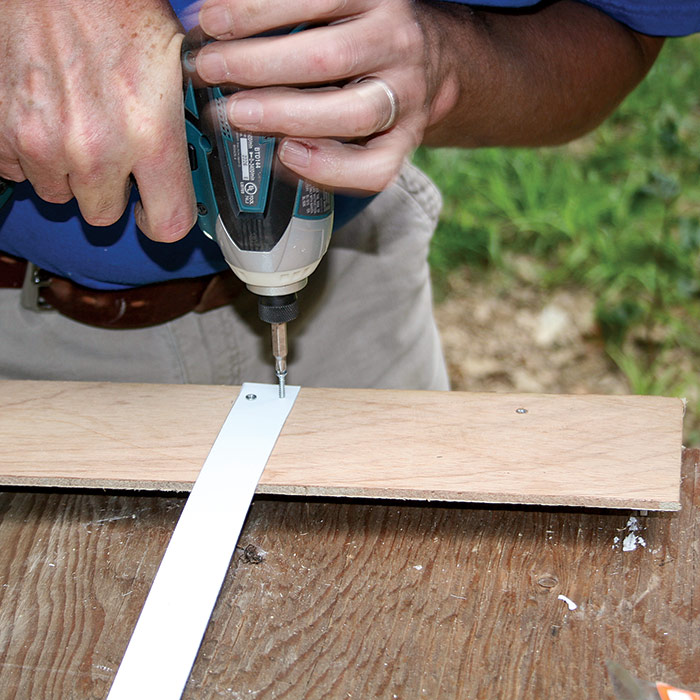
Cut a 1⁄2-in. × 1⁄2-in. rabbet in a piece of 1×2 and screw that to the 1⁄4-in. plywood with the rabbet facing up and in. Photo 1 The shingles will sit in this rabbet. Cut two or three strips of aluminum flashing (two for a 4-ft. rack, three for an 8-footer) about 1 in. wide and 2 ft. long, and fasten these to the back of the plywood with screws driven into the 1×2. Photo 2  Use 3⁄4-in. screws from behind for all the connections.

fasten a piece of 1⁄4-in. plywood
1 Cut a 1⁄2-in. by 1⁄2-in. rabbet in a 1×2 board for the bottom of the rack and fasten a piece of 1⁄4-in. plywood.

Fasten them to the bottom of the rack with two screws.
2 Use aluminum coil stock to cut strips for hanging the rack. Fasten them to the bottom of the rack with two screws.

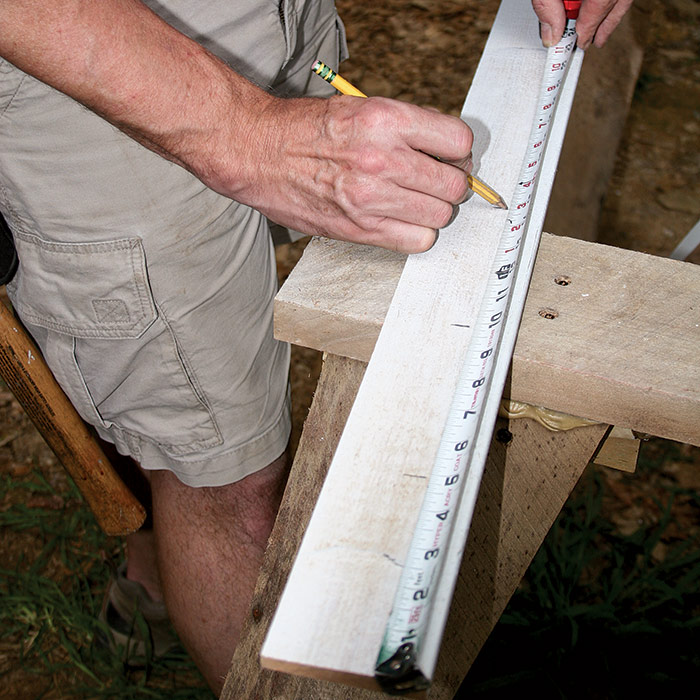
 Marking the Story Pole

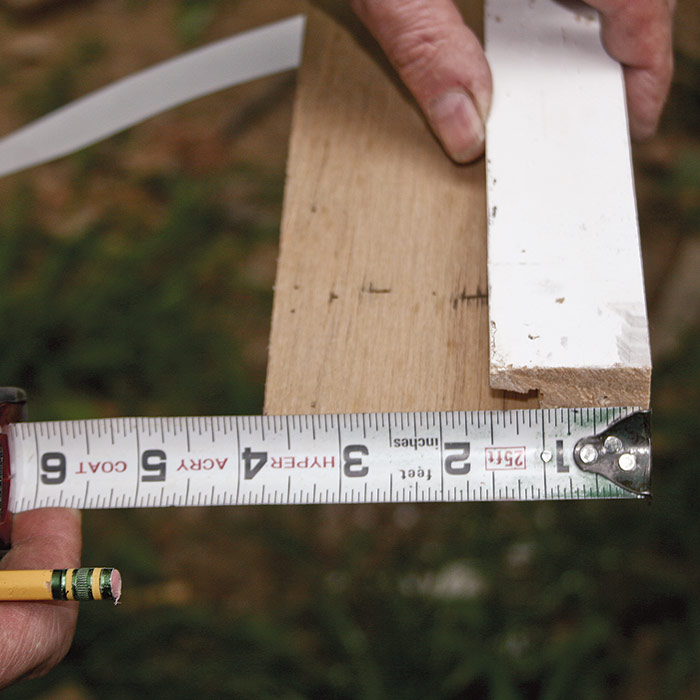
The length of shingles varies too much for you to lay them out along their tops, so a story pole for shingles has to work with the bottoms of the courses. To do this, shorten the story pole by the distance between the bottom of the rabbet and the bottom of the installation board. 3 Compute your exposure and lay out the story pole as you would for clapboards, except don’t adjust the layout to work with the tops of the shingles. 4

Measure the un-rabbetted dimension
3 Measure the un-rabbetted dimension and shorten the story pole by this measurement.

Lay out the story pole
4 Lay out the story pole for the bottom of the shingles, extending the marks to the edge of the board with a combination square.


SHINGLE PANELS

To speed up the installation of cedar shingles, manufacturers also supply them attached to plywood panels that apply more like short, wide clapboards. The material cost is greater, but installation is a lot faster. However, panelized shingles cannot be installed with varying course widths, so odds are their bottoms won’t align with the windows.

Manufactured shingle panels
Manufactured shingle panels install much faster than using traditional methods. (Photo courtesy Michael R. Guertin)


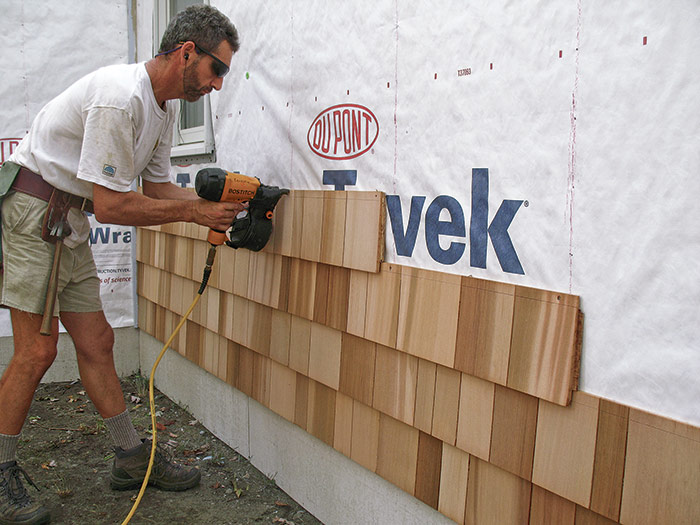
Where I work, the most common shingle or shake sidewall product is R and R shingles. That stands for resawn and rebutted and means the shingles have parallel edges and square bottoms. What I’m installing here are 16-in.-long, raw, eastern white cedar R and Rs, with a 5-in. exposure.

Installing the Undercourse

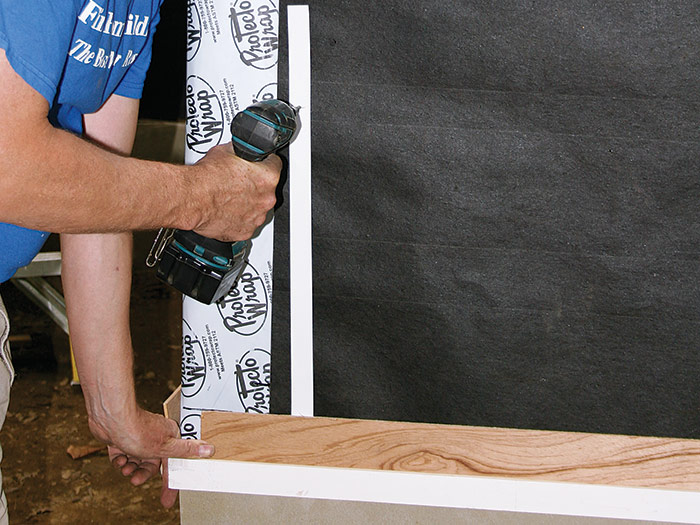
Seal each corner with a layer of adhesive membrane, extending the membrane about 6 in. in both directions. Photo 1 Then install any cornerboards and trim called for by your design.

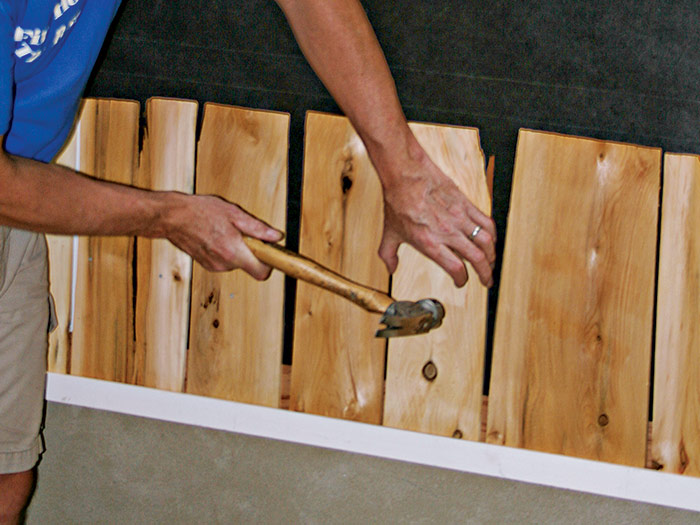
Fasten the shingle rack to the wall with screws through the tops of the aluminum straps, lapping the bottom of the rabbet over the foundation by 1 in. 2 Start with a course of undercourse, arranging them in the rack. Space the undercourse, and all shingles, 1⁄8 in. to 1⁄4 in. at their sides to allow for expansion. Use stainless-steel shake nails long enough to penetrate the framing by at least 1 in. to fasten the undercourse (and all succeeding courses) about 1 in. up from the exposure line and 3⁄4 in. in from each edge (but see “Special Nailing Procedures”). 3 Don’t worry about hitting studs, and don’t nail through the rack straps, or even right next to them. Skip those nails, and when you have finished the undercourse, go back and unscrew the shingle rack. Carefully pull down so the straps slip past the back of the shingles. Now, nail the shingles next to where the straps were.

Back up corners with membrane
1 Back up corners in shingled walls with a layer of adhesive membrane at least 6 in. on both sides of the corner.

Hang the shingle rack
2 Hang the shingle rack for the undercourse so those shingles will lap the top of the foundation by about 1 in.

Nail the undercourse
3 Nail the undercourse and all shingles 1 in. above where the bottom of the next course will fall.


Special Nailing Procedures

On eastern white cedar shingles wider than 7 in. and western red cedar shingles wider than 8 in., nail the center of the shingle with two nails spaced 1 in. apart. Shingles of this size are likely to split, and the idea here is that this nail placement will make the split happen in the center of the shingle between the nails, and each remaining half will still be held fast by two nails.

nail the center of the shingle


Installing the Shingles

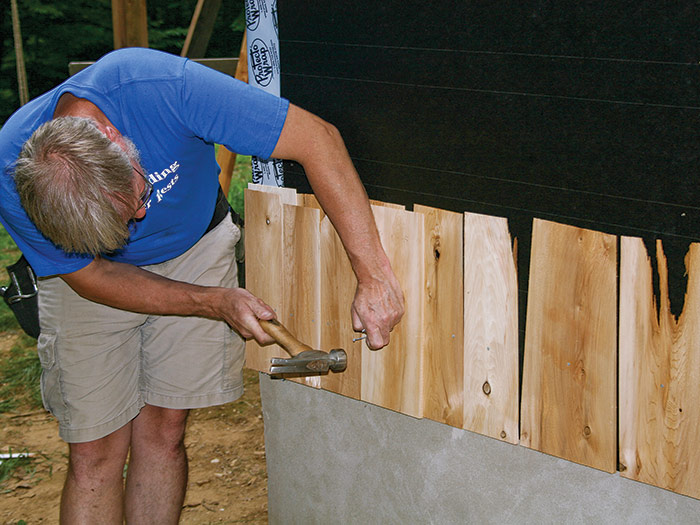
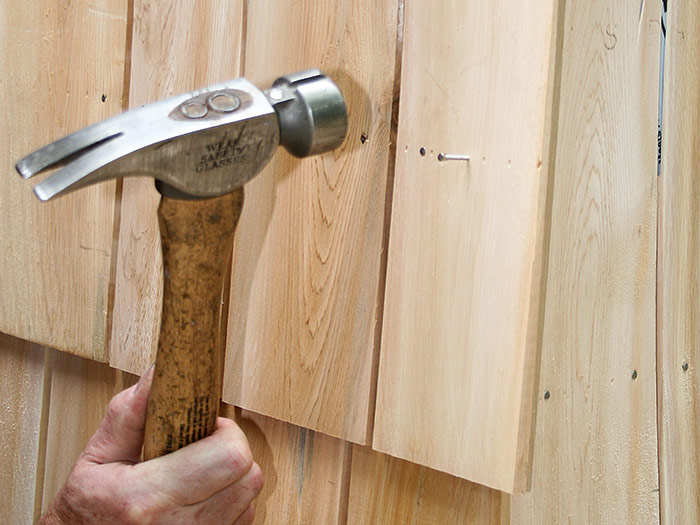
You could reinstall the rack for the first course of shingles, which goes directly over the undercourse, but I find it easier to skip the rack for this course. Just flush the bottoms of the first course with the undercourse shingles, offsetting the joints between these shingles by at least 11⁄2 in. from the undercourse joints. Photo 4

Then align the story pole on the bottom of the first course and mark both sides of the wall at the story-pole marks, which you adjusted down to align with the bottom of the shingle rack.

Skip the shingle rack for the first visible course
4 Skip the shingle rack for the first visible course. Flush the bottoms with the undercourse, and stagger the edges by at least 1 1⁄2 in.

cut cedar shingles
5 When you reach windows and other obstacles, cut cedar shingles with a sharp knife and a square.

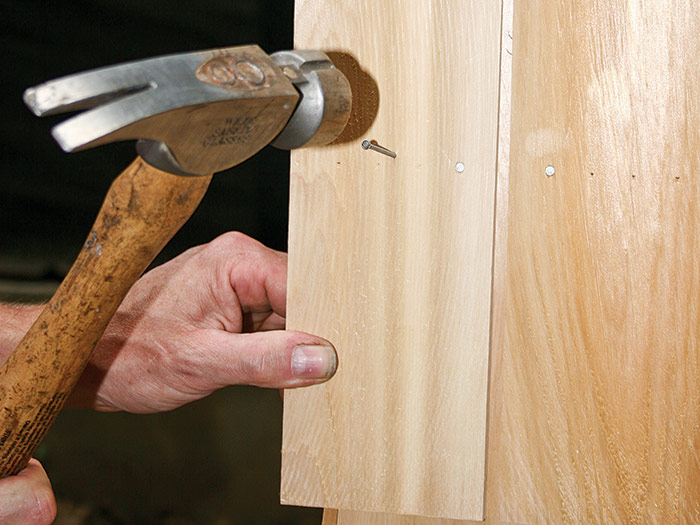
For the next course, fasten the rack with its bottom edge on the story-pole marks. Arrange the shingles in the rack so the joints will offset correctly. Nail this row of shingles then remove and reset the rack for the next course. Repeat this to the top of the wall.

When you get to windows or the top course, you’ll need to cut the shingles to length. Cedar is so soft, these cuts can be made with a square and a sharp knife. 5 When trimming the thinner section near the top of a shingle, tin snips work well. In fact, there’s no need for power tools to install cedar shingles. It’s pretty cool to work with a material so timeless that a carpenter from a century ago would immediately recognize the tools being used today.
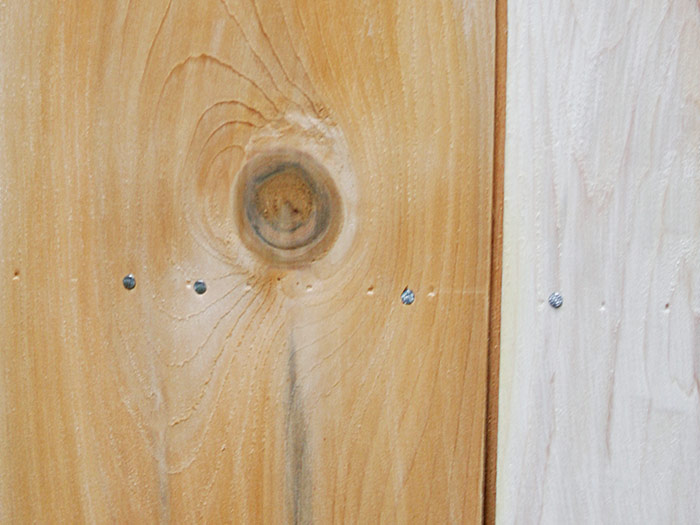
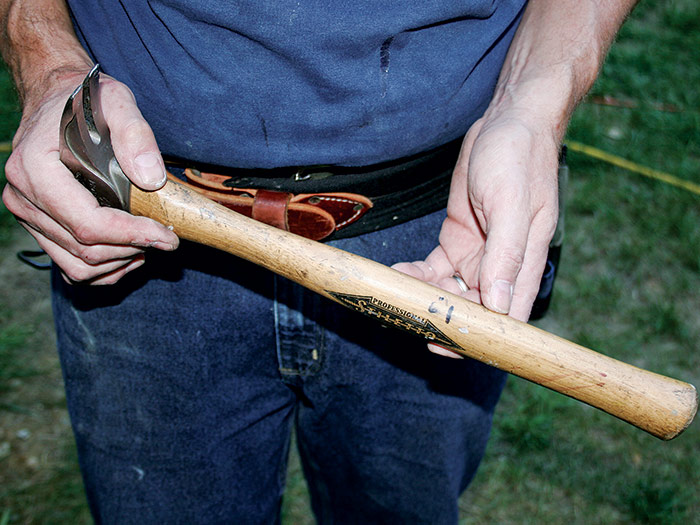
 

Getting the Spacing Right

Many shingles come with a nail line embossed in them (top). If yours don’t, mark your hammer handle with the nail height and use that to gauge their placement from the bottom of the shingles (bottom).

embossed nail line

mark your hammer handle


Weaving Corners

Woven corners are a traditional cedar-shingle detail. Instead of butting against cornerboards, the end shingles of alternating courses lap each other at the corner. To weave a corner, you need to shingle both adjoining walls at the same time. You don’t need to do all of both walls at once, but you do need to shingle each course out 4 ft. or so on each wall, to give yourself enough area to work with. Of course, if one or both walls are short, then do the entire area at once. You can also leave the corners till last, installing and trimming the final shingle in each row after shingling the body of the wall.

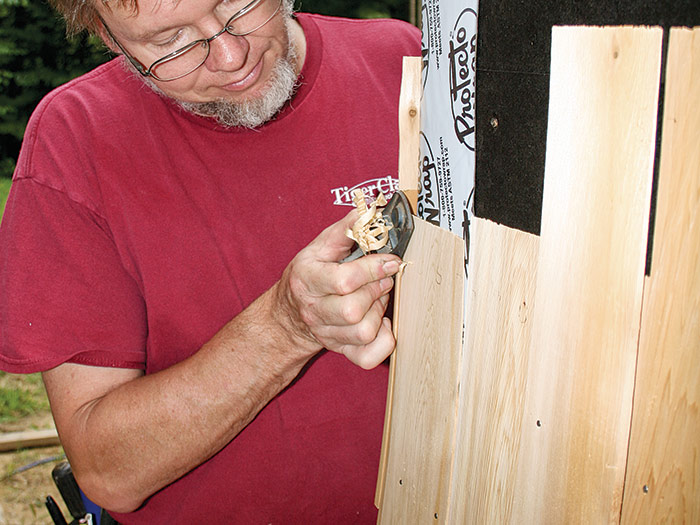
When you get to an end shingle in a course, nail it in place so its edge overhangs the corner. 1 Use a sharp knife to trim that shingle to within about 1⁄8 in. of the face of the lower-course shingle on the other side of the corner. 2

Overlap the corner
1 Overlap the corner by enough to trim the edge of the end shingle properly.

Trim the first shingle
2 Trim the first shingle to within about 1⁄8 in. of the profile of the shingle and wall on the opposite side of the corner.

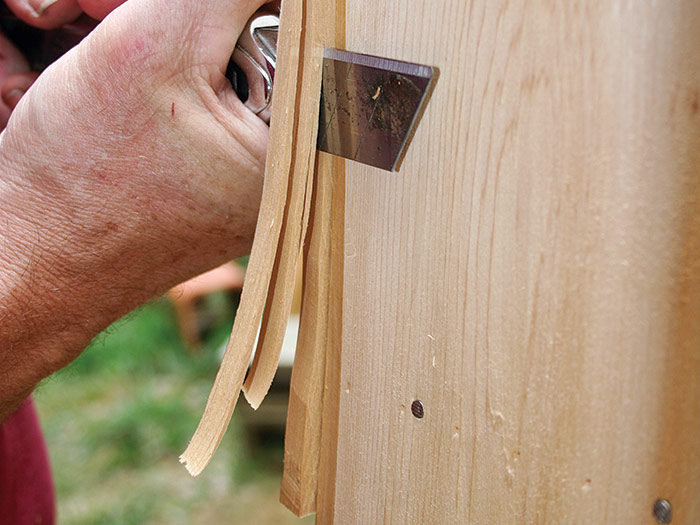
Finish flushing up the trimmed shingle with a plane. 3 You don’t need a fancy plane here—just a small, basic standard-angle block plane. Move to the other side, and nail that end shingle in place so it laps the one you just installed. 4 Flush it up with a knife and a block plane as you did the first side. Change which wall you start on so that the corner laps alternate. 5

finish trimming
2 Using a block plane, finish trimming the first shingle flush with the material on the other side of the corner.

shingle lapping
4 When you get to the last shingle of the adjoining course, nail a shingle lapping the one you just trimmed.

stagger the joints
5 Alternate the overlaps to stagger the joints from one course to the other.


TRADE SECRET: Weaving corners is not necessarily limited to outside corners, but it’s easier. You can weave inside corners. It’s more work, and it doesn’t look a lot different than when an inside cornerboard is used. In short, it’s probably not worth the trouble to weave an inside corner.


Going with the GrainGoing with the Grain

Wood grain is rarely straight; most often it angles toward one edge or the other. Knife (or chisel) cuts will tend to split the wood along the grain. Cut in a direction so that if the shingle splits, the split will run to the scrap edge and not into the part you’re keeping. Grain direction can change, so you may need to cut from each end of the shingle.

For example, on the shingle shown, cutting up on the right side would not likely cause a visible split, but cutting down would. However, cutting on the left side is more complicated. Within about an inch of the edge, I’d cut up, but farther in from the edge, I’d cut down.


Carpentry CompleteExcerpted from Carpentry Complete: Expert Advice from Start to Finish, by Andy Engel

Available at Amazon.com.

Sign up for eletters today and get the latest how-to from Fine Homebuilding, plus special offers.

Signing you up...

This site is protected by reCAPTCHA and the Google Privacy Policy and Terms of Service apply.
See all newsletters
See all newsletters
Previous: Douglas Fir Stained Siding Next: Weaving Sidewall Shingle Corners

Guide

Siding & Exterior Trim

Chapter

Installing Siding

Log in or create an account to post a comment.

Sign up Log in

Become a member and get full access to FineHomebuilding.com

Siding & Exterior Trim

Siding & Exterior Trim

Trusted, comprehensive guidance from the pros for choosing, installing, and repairing siding and exterior trim

View Project Guide

View All Project Guides »

Become a member and get unlimited site access, including the Siding & Exterior Trim Project Guide.

Start Free Trial

Choosing Siding
  • Materials
  • Design Options
Installing Siding
  • Siding Basics
  • Lap Siding
  • Shingle Siding
  • Board & Batten
  • Fiber Cement and Composite Siding
  • Vinyl Siding
  • Masonry Claddings
Choosing Exterior Trim
  • Trim Materials
  • Trim Design
Installing Exterior Trim
  • Trim Basics
  • Roof Eaves Trim
  • Corner Boards
  • Corbels & Brackets
  • Window & Door Trim
Repairing Siding & Trim
  • Trim Repairs
  • Siding Repairs

Fine Home Building

Newsletter Sign-up

  • Fine Homebuilding

    Home building tips, offers, and expert advice in your inbox.

  • Green Building Advisor

    Building science and energy efficiency advice, plus special offers, in your inbox.

  • Old House Journal

    Repair, renovation, and restoration tips, plus special offers, in your inbox.

Signing you up...

This site is protected by reCAPTCHA and the Google Privacy Policy and Terms of Service apply.
See all newsletters

Follow

  • Fine Homebuilding

    Dig into cutting-edge approaches and decades of proven solutions with total access to our experts and tradespeople.

    Start Free Trial Now
    • Facebook
    • Instagram
    • X
    • LinkedIn
  • GBA Prime

    Get instant access to the latest developments in green building, research, and reports from the field.

    Start Free Trial Now
    • Facebook
    • YouTube
  • Old House Journal

    Learn how to restore, repair, update, and decorate your home.

    Subscribe Now
    • Facebook
    • Instagram
    • X

Membership & Magazine

  • Online Archive
  • Start Free Trial
  • Magazine Subscription
  • Magazine Renewal
  • Gift a Subscription
  • Customer Support
  • Privacy Preferences
  • About
  • Contact
  • Advertise
  • Careers
  • Terms of Use
  • Site Map
  • Do not sell or share my information
  • Privacy Policy
  • Accessibility
  • California Privacy Rights

© 2025 Active Interest Media. All rights reserved.

Fine Homebuilding receives a commission for items purchased through links on this site, including Amazon Associates and other affiliate advertising programs.

X
X
This is a dialog window which overlays the main content of the page. The modal window is a 'site map' of the most critical areas of the site. Pressing the Escape (ESC) button will close the modal and bring you back to where you were on the page.

Main Menu

  • How-To
  • Design
  • Tools & Materials
  • Video
  • Blogs
  • Forum
  • Project Guides
  • Reader Projects
  • Magazine
  • Members
  • FHB House

Podcasts

  • FHB Podcast
  • ProTalk

Webinars

  • Upcoming and On-Demand

Podcasts

  • FHB Podcast
  • ProTalk

Webinars

  • Upcoming and On-Demand

Popular Topics

  • Kitchens
  • Business
  • Bedrooms
  • Roofs
  • Architecture and Design
  • Green Building
  • Decks
  • Framing
  • Safety
  • Remodeling
  • Bathrooms
  • Windows
  • Tilework
  • Ceilings
  • HVAC

Magazine

  • Current Issue
  • Past Issues
  • Magazine Index
  • Subscribe
  • Online Archive
  • Author Guidelines

All Access

  • Member Home
  • Start Free Trial
  • Gift Membership

Online Learning

  • Courses
  • Project Guides
  • Reader Projects
  • Podcast

More

  • FHB Ambassadors
  • FHB House
  • Customer Support

Account

  • Log In
  • Join

Newsletter

Get home building tips, offers, and expert advice in your inbox

Signing you up...

This site is protected by reCAPTCHA and the Google Privacy Policy and Terms of Service apply.
See all newsletters
See all newsletters

Follow

  • X
  • YouTube
  • instagram
  • facebook
  • pinterest
  • Tiktok

Join All Access

Become a member and get instant access to thousands of videos, how-tos, tool reviews, and design features.

Start Your Free Trial

Subscribe

FHB Magazine

Start your subscription today and save up to 70%

Subscribe

We hope you’ve enjoyed your free articles. To keep reading, become a member today.

Get complete site access to expert advice, how-to videos, Code Check, and more, plus the print magazine.

Start your FREE trial

Already a member? Log in