FHB Logo Facebook LinkedIn Email Pinterest Twitter X Instagram Tiktok YouTube Plus Icon Close Icon Navigation Search Icon Navigation Search Icon Arrow Down Icon Video Guide Icon Article Guide Icon Modal Close Icon Guide Search Icon Skip to content
Subscribe
Log In
  • How-To
  • Design
  • Tools & Materials
  • Restoration
  • Videos
  • Blogs
  • Forum
  • Magazine
  • Members
  • FHB House
  • Podcast
Log In

Fine Homebuilding Project Guides

Roofing

Guide Home
  • Tools and Materials
  • Roof Replacement and Reroofing
  • Roof Ventilation
  • Waterproofing
  • Installing Asphalt Shingles
  • Installing Other Types of Roofs
  • Roof Maintenance and Repair

Installing Chimney Flashing

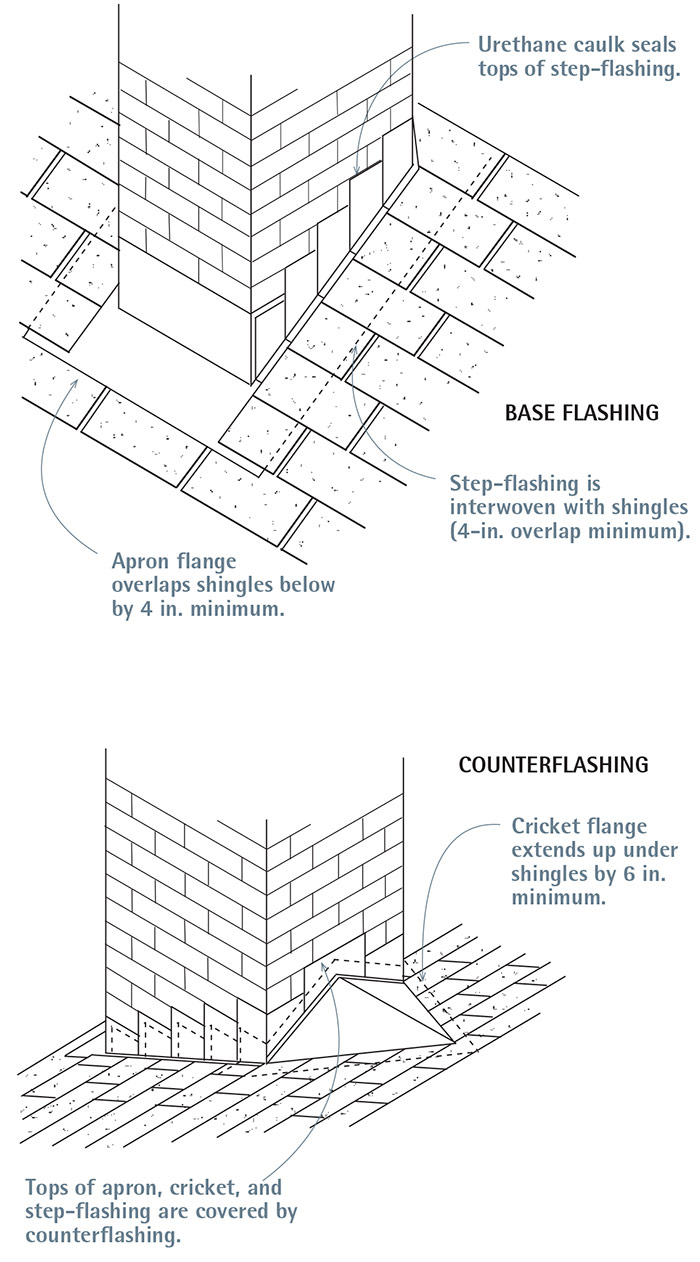
Counterflashing overlaps base flashing to repel water along the chimney/roof line.

By Mike Litchfield

Chimneys must be counterflashed. The upper pieces of counterflashing are usually tucked into chimney mortar joints and made to overhang various pieces of base flashing, which are nailed to the roof deck. Counterflashing and base pieces overlap but aren’t physically joined, so they can move independently yet still repel water. (This independence is necessary because houses and chimneys settle at different rates, causing single-piece flashing to tear and leak.)

Chimney Flashing

Chimney Flashing
The apron flashing along the downslope of the chimney wraps around the corners of the chimney and is itself overlapped by step-flashing coming down each side. The cricket on the upslope side is also complex; it wraps corners and overlaps step-flashing below. Have a sheet-metal shop solder all seams so they’ll be watertight.


Replace Counterflashing and Base Flashing

To avoid damaging the chimney when reroofing, use the gentlest possible method to remove counterflashing. If mortar is weak and crumbling, you may be able to pull the flashing out by hand; in that case, repoint the mortar after replacing counterflashing. If the mortar is sound and the counterflashing is firmly lodged, try using a cold chisel or a carbide-tipped bit in a pneumatic air chisel to cut out the flashing and as little of the mortar as possible.

Base flashing should be removed because you’ll strip the roofing and building paper at the same time. Base flashing has several components: a continuous sheet-metal apron across the chimney’s downslope face, L-shaped step-flashing running up both sides, and (when the chimney sits below the roof ridge) a cricket (or saddle) running across the upslope face. A cricket is sloped like a tent roof to deflect water around the chimney. Use a claw hammer, a flat bar, or a cat’s paw to pry up old base flashing from the roof sheathing. Then hammer down any nails you can’t pull.

PRO TIP: Before inserting chimney counterflashing, blow or brush out any debris from the mortar joints. If your air-compressor hose can reach the roof, use it. Otherwise, a narrow brush or an air can ( the kind found in office supply stores for cleaning keyboards). But be sure to wear safety glasses and a dust mask or respirator when disturbing masonry debris.


Reattach Base Flashings First

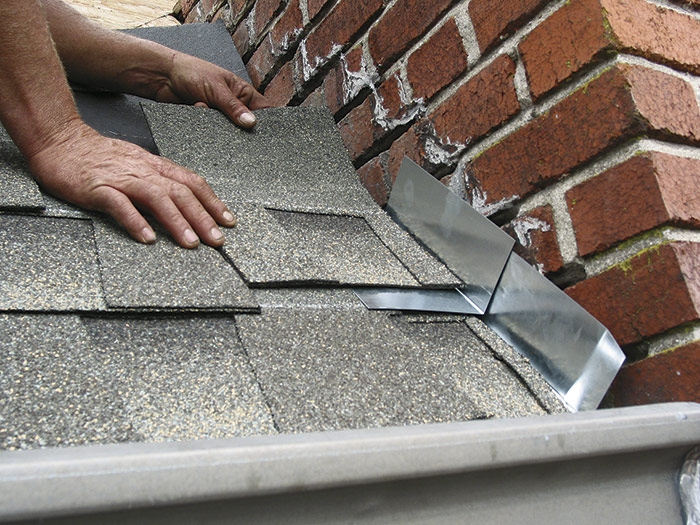
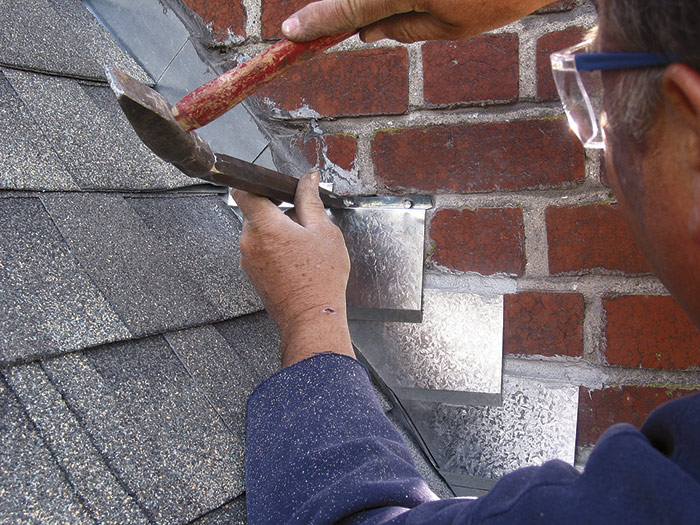
As shingles butt against the chimney’s downslope face, place the apron over them. The apron’s bottom flange should overlap shingles at least 4 in.; its upper flange should run at least 12 in. up the face of the chimney. Prefabricated aprons usually have “ears” that wrap around chimney corners and are nailed to the sheathing. As shingles ascend both sides of the chimney, they overlap the bottoms of L-shaped pieces of step-flashing.

Keep nails as far back from the flashing crease as possible. Use a single nail to nail down each piece of step-flashing and the shingle covering it. When shingle courses along both sides of the chimney reach the back (upslope) face of the chimney, the lower flanges of the cricket overlap them.

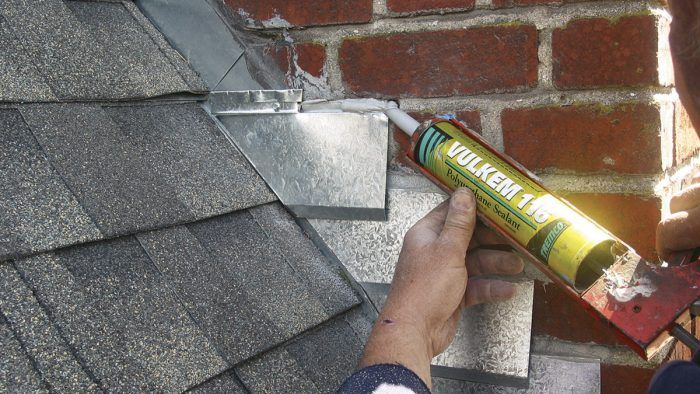
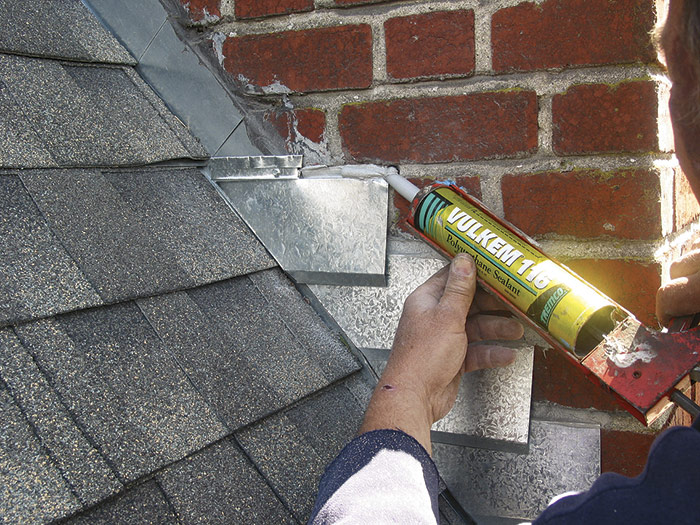
If a self-supporting cricket is fabricated from heavy 20-gauge galvanized steel, predrill the nail holes in the cricket’s lower flange. Nail it down with gasketed roofing nails spaced every 6 in., down 2 in. from the top edge. Then cover the top edges of the cricket flange with a strip of peel-and-stick bituminous membrane, and overlap that with shingles. Finally, caulk the top edges of apron, cricket, and step-flashings with urethane caulk to seal them to the chimney.

alternate shingles and step-flashing.
1. As you roof along a chimney, alternate shingles and L-shaped pieces of step-flashing. Counterflashing will cover the tops of the step-flashing. For extra protection, run a bead of urethane between the step-flashing and the chimney. Press the flashing into the urethane to achieve a positive seal.

grind out an old chimney mortar
2. This grinder is poised to grind out an old chimney mortar joint. Once the abrasive wheel hits mortar, you’ll see nothing but grit. Wear safety glasses or goggles.

Counterflashing held in place by masonry nails.jpg
3. Counterflashing is held in place by a folded lip jammed into the mortar joint. For good measure, the mason hammered masonry nails into the mortar and then used a cold chisel to tap them in deeper.

fill the joint with urethane caulk
4. Finally, run a bead of urethane caulk such as Vulkem 116 to fill the joint and seal out water. Once the caulk has set a bit, you can tool it with your thumb.

Install Counterflashing

Counterflashing should overlap the base flashing by 4 in. Traditionally, a mason used a tuck-pointing chisel to remove chimney mortar to a depth of 1 1⁄2 in. and then inserted a folded lip of counterflashing into the mortar joint. The joint was then packed with strips of lead to hold the flashing in place, followed by fresh mortar applied with a striking tool (also known as a slick). This method works well, but you need to be careful not to damage the surrounding bricks. Caulk with urethane caulk once the mortar has set.

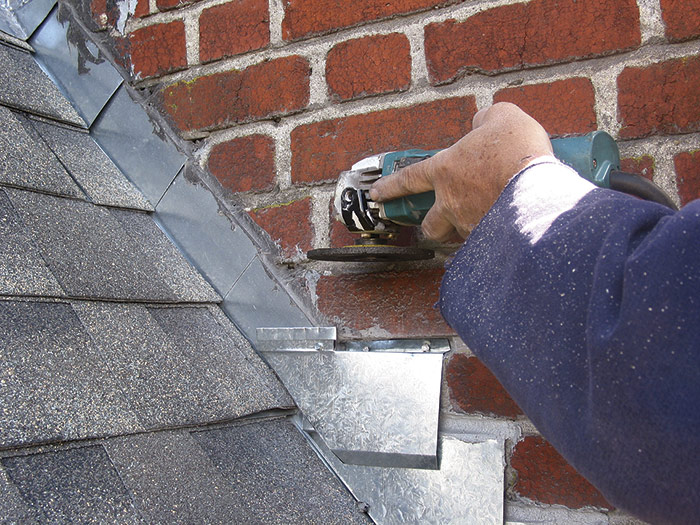
Alternatively, you can use an abrasive wheel in a cordless grinder to cut narrow slots in the mortar joints; then insert counterflashing with its lip folded back so sharply that it resembles the barb of a fishing hook. This barbed lip friction-fits tightly into the slot, so mortar is unnecessary. Instead, fill the slot with urethane caulk, which adheres well and seals out water.

Fine Homebuilding Recommended Products

Fine Homebuilding receives a commission for items purchased through links on this site, including Amazon Associates and other affiliate advertising programs.

Hook Blade Roofing Knife

Cutting asphalt shingles is made faster, easier, and safer when using a hook-blade. Suitable for any standard utility knife, these are a must-have on any roofing project.
Buy at Amazon

Ladder Stand Off

Stability is key when working off a ladder or accessing the roof, and this lightweight aluminum stand-off makes any extension ladder safer and more comfortable to use.
Buy at Amazon

Roof Jacks

All-steel construction makes these roof brackets durable and long lasting, and their adjustability allows you to create a flat, safe standing surface on most any pitched roof.
Buy at Amazon

Sign up for eletters today and get the latest how-to from Fine Homebuilding, plus special offers.

Signing you up...

This site is protected by reCAPTCHA and the Google Privacy Policy and Terms of Service apply.
See all newsletters
See all newsletters
Previous: Leak-Free Skylights Next: Flashing a Chimney

Guide

Roofing

Chapter

Waterproofing

Log in or create an account to post a comment.

Sign up Log in

Become a member and get full access to FineHomebuilding.com

Roofing

Roofing

A complete resource that includes the best materials and the right techniques to build a sturdy, leak-free, attractive roof on any house

View Project Guide

View All Project Guides »

Become a member and get unlimited site access, including the Roofing Project Guide.

Start Free Trial

Tools and Materials
  • Roof Coverings
  • Roofing Materials
  • Power Tools
  • Handy Helpers
  • Staging and Ladders
  • Safety Equipment
Roof Replacement and Reroofing
  • Preparing the Old Roof
  • Sheathing
  • Installing the New Roof
Roof Ventilation
  • Venting Basics
  • Installation
Waterproofing
  • Underlayment
  • Drip Edge
  • Flashing Adjoining Walls
  • Dormer and Skylight Flashing
  • Chimney Flashing
  • Vent Flashing
  • Gutters
Installing Asphalt Shingles
  • Calculating Shingles
  • Layout
  • Installation
  • Valleys
Installing Other Types of Roofs
  • Cedar Shingles
  • Metal
  • Low-Slope Roofs
  • Slate and Tile
Roof Maintenance and Repair
  • Assessing the Problem
  • Repairing Asphalt-Shingle Roofs
  • Other Roofing Repairs

Fine Home Building

Newsletter Sign-up

  • Fine Homebuilding

    Home building tips, offers, and expert advice in your inbox.

  • Green Building Advisor

    Building science and energy efficiency advice, plus special offers, in your inbox.

  • Old House Journal

    Repair, renovation, and restoration tips, plus special offers, in your inbox.

Signing you up...

This site is protected by reCAPTCHA and the Google Privacy Policy and Terms of Service apply.
See all newsletters

Follow

  • Fine Homebuilding

    Dig into cutting-edge approaches and decades of proven solutions with total access to our experts and tradespeople.

    Start Free Trial Now
    • Facebook
    • Instagram
    • X
    • LinkedIn
  • GBA Prime

    Get instant access to the latest developments in green building, research, and reports from the field.

    Start Free Trial Now
    • Facebook
    • YouTube
  • Old House Journal

    Learn how to restore, repair, update, and decorate your home.

    Subscribe Now
    • Facebook
    • Instagram
    • X

Membership & Magazine

  • Online Archive
  • Start Free Trial
  • Magazine Subscription
  • Magazine Renewal
  • Gift a Subscription
  • Customer Support
  • Privacy Preferences
  • About
  • Contact
  • Advertise
  • Careers
  • Terms of Use
  • Site Map
  • Do not sell or share my information
  • Privacy Policy
  • Accessibility
  • California Privacy Rights

© 2025 Active Interest Media. All rights reserved.

Fine Homebuilding receives a commission for items purchased through links on this site, including Amazon Associates and other affiliate advertising programs.

X
X
This is a dialog window which overlays the main content of the page. The modal window is a 'site map' of the most critical areas of the site. Pressing the Escape (ESC) button will close the modal and bring you back to where you were on the page.

Main Menu

  • How-To
  • Design
  • Tools & Materials
  • Video
  • Blogs
  • Forum
  • Project Guides
  • Reader Projects
  • Magazine
  • Members
  • FHB House

Podcasts

  • FHB Podcast
  • ProTalk

Webinars

  • Upcoming and On-Demand

Podcasts

  • FHB Podcast
  • ProTalk

Webinars

  • Upcoming and On-Demand

Popular Topics

  • Kitchens
  • Business
  • Bedrooms
  • Roofs
  • Architecture and Design
  • Green Building
  • Decks
  • Framing
  • Safety
  • Remodeling
  • Bathrooms
  • Windows
  • Tilework
  • Ceilings
  • HVAC

Magazine

  • Current Issue
  • Past Issues
  • Magazine Index
  • Subscribe
  • Online Archive
  • Author Guidelines

All Access

  • Member Home
  • Start Free Trial
  • Gift Membership

Online Learning

  • Courses
  • Project Guides
  • Reader Projects
  • Podcast

More

  • FHB Ambassadors
  • FHB House
  • Customer Support

Account

  • Log In
  • Join

Newsletter

Get home building tips, offers, and expert advice in your inbox

Signing you up...

This site is protected by reCAPTCHA and the Google Privacy Policy and Terms of Service apply.
See all newsletters
See all newsletters

Follow

  • X
  • YouTube
  • instagram
  • facebook
  • pinterest
  • Tiktok

Join All Access

Become a member and get instant access to thousands of videos, how-tos, tool reviews, and design features.

Start Your Free Trial

Subscribe

FHB Magazine

Start your subscription today and save up to 70%

Subscribe

We hope you’ve enjoyed your free articles. To keep reading, become a member today.

Get complete site access to expert advice, how-to videos, Code Check, and more, plus the print magazine.

Start your FREE trial

Already a member? Log in