
Is Your Deck Safe?
Protect yourself from collapse, rot, and nasty splinters. Inspect these 8 critical areas every season.
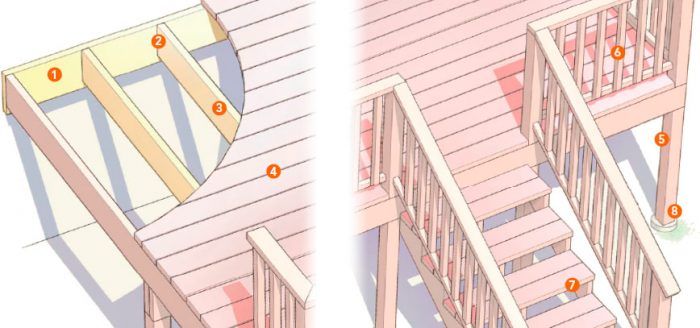
With 40 million decks in the United States that are more than 20 years old, there are plenty of families whose outdoor fun is resting on a shaky foundation. At least 30 people died as a direct result of deck collapses between 2000 and 2008, according to the North American Deck and Railing Association, and every year, many more are injured in deck-related accidents, many of which could be prevented. An annual deck inspection takes less than an hour and could head off a catastrophe. Here’s what to look for.
1. Ledger boards
The ledger board, where the deck attaches to the house, is a common site for deck failure. Check the connection between the ledger and the house, especially if your deck is more than 3 ft. off the ground, in which case a collapse could lead to serious injuries. Ledger boards must be bolted or screwed securely to the house, not just nailed, because nails tend to pull out. The 2009 International Residential Code (IRC) has a prescriptive lag-screw and bolting chart that gives some guidance for adequate fastening and fastener locations. For example, the code calls for a 12-ft.-deep deck to be attached with 1/2-in. lag screws spaced 15 in. apart or 1/2-in. through bolts 29 in. apart.
Also, look for rot in the ledger board and the wall behind the ledger. Water often leaks behind the ledger board due to improperly sized or poorly installed flashing, even on recently built decks. Decay in floor and wall framing weakens the holding power of the bolts and screws to the point where they can pull through, allowing the ledger to come loose. Check for signs of water getting behind the ledger board, and probe the area with an awl or a small screwdriver for soft spots that indicate rot. The deck ledger and possibly the entire deck may need to be removed to repair rotted wall and floor framing.
Deep cracks along the grain of the deck ledger can be dangerous, too. Look for cracks that follow the line of bolts or screws. When cracks go all the way through the board, it can split apart. Cracked ledger boards may need additional fasteners to secure them to the building, or they may need to be replaced.
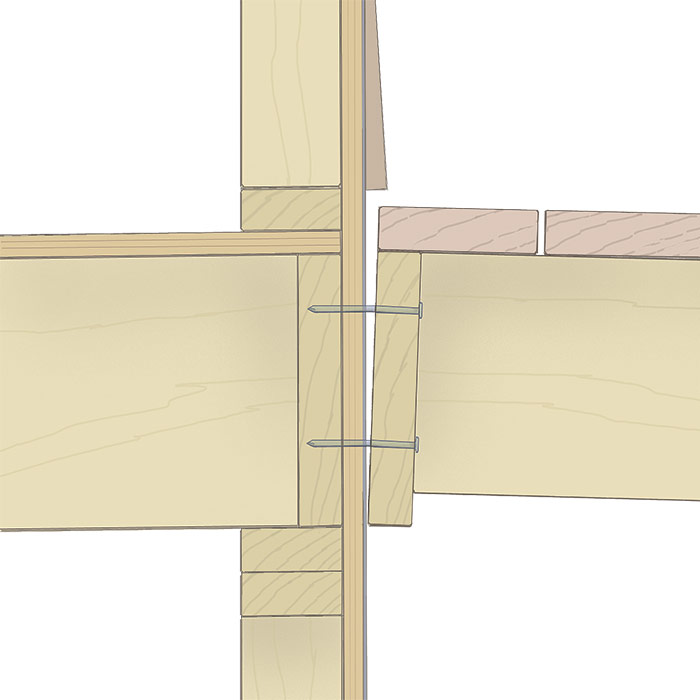
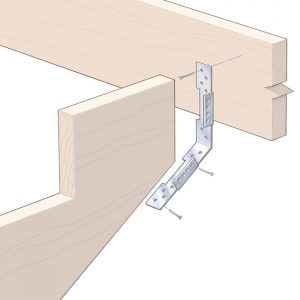
2. Fasteners, hangers, and anchors
Fasteners—including nails, screws, bolts, metal hangers, and anchors—play a critical role in the integrity of a deck. It’s important to tighten or replace any fastener that has become loose or excessively corroded. Old deck frames may be assembled without joist hangers securing the joists to the ledger or beams. The nails securing these decks are hard to inspect, can rust away unnoticed, and often come loose. Joist hangers can be added to joists when there’s access to the underside of the deck; if that’s not possible, a few deck boards can be pulled up for hanger installation from the top of the deck.
Nails or screws that fasten the deck boards themselves also can loosen or rust. Check for loose deck boards, and refasten them with new screws if needed. Stainless-steel and specially coated screws generally resist corrosion better than galvanized screws in pressure-treated lumber. Scan the deck’s surface for proud nails or screws, which are a hazard for bare feet.
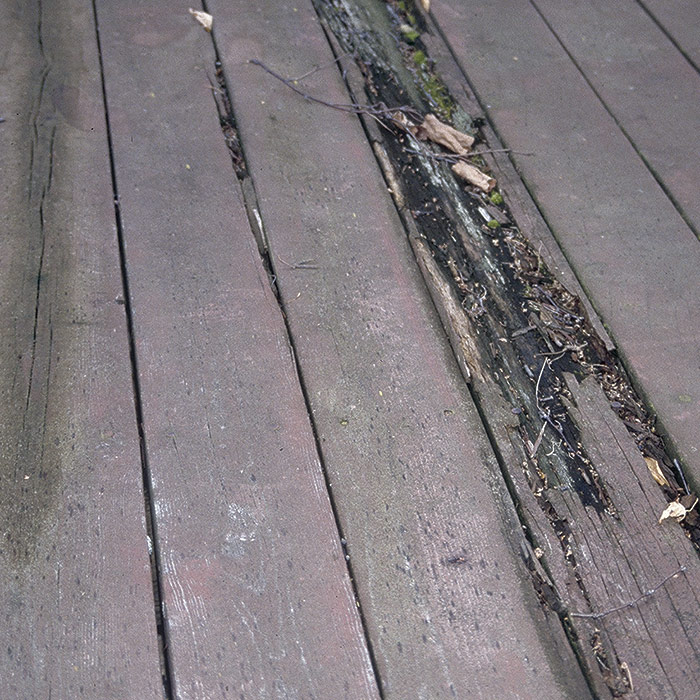
3. Framing Lumber
Decks built before the mid-1970s often were framed with untreated lumber, which decays more quickly than pressure-treated lumber. Check joists, beams, posts, stairs, railings, and decking to be sure wood is still in good condition. Pay special attention to areas that remain damp or are regularly exposed to water. Use an awl or a small screwdriver to test the wood. If the wood is soft and spongy, it’s likely starting to decay and should be replaced. Also, inspect for insect damage and fungus growth, which are indicators of decay.
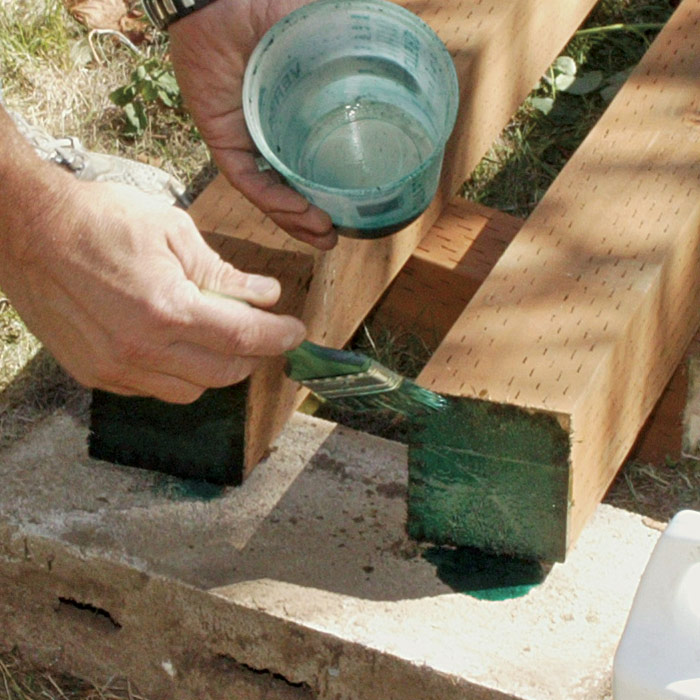
Even pressure-treated lumber isn’t immune from rot. Treatment chemicals rarely penetrate more than 1/2 in. into incised hem-fir lumber, leaving untreated cores. And although southern yellow pine has better treatment penetration, the centers and cut ends still can be susceptible to decay over time. Look for joists, posts, beams, and ledgers with splits and checked ends where water can enter and decay can take hold. Replace deck lumber that appears to have begun decaying, and treat splits and end checks with a copper-naphthenate solution (such as Green Termin-8; www.homaxproducts.com) to stave off future rot.
Photo: Charles Bickford
4. Deck Boards
One of the benefits of synthetic decking is that there are no splinters. Wood grain, on the other hand, can separate and lift when exposed to the elements. Deck sealants can reduce the likelihood that wood grain will lift in the first place, so regular treatments can head off problems. Check wooden deck boards, railings, handrails, and balusters for splinters. You probably can’t halt the splintering process on older decks, but you can carve off splintering spots and sand problem areas to minimize the hazard. When there’s a particularly problematic board, the best solution is to replace it.
Photo: Bob Falk
5. Post Bracing
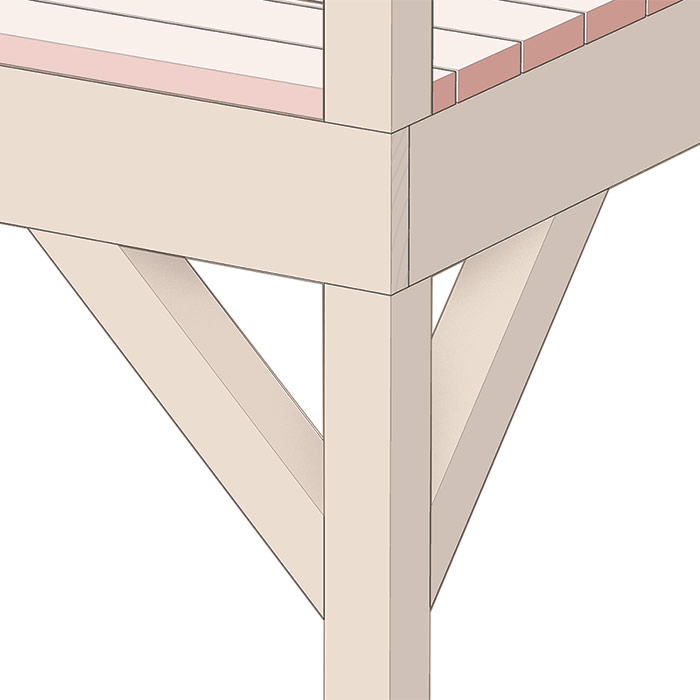
Posts supporting decks 2 ft. or higher off the ground need to be braced laterally. Without bracing, decks can sway as people walk on them, which is not only unsettling but also potentially dangerous. Diagonal braces reaching 2 ft. down the post height and 2 ft. out to the deck frame should be added. Lateral bracing also can be incorporated into the deck frame itself, but before you try this solution, get verification from a structural engineer.
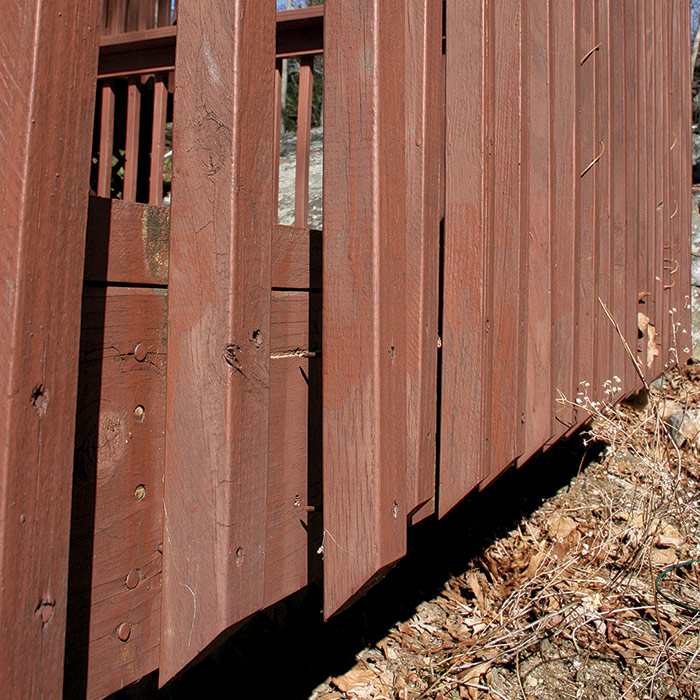
6. Railings and balusters
The railing system on a deck is a big safety concern, especially when the deck is 3 ft. or more off the ground. Guests tend to congregate and lean on railings, and children like to climb on them. Railings, structural posts, and balusters loosen over time, especially those that are nailed rather than screwed or bolted together. Push firmly on each part of the railing system to be sure it’s secure. If your deck has balusters attached on the outside of the railing structure rather than the inside, consider reversing them so that they’re less likely to be pushed off. If railing parts are fastened with nails, secure them with screws.
|
|
|
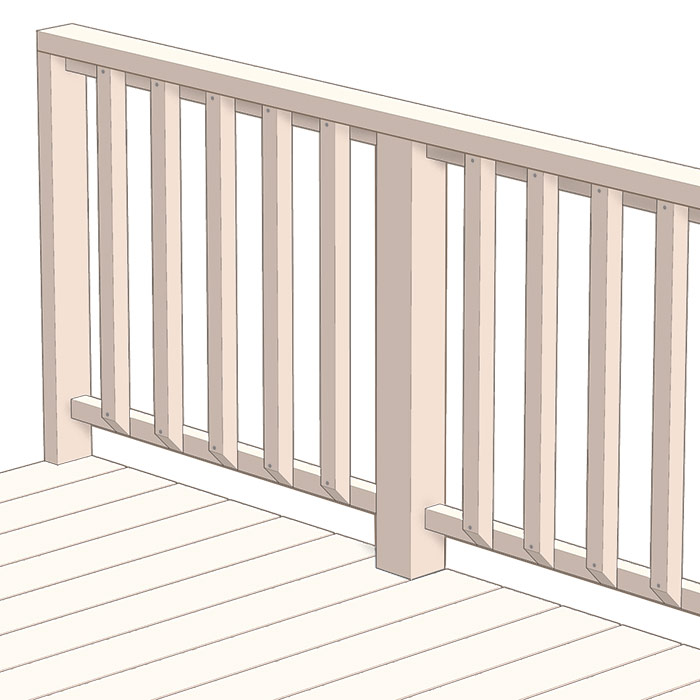
Current building codes call for railings on all decks higher than 30 in. off the ground. The top of the railings must be at least 36 in. above the deck surface and any built-in benches or seating. Built-in benches along the perimeter of a deck can be a hazard for small children who could stand on the benches and topple over the handrail. Under the new code, built-in benches must have 36-in.-high railings measured from bench level when the top of the bench is more than 30 in. off the ground. Regardless of a deck’s height, railings are a good idea to prevent someone from inadvertently stepping off the edge.
The space between balusters should be no greater than 4 in. to prevent small children from crawling through. Older decks often have wide spaces between balusters or horizontal rails. Additional balusters, latticework, or other barriers (glass, polycarbonate, or wire cables, for example) can be used to reduce open spacing.
7. Stairs
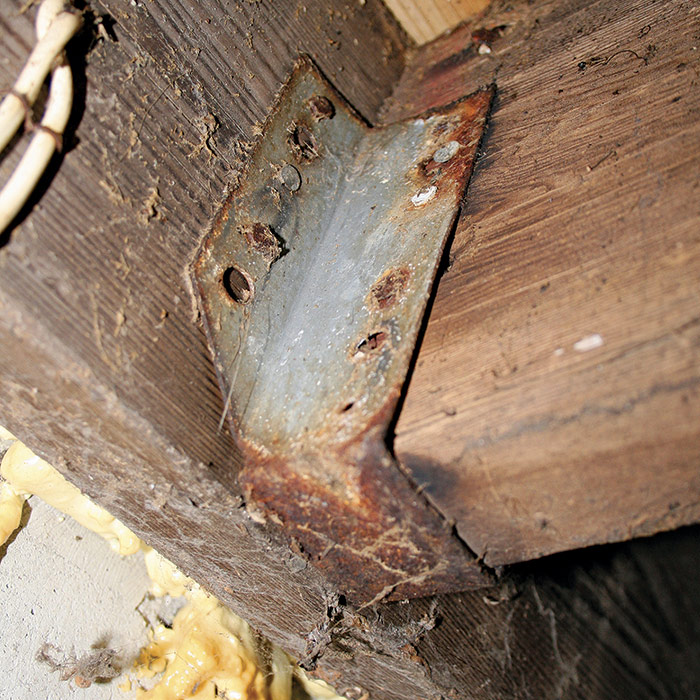
Stairs are another critical component where failures can lead to injuries. Check stair railings to be sure they are attached firmly, and inspect the risers, treads, and stringers to be certain they are attached securely and are not decayed. Look especially closely at the structural connections where the top of the stairs mounts to the deck framing and intermediate landings. Many deck-stair installations rely on nails through the back side of the stringers and may be subject to pulling out; other systems rely on toenails or metal hardware like angle brackets or straps used in a fashion they were not intended for. Stringer-mounting hardware from major manufacturers became available only in 2009. If you are concerned that the stringer-to-deck-frame connection is inadequate, consider installing this new hardware for a secure mount.
Make sure the landing at the bottom of the stairs is level and does not present a trip hazard. Current building codes call for at least 3 ft.
of solid travel surface leading away from the bottom step. Stairs that end on earth rather than a solid landing pose a trip hazard. The earth level can change over time, making the rise to the first step greater or less than the common rise along the stair flight. The bottom of the stair stringers should be secured to the landing with metal hardware.
While you’re inspecting the stairs, be on the lookout for unsafe handrails. Stair railings are often built with framing lumber, which does not offer a good grip. A grippable handrail with terminating ends at top and bottom can be added alongside the stair guardrail with handrail brackets.
8. Footings
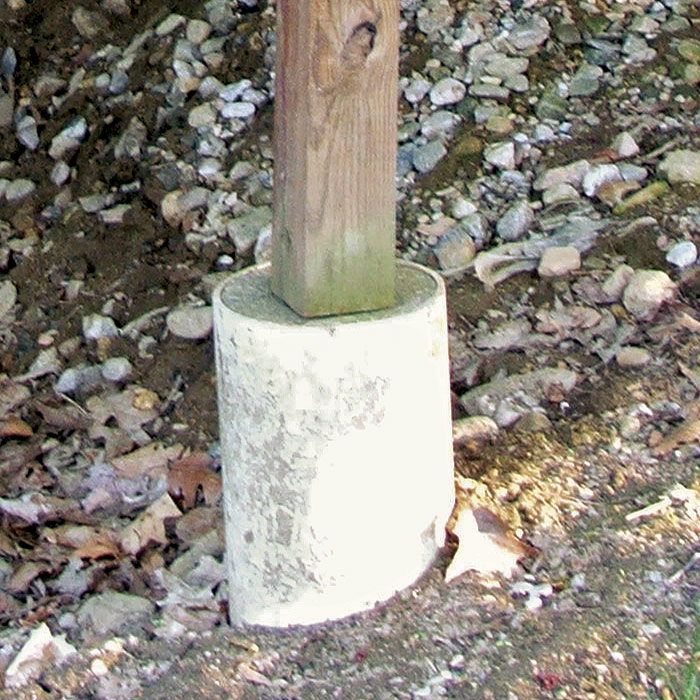
Deck-support posts must be mounted to solid concrete footings. Often, footings are too shallow and/or too small to support a deck, making it unstable. Footings must be a minimum of 12 in. deep in the earth and extend past the local frost line. The footings must be sized to support the load of the deck while also taking into account the bearing capacity of the local soil. Consult your local building department if the footings seem inadequate. Footings can be replaced or added to an existing deck.
Posts embedded in concrete footings or buried in earth are prone to rotting even if they are pressure-treated. Embedded or buried posts can be trimmed at the ground/footing surface and secured to the footing with proper metal post bases. Where footings don’t reach grade, new ones should be installed beneath the posts.
Photo: Brian Pontolilo
EDITOR’S NOTE:
In section 3 Framing Lumber the last sentence gives an example of a copper naphthenate from Homax products. This is no longer available. Wolman Copper Coat, Green Products Copper Green, and Tenino Copper Care are some examples of other copper naphthenate wood coating products.
In section 6 Railings and Balusters there is one building code change and an error to note. The measurement of the guard height is no longer required to be 36 in. above the top of fixed seating or benches when the deck or seating is greater than 30 in. above the ground level. The required guard is measured above the walking surface of the deck and not the seating. Check with your local building department to see which version of the building code they follow.
And the maximum space between balusters on modern decks shall be less than 4 in. The space cannot be 4 in. or greater.
The first sentence in section 8 Footings states: “Deck-support posts must be mounted to solid concrete footings.” Concrete footings are not the only option. There are many types of footings that can be used provided they extend to frost line when the deck is connected to the house and at least a minimum of 12 in. deep.
Photos, except where noted: Debra Silber. Drawings: Dan Thornton.
For more photos, illustrations, and details, click the View PDF button below:
Fine Homebuilding Recommended Products
Fine Homebuilding receives a commission for items purchased through links on this site, including Amazon Associates and other affiliate advertising programs.

Metal Connector Nailer

Jigsaw
4-Gallon Piston Backpack Sprayer
