
Laying Out Wainscot Paneling
Address common problems that arise when planning for paneling and trim to ensure trouble-free installation.
Historically, most paneling in houses was wood. It was available, it was beautiful, and it was more durable than plaster. But solid wood has a pesky attribute: It moves as temperature and humidity change.
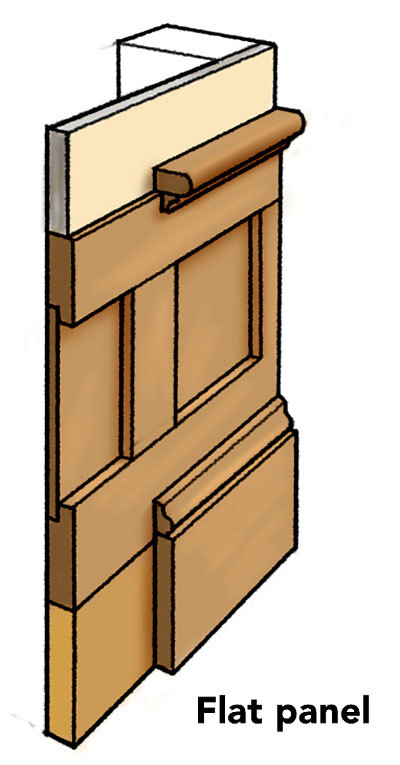
Our clever forebears figured out how to turn this limitation into an advantage. They floated panels in a railand-stile frame. The panels were beveled around the perimeter so that they were thick enough in the center not to warp, but thin enough at the edges to fit into the grooves or rabbets in the rails (horizontal pieces) and stiles (vertical pieces). Known as a raised panel, this design not only allows for wood’s natural movement but also creates attractive profiles and shadowlines. Around the turn of the 20th century, the advent of sheet goods meant that a thinner, flat, dimensionally stable panel could be used. In flat-panel construction, the rails and stiles are still grooved or rabbeted, but seasonal movement isn’t a concern. Composite paneling is a flat-panel system embellished with molding, or sticking, applied where the panel meets the rails and stiles.
History can help to guide your choice between raised and flat panel styles. Rooms that strive to achieve a colonial, French provincial, Victorian, or other period character predating the late-19th century are appropriately clothed in raised or composite paneling. Rooms that take their cues from the simpler styles of the mid-19th century on, including the Shaker, Craftsman, deco, and modern eras, will feel most at home with flat panels.
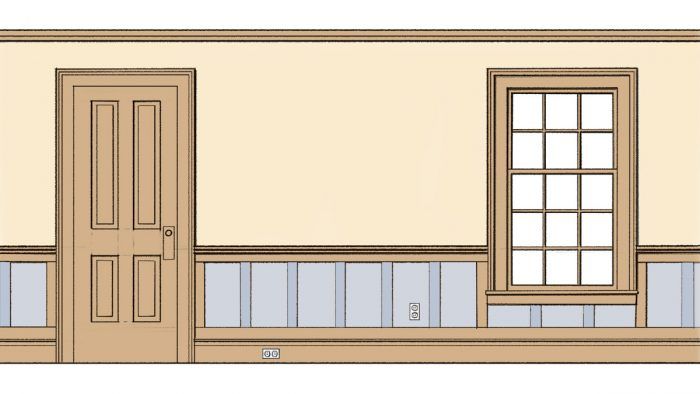
Wainscot paneling covers the wall to the height of a chair rail, typically 30 in. to 42 in. above the floor. It is a popular height for kitchens, breakfast areas, and dining rooms, where the paneling serves a protective as well as a decorative role. Taller paneling is appropriate in more-lavish or more-intimate rooms.
The following drawings demonstrate how I handle some of the common issues that arise when laying out paneling in a room.
Anatomy of a Panel
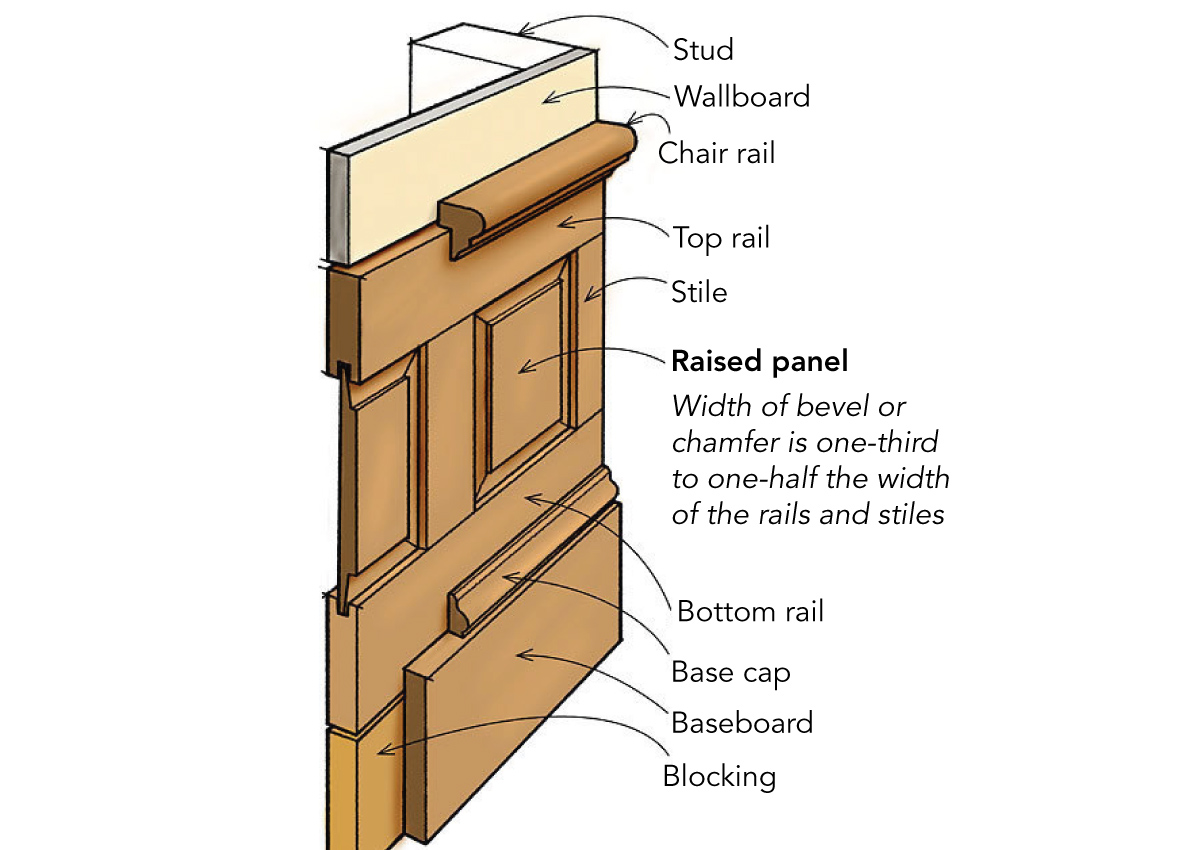
Raised panels are the most traditional and formal style of paneling. Their elegant form derives from the practical need to prevent unsightly gaps from appearing as solid-wood parts expand and contract.
Raised panels are the most expensive to make and install. They require material that can be beveled, such as solid wood or medium-density fiberboard (MDF). Panels must be measured, cut, and beveled to close tolerances.
Dimensionally stable flat panels are less expensive to fabricate and install than raised panels.
Composite paneling relies on sticking for its profile. Consequently, it can be easily field-adjusted like a flat panel, yet provide the visual interest of a raised panel.
 |
 |
Three steps to a perfect layout
Start with a scale drawing of each wall in the room, showing all doors, windows, electrical outlets and switches, air vents, radiators, and other features. The baseboard and door and window casings should also be shown on the drawing. The baseboard is usually the widest trim, followed by door and window casings.
The first step to laying out the paneling is to set the chair rail of the wainscot at the desired height. Wainscoting is typically between 30 in. and 42 in. tall. I like to locate the chair rail one-third to two-fifths of the way up the wall. I use a molding 11/2 in. to 21/2 in. wide.
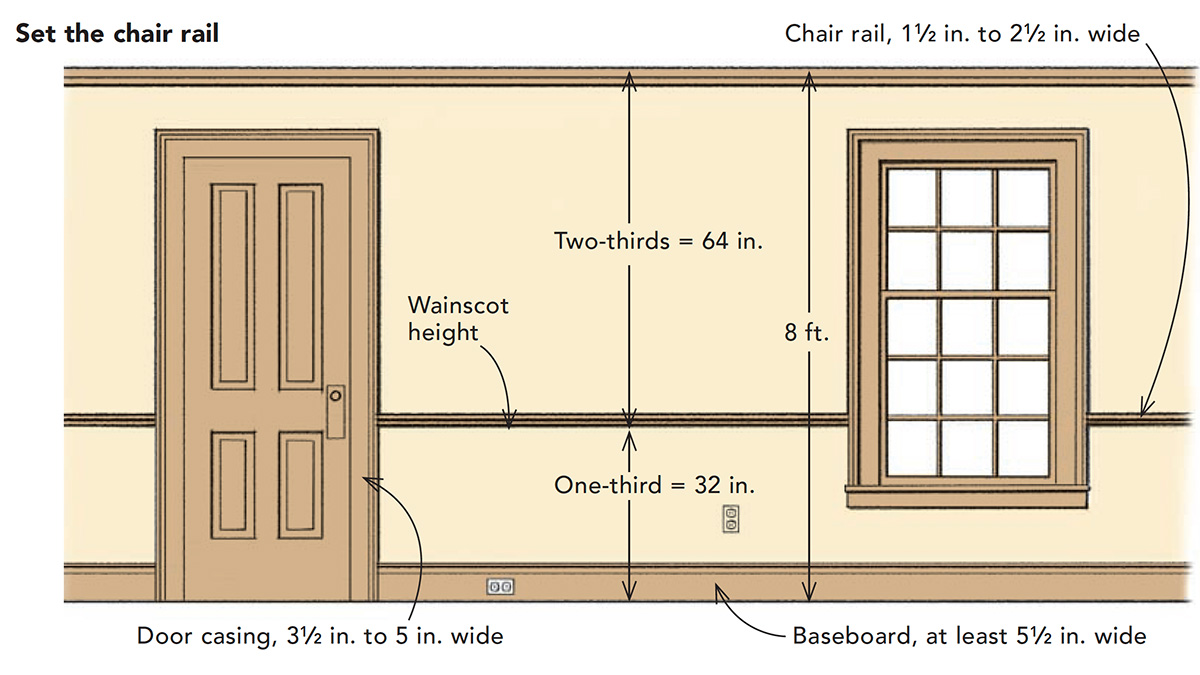
The second step is to draw the rails and end stiles. Once I’ve determined the height of the chair rail, I draw the rails. The proportions of the rails and stiles should relate to the other trim in the room. The rails should be between one-third and two-thirds the width of the baseboard. I usually make my rails and stiles between 2 in. and 31/2 in. wide and keep the stiles the same width as the rails. Draw an end stile next to the side casings of each window and each door.
The final step is to add the intermediate stiles that create the frames for the panels (the blue-gray shaded stiles in the bottom drawing). Paneling will be most pleasing if you establish a regular module that repeats as it wraps around the room. Sometimes this is easier to accomplish with wide, horizontal panels. Other times, narrow vertical panels look best. Here’s where the artistry of trial and error comes in.
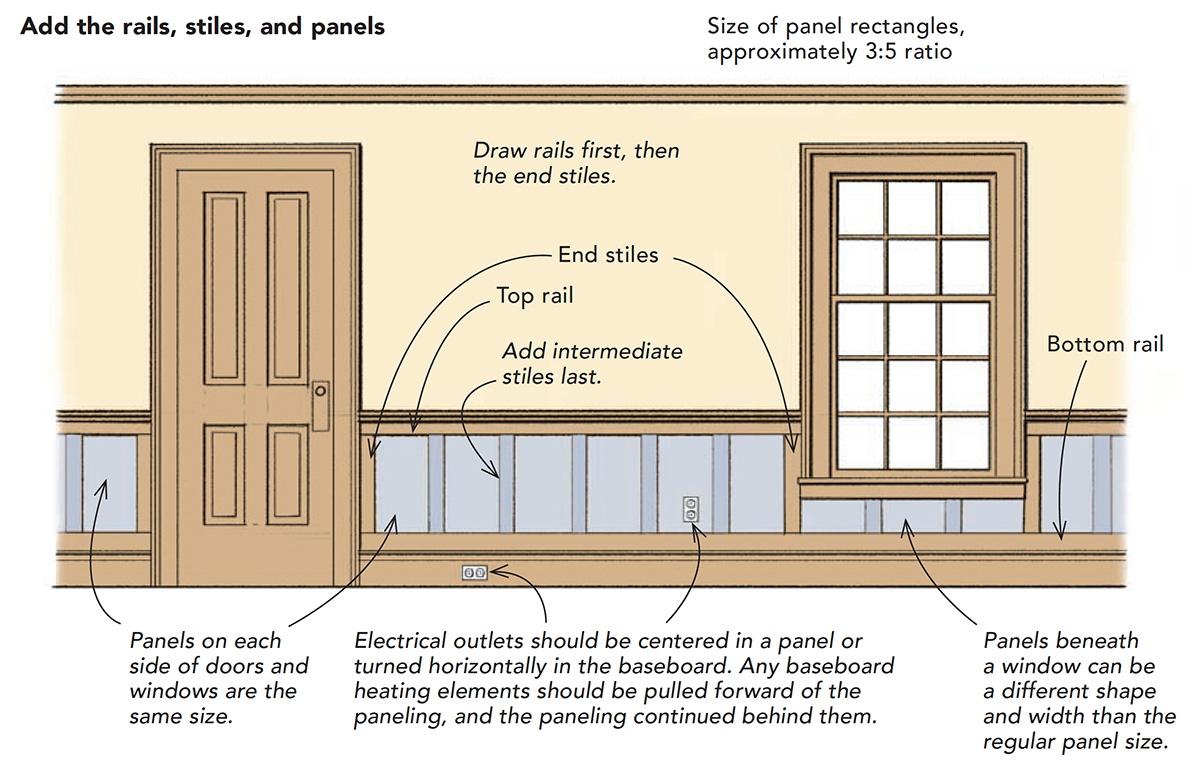
In sizing panels, I often aim to create rectangles with a 3:5 ratio. It’s smart to begin in the center of the wall or in the center between two windows or doors, and to work toward the corners. The space left over at the end of the section probably won’t be a typical panel width. (The end panel can differ from the standard module.) Once you have a panel module, take that width to the other walls and chase it around the room. You might find that you need to adjust panel widths as you lay out the room. It could take a few trials before you find the standard panel width that creates the most-pleasing corner panels, but remember that it is better to work through these issues on paper than in wood.
Whether you place stiles in the corners depends on the circumstances of each room, but be consistent. Either each inside corner should have two stiles (larger end panels), or none of the corners should have any (smaller end panels). Generally, it is best to use stiles on each side of all outside corners.
The horizontal panels below the windows will be their own unique width, although you might wish to subdivide them.
Casing should be thicker than paneling
As you plan a room, consider how the paneling meets the door and window casing. If the outside edge of the casing stands proud of the paneling’s top cap (or chair rail), base cap, and baseboard, then life is easy. You can butt the paneling against the trim. If not, then you need to deal with the different material thicknesses.
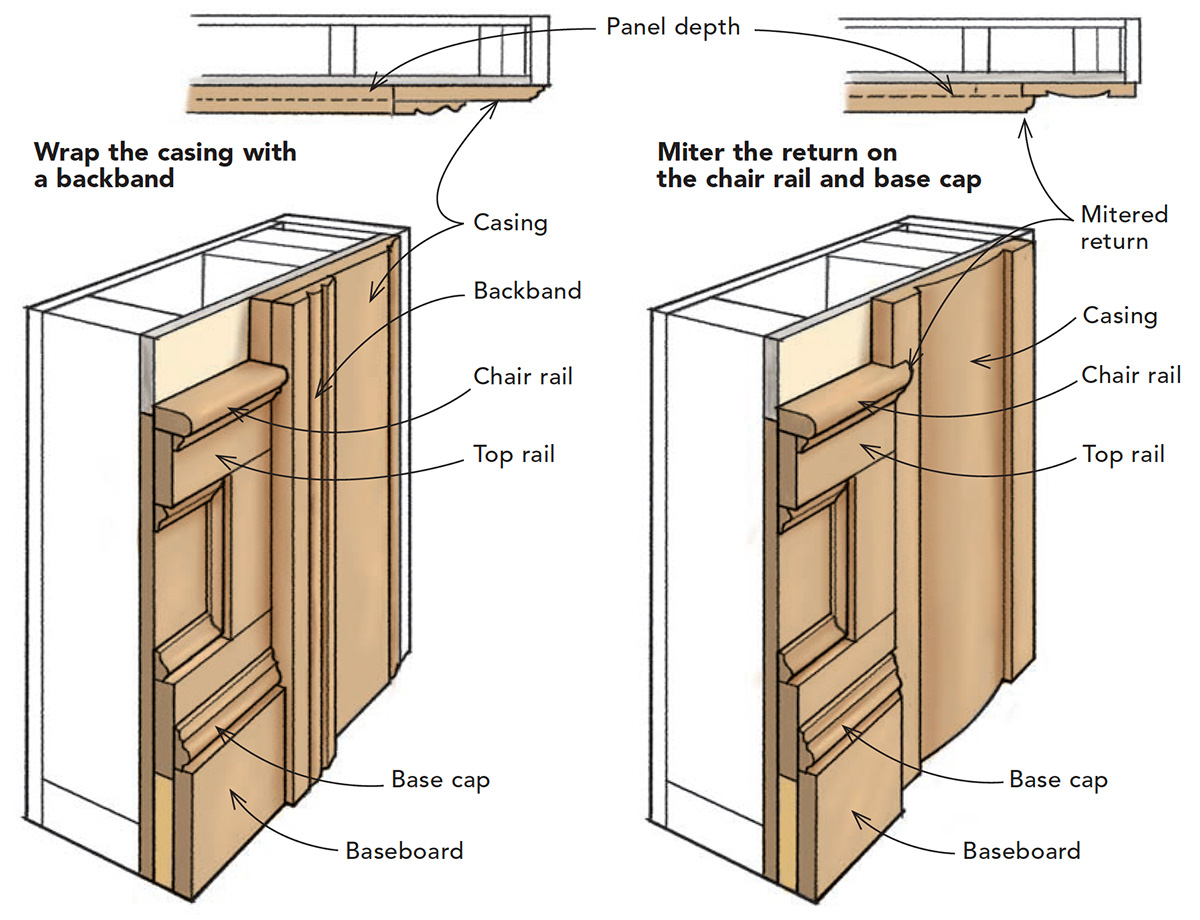
Although a mitered return on the top cap, base cap, and baseboard is a frequently used solution (drawing above right), I think it is cleaner and easier to use casings thick enough to avoid a mitered return. One solution is to wrap the casings with a thicker backband (drawing above left). If the casing has a flat profile, you might be able to use the top-cap profile as the backband.
Use taller paneling in formal or intimate rooms
Because there is little practical reason to protect the upper wall, taller paneling is more lavish than wainscot; the extra height is primarily decorative. This more-regal height is an appropriate choice for living rooms, libraries, and some dining rooms. Paneling that rises to shoulder height or above provides a feeling of enclosure, protection, and intimacy, making it comforting for bedrooms. It’s also good in rooms with high or cathedral ceilings where wainscot height would seem out of scale.
Taller-than-wainscot paneling that doesn’t go all the way to the ceiling has two standard heights. Plate-rail height is about shoulder level and is worth considering if you have plates or something similar in size you wish to display at eye level. But this height can be restricting because hanging artwork above or below the rail puts these items at an awkward viewing level.
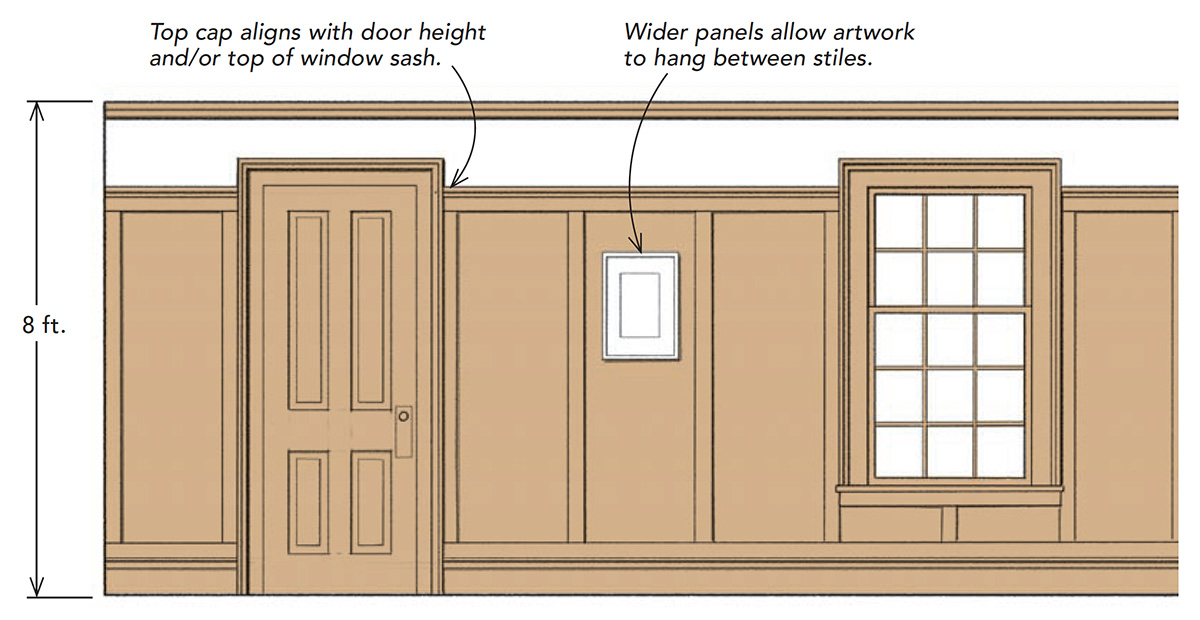
Picture-rail-height paneling is a moreflexible option. I typically set the top cap at the height of the door and/or the top of the window sash. The casings around the doors and windows will be higher than the paneling cap. I prefer this design as it acknowledges that windows and doors are important enough to interrupt the paneling.
Wider spacing of the stiles with taller paneling makes it possible to hang artwork at a comfortable viewing height within the panels. The wider the spacing, the wider the art you can accommodate without straddling a stile. An odd number of panels between doors and windows will let you center artwork in a panel and between the doors and windows. With wide spacing between the stiles, it often looks best to use two stiles in each corner of the room.
Drawings by: Chuck Lockhart
