
Lead-Safe Remodeling
If the house you're working on was built before 1978, follow these abatement guidelines to minimize the health risks caused by sanding or scraping lead paint.
In 2010, the Environmental Protection Agency (EPA) issued the Renovation, Repair, and Painting (RRP) ruling, which required professional contractors working on houses built before 1978 to take extensive precautions to protect their crews and homeowners from the potential presence of lead dust. Although the EPA exempts homeowners working on their own homes, lead poisoning doesn’t exempt anyone. So it’s something everyone should take seriously.
| When to Call in a Lead-Abatement Specialist The EPA’s 2010 RRP Rule is complex, and this brief discussion is no substitute for knowing the law. You can read it here.Broadly stated, the rules are designed to make people aware of the hazards of lead, require renovation firms to be certified in lead-safe work practices, present ways to limit potential contamination, and, in effect, direct those doing the abatement to capture lead-contaminated materials, treat them as toxic wastes, and dispose of them safely.The law is quite specific about how waste is to be captured—requiring, for example, that exterior trim painted with lead paint be individually wrapped in sheet plastic before being carted off site. Containing the limited amount of debris generated by, say, a kitchen remodel is probably within the capabilities of most contractors or well-prepared homeowners. But if the renovation project involves a sizable modification of an exterior that has tested positive for lead—hire lead-abatement specialists. Complying with particulars of the RRP Rule will be their headache, not yours.In theory, containing lead-painted debris is straightforward, but in practice, it is a nightmare. Most job sites are already a chaotic stream of delivery trucks, subs, inspectors, and crew coming and going. Add to the mix nervous neighbors—thanks to extensive notifications of lead abatement in progress, posted throughout the neighborhood. If your region is windy, containment may also involve erecting scaffolding and a plastic envelope around the house. It can be a huge undertaking. |
Understanding Lead Paint
Lead-based paint adheres to almost any surface and weathers well, so it’s not surprising that it can be found in 90% of houses built before 1940. However, as lead’s health hazards became known in the 1950s, paint manufacturers began to phase it out. It was banned altogether in 1978 by the U.S. government.
Because lead is a neurological toxin, it is particularly damaging to children ages six years and younger, who seem drawn to it because it’s slightly sweet. Breathing or eating it can cause mental retardation in children. In people of all ages, lead can also cause headaches, anemia, lethargy, kidney damage, high blood pressure, and other ailments.
Because of its durability, lead paint was commonly used on exteriors, glossy kitchen and bathroom walls, in closets (which rarely get repainted), and as an enamel on interior doors, windows, stair treads, and woodwork. So each time a swollen window or sticking door was forced open, it ground lead paint into flakes and dust. Roof leaks, drainage problems, and inadequate ventilation added to the problem because excessive moisture causes the paint to degrade and detach sooner.
If you have an older home, the presence of lead may not be a dire problem if your home is well maintained and old paint is well adhered. However, lead becomes most dangerous when it becomes airborne, especially during sanding or heat stripping, for then it can be inhaled and easily absorbed into the bloodstream. Therefore, if you are considering renovating your old house, be methodical. Postpone any demolition or paint removal until you test to see if lead paint is present. If it is, develop a plan for dealing with it.
| PRO TIP: If painted surfaces are intact and you don’t have small children, either leave the lead paint alone or paint over it to seal it in place. You might also cover walls with 1/4-in. drywall. |
Step One: Test for Lead
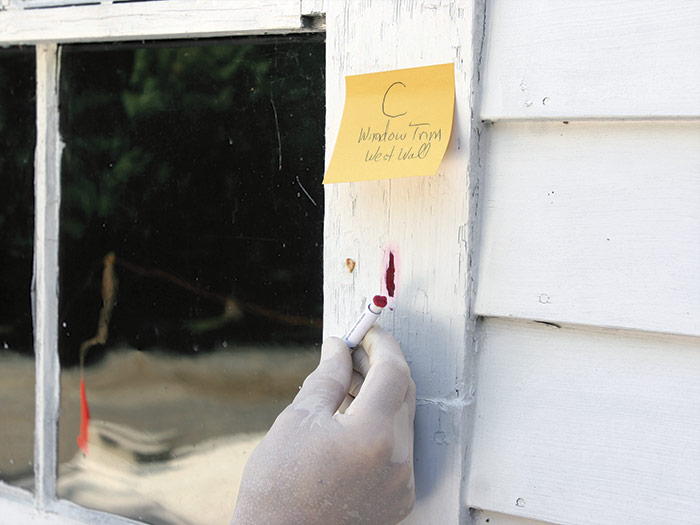
If you suspect the house has lead paint, test it to be sure. There are a number of test kits available at home centers, but at this writing only one satisfies EPA criteria for false positives and false negatives: LeadCheck.
Testing is pretty straightforward. Using a utility knife, cut away a small amount of surface paint to get at earlier layers underneath. Rub the test swab on the exposed area: the brighter the swabbed area, the greater the concentration of lead. Test several areas, such as door and window trim and siding. A LeadCheck kit containing 2 swabs costs less than $12.
If sample areas test negative, it’s probably safe to work on the house, although you should of course still wear appropriate respirators and minimize exposure to paint dust. If renovation is extensive, however, you’d be well served to order a lead-testing kit from an accredited testing lab, take additional samples, and have the lab validate the results you got from the inexpensive kit. Note: Some states consider home lead tests to be inconclusive. Instead, they require in situ lead-testing with an XRF gun (handheld XRF spectrometer).
Step Two: Cover Up
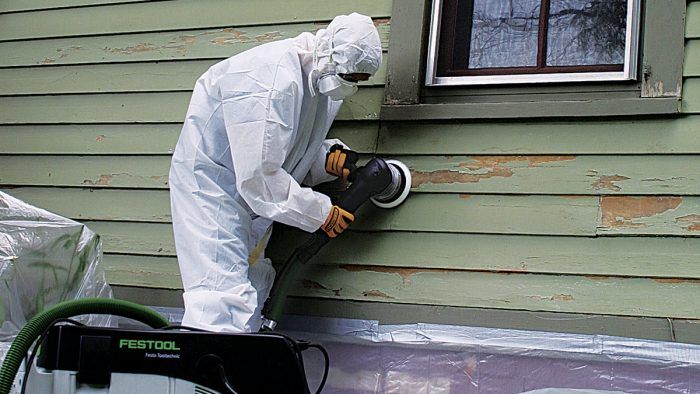
Wear a respirator with N100 or P100 HEPA filters and snug-fitting goggles; a full-face respirator is not a bad idea but may be too hot to work in. Disposable coveralls, booties, and gloves are also a must; tape shut neck, wrist, and ankle openings. At the end of day, shed contaminated work clothes at the job site: Wearing them home can endanger your family. Note: You can find disposable respirators for about $10, but a reusable respirator with replaceable filter cartridges is a better buy if the job extends beyond a few days.
| Safety alert: Whenever you take a break, stop for lunch, or quit for the day, wash your hands well. Otherwise, you can easily ingest lead dust. At the very least, change out of your work clothes and take a sponge bath at the site before changing into clean clothes. This is definitely one time when you don’t want to take work home with you. |
Step Three: Contain the Mess
Interior containment. Tape shut all HVAC registers and turn off the furnace/AC so it won’t start while you’re working in the room. To contain lead-paint dust and debris inside, use 6-mil sheet plastic and painter’s tape to isolate and contain the mess. Tape plastic across door openings to seal off work areas from living spaces, and cover walls inside the work area with plastic as well so they can be wiped down and vacuumed when you’re done. Protect floors with rosin paper or heavy cardboard, and cover that with sheet plastic taped to baseboards to keep it in place. When cleanup is complete, you will roll up and discard the plastic.
| PRO TIP: A HEPA filter on a cheap, leaky vacuum is a fool’s bargain: It will recirculate lead-contaminated air in the house. Quality HEPA vacs (Bosch, Fein, Festool, Metabo, Hilti, etc.) run $500 and up. |
|
|
|

Exterior containment. It’s impossible to predict the movement of air or neighbors, so containing the mess of an exterior renovation is complicated. Start by taping sheet plastic over doors and windows to keep dust out of the house. Next, use 6-mil black plastic to cover the ground to a radius of 10 ft. from any lead-bearing surfaces that will be disturbed. To keep dust, paint chips, and debris inside this 10-ft. containment area, construct a box around it—rather like the sides of a sandbox—using lumber set on edge. Staple the plastic to the box. Lastly, create a cordon of rope or plastic warning tape in a 20-ft. radius from lead-bearing surfaces to keep people out of the work area. If strong winds are an issue, a plastic envelope supported by scaffolding may be required, as noted in the sidebar “When to Call in a Lead-Abatement Specialist” above.
Step Four: Minimize Dust
An essential part of confining lead contamination is minimizing dust. Consequently, any sanding, grinding, or scraping tools must be attached to a HEPA-filtered vacuum system. Noxious fumes are equally taboo, so avoid using heat guns, which generate temperatures exceeding 1,100°F. Setting dry, old wood ablaze is another hazard to avoid. So if strip you must, chemical strippers are safer, especially environmentally friendly paint strippers.
Before scraping, stripping, or removing any lead-painted materials, mist the surfaces to suppress dust. During cleanup phases, mist plastic wall and floor coverings too to keep down dust.
A gardener’s pump sprayer is a good tool for this operation.
Step Five: Deconstruct, Don’t Demolish
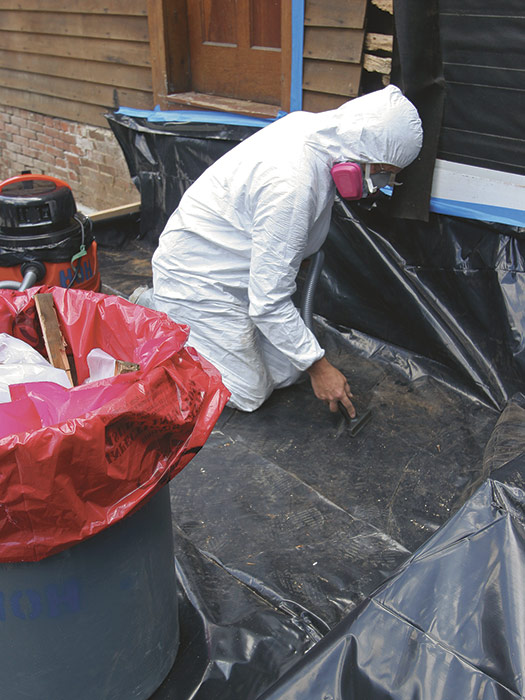
Carefully dismantling materials will release less dust than demolishing them. Scoring along the edges of painted trim, siding, and other building materials will reduce debris when removing them. When you pry such materials, do so gradually along their length to minimize breakage. If it’s necessary to cut tainted materials to a more manageable size, use a power saw attached to a HEPA-filtered vacuum system. Remember, every piece of contaminated building material must be bagged in extrastrength plastic disposal bags—or wrapped in plastic and vacuumed—before removing it from the containment area.
Step Six: Clean Thoroughly
Outside. After bagging or wrapping everything sizable, use a HEPA-filtered vacuum to capture dust and small debris. Mist the plastic to keep dust down, detach the plastic anywhere you stapled or nailed it to the house exterior or the containment frame, then fold the plastic in on itself to capture any remaining residue and bag the plastic. While still in the containment area, vacuum your coveralls and booties, then remove and discard them.
Inside. Once you’ve bagged, wrapped, or removed any interior debris, wipe down the plastic covering the walls. (Wet- and dry-cleaning cloths can be purchased at most home centers.) Then wipe plastic floor tarps. Roll each plastic sheet in on itself to trap remaining debris, then bag it. Vacuum coveralls and booties and discard them. Finish up by wiping down all surfaces with a wet-cleaning cloth; each cloth is good for cleaning about 40 sq. ft.
RELATED LINKS:

View Comments
You can safely strip lead-based paint with infrared (IR) heat Speedheaters™. The IR rays need to heat the paint to only 400-600 F to release the paint from the wood, so no toxic lead fumes are generated. Heated, scraped, soft paint waste makes little dust and is easier to contain that liquid chemical waste or flying dust. See eco-strip.com.
Read: https://www.finehomebuilding.com/project-guides/painting/283-infrared-paint-remover