
Multipurpose Kitchen Islands
Learn how to design a workhorse of an island that offers comfortable seating for family and friends.
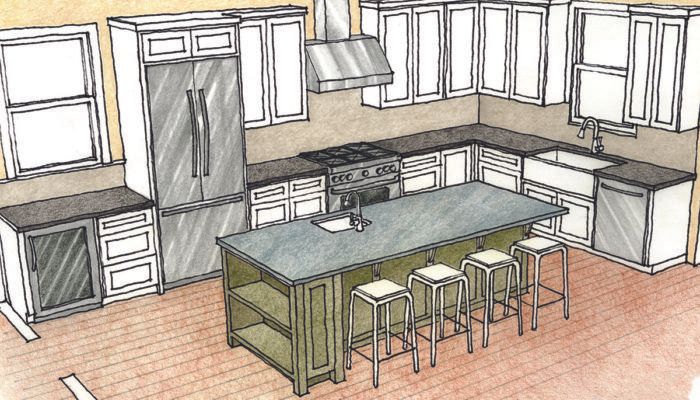
Whether they are planning a kitchen for a new home or remodeling their existing kitchen, most of my clients ask for an island as soon as we start to talk about their project. And most of them describe a workhorse that is handy, functional, durable, and beautiful. They want an island that can support food prep, cooking, cleanup, casual meals, and socializing, as well as doing homework and making crafts. In my experience, however, the first item on a client’s island wish list is seating. Here are some tips for designing a multipurpose kitchen island that offers comfortable seating for family and friends.
Start with the seating
Everyone wants a place for the kids to eat breakfast and for friends to sip wine and nibble on appetizers. Island seating can usurp the kitchen table and save valuable floor space. In this way, incorporating seating is one of the first drivers of the design. If regular chairs are to be used, then part of the island will need to drop down to table height: 29 in. to 30 in. Most folks prefer stools, though. There are stools that fit comfortably under a standard 36-in. countertop, and there are taller stools designed for counters elevated 6 in. to 8 in. above the rest of the island. I prefer the 36-in. countertop. It maximizes the utility of the work surface, and the shorter stools are easy to use for young and old alike. There are reasons for an island to have more than one level — hiding a messy counter, for example — but in most cases, a simple single-level counter is all that’s needed.
I aim to use the island as a traffic cop. Placed well, it keeps those hanging out in the kitchen from getting in the cook’s way. Accordingly, I place seating on the nonkitchen side, closest to the adjacent living or dining room. Sometimes stools are needed on the ends, too, for extra guests or as a place to prepare food while sitting down. What happens on the working side of the island is dictated primarily by the rest of the kitchen layout. If the sink is by a window, then I consider placing the cooktop and/or the oven in the island. Smaller kitchens with limited wall space are good candidates for this. Cooking at the island frees up more upper-cabinet storage on perimeter walls. Meanwhile, the chef gets a commanding view of the family room and guests.
I’ve designed a few kitchens with the main sink and the dishwasher located in the island. I think the scarcity of this setup is because folks don’t want dirty dishes, pots, and pans in plain view; they don’t want raised bar tops to hide the clutter; and they prefer upper cabinets nearby when unloading the dishwasher. However, a secondary sink in the island can add another level of convenience to the kitchen.
Get the size right
I’ve seen lots of islands tiny enough for me to question their utility. They were plopped into the middle of small kitchens, their owners desperate for more counter space. A common result of this is that the island blocks the normal traffic flow between the sink, the refrigerator, and the cooktop. On the other hand, I’ve seen islands that were so large that I couldn’t reach the middle of them. I try to find the sweet spot for island size. Perhaps more important than size, however, is the amount of space around the island; therefore, I plan aisle widths before island size. Whenever possible, I give 42 in. to 48 in. to an aisle where an oven door or dishwasher door opens into it. This provides room for a person to maneuver past the door when it’s down (a typical dishwasher door can block 26 in. of the aisle). When no door is open, a 48-in.-wide clearance allows two people to walk past each other comfortably. Obviously, there are times when aisles cannot be quite so wide. In such cases, 36 in. should be the minimum clearance, with careful placement of appliances to minimize bottlenecks.
Remember that extra room is needed at the oven door. Removing hot dishes from the oven is difficult and dangerous when a narrow aisle forces you to stand to the side.
Aisles by refrigerators need plenty of space, too; in a busy household, the refrigerator sees a lot of traffic. Consider a 36-in.- wide aisle the minimum; you may want to hold to this size if the island is the nearest countertop to the fridge. Otherwise, use 42 in. to 48 in., especially when your family’s main path in and out of the kitchen is via the fridge aisle.
I think any width over 60 in. is excessive for an aisle and an indication that perhaps the kitchen is oversize to start with. I can imagine when such generosity might be warranted — next to a wide exterior door, for example — but day to day, do you really want to turn around from the sink and take four steps or more to get to the island?
The island’s length usually is set by the number of stools that are desired. Allowing 24 in. per stool, an island for four ends up being at least 8 ft. long. When room is limited, moving one stool to an end allows you to shorten the length. If you have less than 6 ft. for the length, though, consider a more square shape with stools on three sides. The recessed area for stools needs to be deep enough to keep shoes from scuffing the cabinetry. I use 18 in. as a minimum, but I prefer 24 in. (Be sure to provide structural support for overhanging countertops.) Couple this dimension with a standard cabinet depth on the working side, and the narrow island dimension ends up being in the 48-in. range. For bigger kitchens, this dimension might approach 60 in., which is the width limit of many countertop slab materials.
Add some style
Regardless of size, islands are an opportunity to add some style to a kitchen. You can use an island to bring contrast to the kitchen’s aesthetic, perhaps with a paint color on the cabinets or a counter material that differs from what is used in the rest of the kitchen. A butcher-block countertop looks great as a departure from swaths of shiny stone used to top the main cabinets.
The same goes for concrete and soapstone; their matte finishes and natural hues make them irresistibly touchable. Island ends can feature display shelves, furniturelike legs, or a countertop waterfall to enhance the kitchen’s style. Lighting above the island is necessary and represents another opportunity to dress up the kitchen. My clients routinely want pendant lights hanging over their islands, not recessed lights. Whether contemporary, traditional or in between, these lights provide a spot of visual punch.
Paul DeGroot is an architect in Austin, Texas (degrootarchitect.com), and a regular contributor to Fine Homebuilding. Drawings by the author.
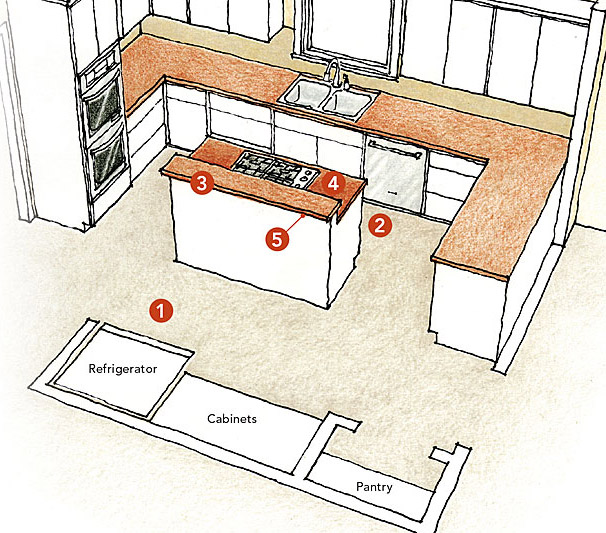
AVOID THE SQUEEZE — The most common mistakes happen when the kitchen is too small to fit a useful island. The aisles around the island become cramped, and the island itself offers minimal function. Avoid these five common blunders, and you’re on your way to designing a smarter island.
1. The island isolates the sink and the cooktop from the refrigerator.
2. The aisles are too narrow. Two people cannot pass in the aisles, and appliance doors completely stop traffic.
3. The raised counter is too narrow to be useful for eating or for other activities such as doing homework.
4. There is too little counter space on either side of the cooktop.
5. The overhang is inadequate for seating.
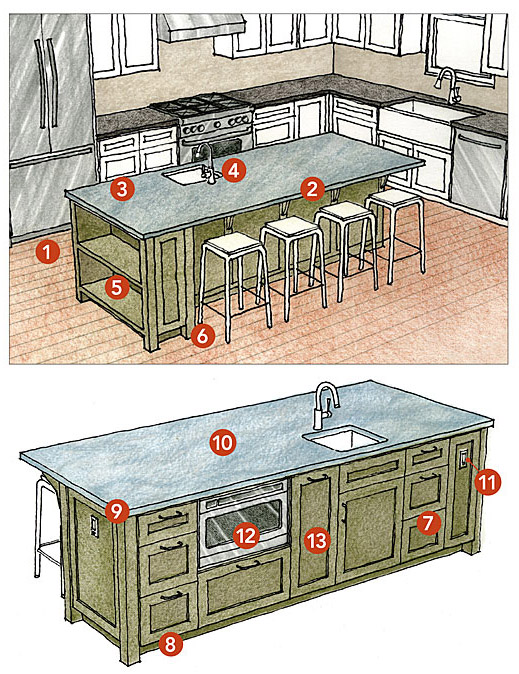
WITH SPACE COMES FUNCTION — A kitchen is ideally suited for a multipurpose island when all of the cooking and cleaning zones, as well as the appliances, can be located on the inside. The outside then becomes a comfortable place for meals, socializing, and more. Here’s why this island works.
Outside:
1. The aisle widths are ample, especially near appliances.
2. The length and the overhang are sufficient for comfortable seating.
3. Extra counter space is available for loading and unloading the refrigerator.
4. A secondary prep sink offers a greater level of function to the kitchen.
5. End shelves display items and cookbooks. 6 Furniturelike legs add style.
Inside:
7. Drawers make items easier to find.
8. A recessed toe kick on all sides makes it comfortable to stand at the island and hides scuffs.
9. The paint color and counter material add contrast and style.
10. The large, one-level work surface is more useful for multiple tasks than a multilevel island.
11. Electrical outlets at each end are a code requirement.
12. A drawer-style microwave below the counter is safe for people of all ages to use.
13. Pull-out trash and recycle bins, or vertical dividers for sheet pans or cutting boards, are another smart use of below-counter cabinets.

View Comments
Not much help without minimum or desirable dimensions.
Sorry. Disregard comment. I should have read the entire article.
hi
in our house the kitchen and living room is 1 big room . if i push the island out too far from the kitchen it will crowd th living room area where we have a couch. how much space is recommended between the living room couch and the island and the couch to the end of the house. thanks
The 2023 NEC made a big change in island recepticle requirements. Receptacle outlets for islands and peninsulas are no longer able to be installed below the countertop and work surface level. A cord draping over the edge of a counter is considered a hazzard.
The code allows for the following three options for where island and peninsula receptacle outlets can be installed (paraphrased):
1) On or above countertop or work surfaces, but no more than 20 inches above.
2) In a countertop using a receptacle outlet assembly listed for use in countertops.
3) In a work surface using a receptacle outlet assembly listed for use in work surfaces or listed for use in countertops.