
Plumb Perfect Prehung Doors
Believe it or not, you need the level only once, and that’s before you ever touch the door.
Synopsis: Hanging doors can be a tough, tricky process, but veteran Arkansas builder Gary Striegler has developed a straightforward technique that requires the use of a level only once. Striegler begins by marking the rough openings and making sure they are big enough for the door; he also writes the size and swing of each door on the trimmer stud of its corresponding rough opening. As doors are delivered, he checks each one for damage, then stores them in a climate-controlled area. If possible, Striegler installs doors before finished flooring has been put in place. He finishes the job by tipping the door into place, attaching and plumbing the hinge side, then using shims and nails to get the door located perfectly in its rough opening.
Several years ago, I walked onto a job site to find one proud employee. On his own initiative, he’d hung all the doors in the house alone — in less than three hours. Initially, I was impressed, but the 20 years that I’d been building houses tempered my excitement with skepticism. A little voice in my head said that I would regret not having given him a to-do list before I left — one so easy and so short that when I got back, I might find him in the pasture behind the house, practicing his Frisbee throw with a dry cow patty.
The first door I checked was sufficiently nailed, opened freely, and didn’t swing on its own when I let it free from my hands. But the rest of the doors had plenty of problems. Besides the fact that my proud employee didn’t once use a level, he also failed to put shims in all the key places. What got me most, though, was that more than a few of the doors were swinging the wrong way. I’m all for getting things done fast, but accuracy is key when it comes to hanging doors. To minimize such mistakes in the future, I developed a door-hanging process that I could easily teach to my crew. It starts with making sure the right door ends up in the right opening.
Mark The Rough Openings
Ordering doors doesn’t take much effort on my part because my salesman does it. But it does warrant a couple of hours of my time and attention to ensure that the doors show up without incident. That’s why my salesman and I walk through the house room by room with the floor plans in hand before the electrician starts his rough-in. I like to get door orders out of the way before the drywall is installed to allow enough lead time for the order. At this stage, the walk-through is a good opportunity for me to catch any errors in rough-opening sizes or locations that my framers might have made. It also lets me visualize potential errors in door swing on the plans and to correct them as needed.
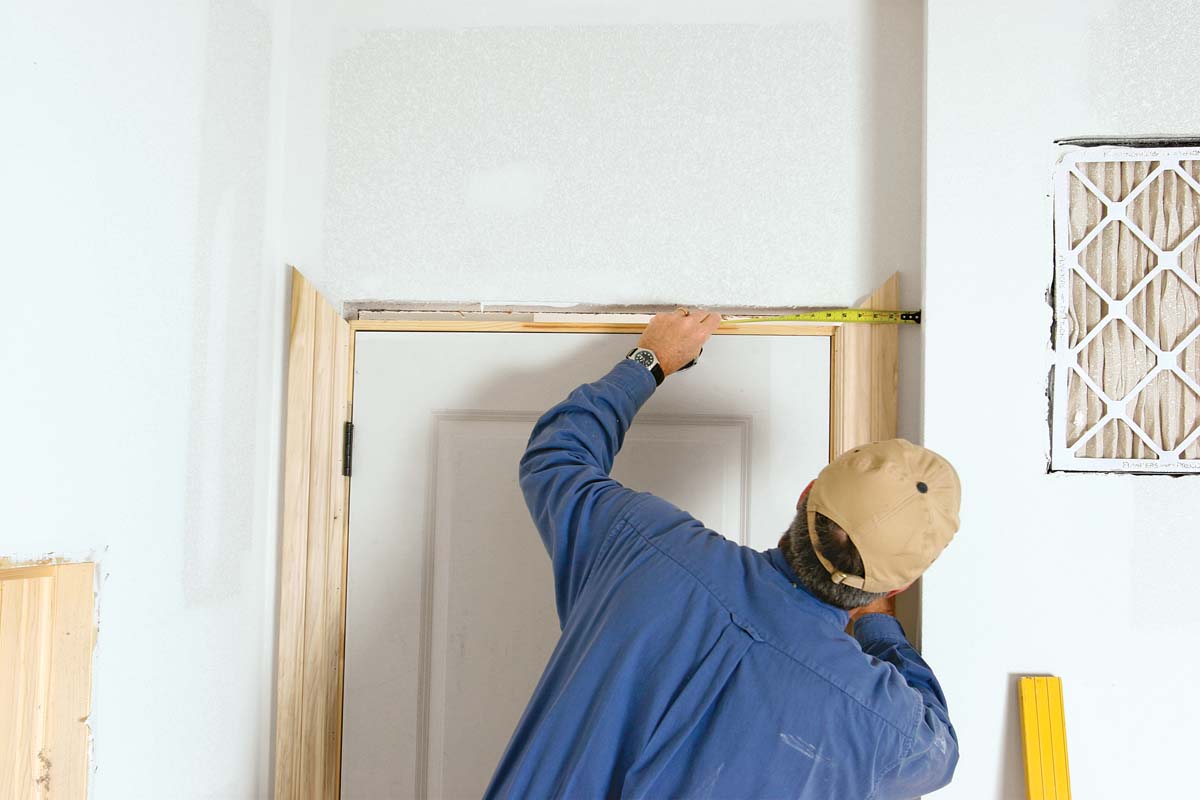
During this walk-through, I measure the rough openings to make sure they’re 2 in. wider than the door size; this leaves 3⁄4 in. for each jamb leg and 1⁄4 in. of shim space on each side of the door. The door sizes usually already account for a 1⁄8-in. reveal around the door (for example, a 36-in. door will measure closer to 35 3⁄4 in.).
I write the size and swing of each door in permanent marker on the trimmer stud of its corresponding rough opening. This becomes the final size. I mark the plans if the size or swing has changed, and I make sure that my salesman makes the final list so that if a door shows up that doesn’t match what’s written on the trimmer, it’s his problem to fix, not mine.
Marking the door swing on the trimmer stud also informs subcontractors who need to make decisions based on this information. Electricians need to know the door swing to locate light switches. HVAC contractors position return-air vents and feed registers according to door swing as well.
Finally, my hardwood-flooring contractor needs this information for certain rooms if he shows up before we hang the doors. Flooring transitions between wood and tile, for example, should happen under a closed door. If he knows the swing, then he can make the transition in the right place even if the door isn’t installed yet. This process isn’t ideal, though. I do my best to get the doors in before any flooring is in place. Then I can set the jamb legs directly on the subfloor and let the flooring contractor work around them as he goes.
Have A Place To Store The Doors
There’s nothing worse than not having a place to store all the interior doors for a house when they are delivered to a job site. That many doors—often 30 or so for the houses I build—take up a lot of space. So before the truck shows up, I make sure to have a safe, secure place to store them.
It is always a good idea to store millwork of any kind in a controlled climate. Doors can scratch walls, though, so if I’m storing them inside, I put them in rooms like the kitchen, where drywall damage will be covered by cabinets. No matter where the doors end up, they’re stacked with the hinges facing away from the wall.
If I have to put the doors in the garage, I lay down heavy plastic or tar paper to keep moisture from wicking into the jamb legs and the door bottoms. On that note, though, I rarely store solid-wood doors in the garage because they’re most prone to movement in humid conditions.
As they’re coming off the truck, I inspect each door for damage. The damage I discover usually happens on the jambs. I look for splits in the jambs, edges that have been nicked, and evidence that the door frame came apart in shipping or from rough handling. Solid doors are hard to damage, but I have seen holes in hollow-core doors. All wood doors can be scratched pretty easily. Anything that isn’t repairable (within reason) on site goes back with the truck, and my sales rep gets a phone call.
Assume The Opening Is Not Plumb
Before I hang even one door, I move all the doors to their respective rough openings. Once the doors are spread out, I start the hanging process by inspecting the rough opening. I make sure there aren’t any obstructions like drywall, nails, or a long bottom plate.
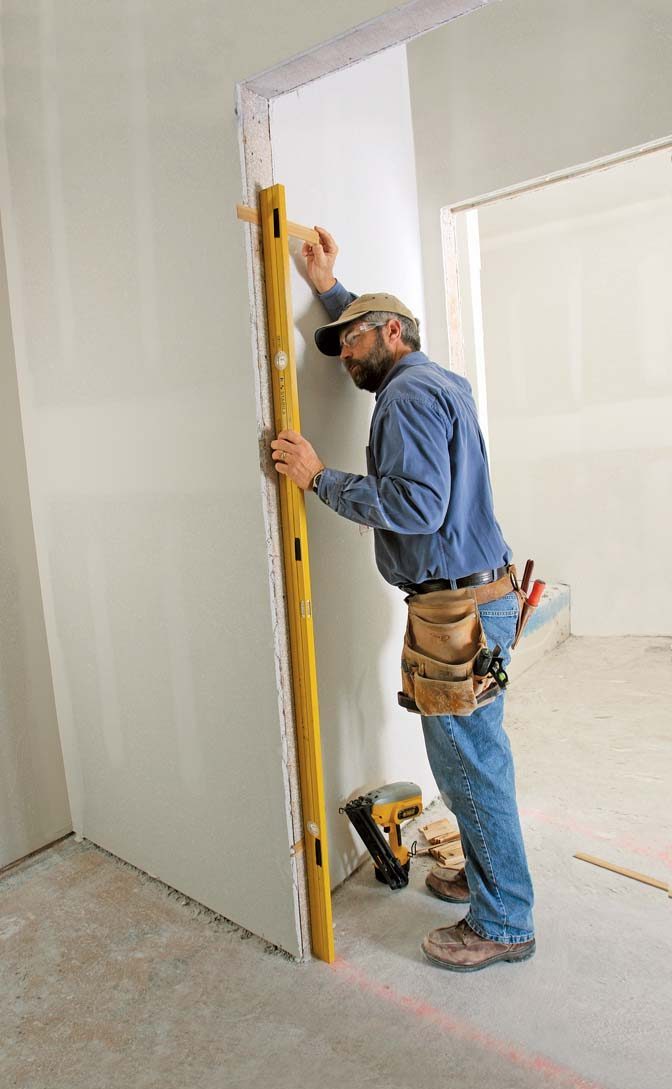
The only time I use a level is to plumb the rough opening. I check the edge of the hinge-side trimmer stud first to make sure that the wall is plumb (i.e., the bottom plate is plumb to the top plate). If it isn’t, the door will open or close on its own. If my level shows that the wall is within 3⁄16 in. over the height of the door, I leave it alone. If it’s out of plumb, I tap the bottom plate as needed and toenail it to the subfloor to keep it in place.
Once the plates are plumb, I move to the inside of the opening. I use black tape to mark the hinge locations on my door-hanging level. If you don’t have a long level, tape a short level to a long straightedge like a 3-in.-wide length of 3⁄4-in. plywood.
I plumb the hinge-side trimmer stud with one shim at each hinge location. I tack the bottom shim in first, then move to the top, then the middle. Finish nails can work here, but sometimes, the impact from the nail gun splits the shim or blows the nail right through it. Drywall nails are a good alternative.
Some people think it’s necessary to double-shim here to counter the effect of the shim’s taper, but I disagree. Unless the stud is twisted, I put the thick edge of the shim on the hinge-knuckle side. I use one shim to cock the jamb just enough to keep the hinges from binding. Besides, using one shim is quicker. Once the shims are in place, I use a utility knife to trim them flush with the drywall.
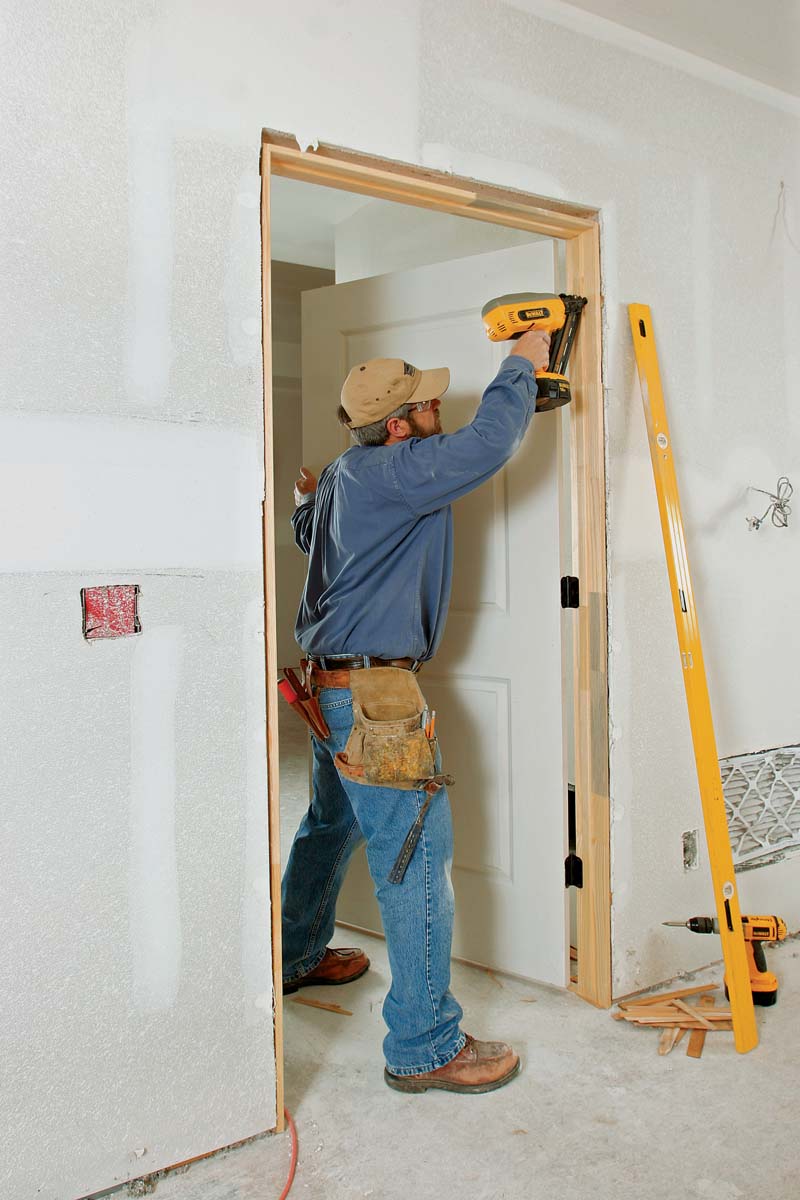
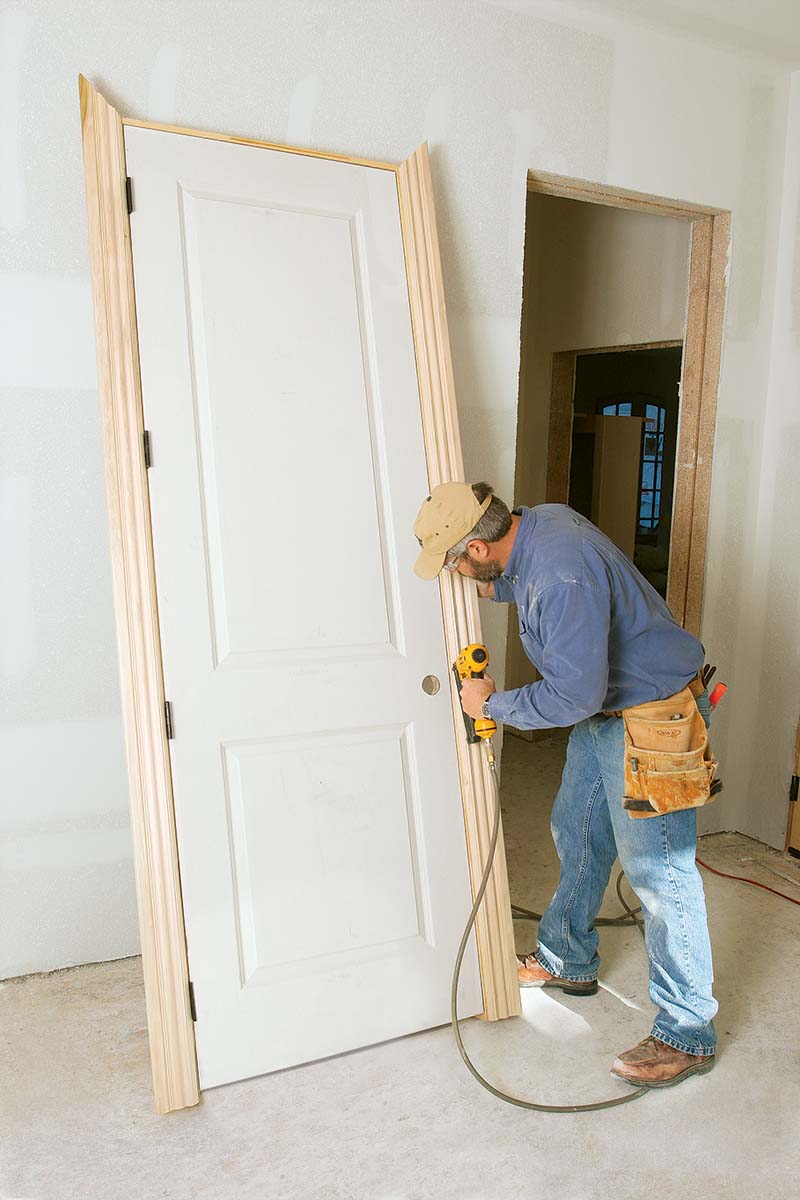
Tip The Door Into Place
Although the hinge-side trimmer stud is ready, the opening is not done yet. Installing the doors before any flooring is in place is ideal because I don’t have to cut any jamb legs. It saves me time at this stage, but the best part is that it ensures a tighter transition once the flooring is in place. But I don’t count on a level subfloor.
Before I place the door in the opening, I put a shim on the floor with the thick part toward the hinge knuckle to raise the hinge side of the jamb slightly. Raising this jamb leg a bit ensures that I’ll get the right reveal across the top of the door. Otherwise, if I set the door on the floor and this side is lower than the latch side, I have to cut the latch side once it’s hung.
I tip the door into the opening and start by securing the hinge-side jamb leg to the trimmer stud. I often slip a wedge under the door to hold it open and in place while I’m working. I tack the top corner in place and replace the middle screw on the top hinge with a 21⁄2-in.-long screw that fastens into the trimmer stud. Then I tack the bottom corner and move to the top of the latch-side jamb leg. I use one or two shims as needed in each location of the latch side, making sure that the jamb remains aligned with the wall plane.
Once the door is hung, I double-check the reveal around the door. If the reveal is even and if the door is working properly, I make sure it is closing fully against the doorstop. If it doesn’t meet the stop, I adjust the jamb legs as needed. Occasionally, the stop might have to be moved with a wood block and a hammer.
When the door is operating to my liking, I finish by adding one or two more nails at each shim location along both jambs. Then I trim the latch-side shims. Although this is the end of the hanging process, it’s also my least favorite thing to do. I’ve found that a sharp utility knife is ideal for the thin end of the shim and that a dovetail saw works best on the thick end.
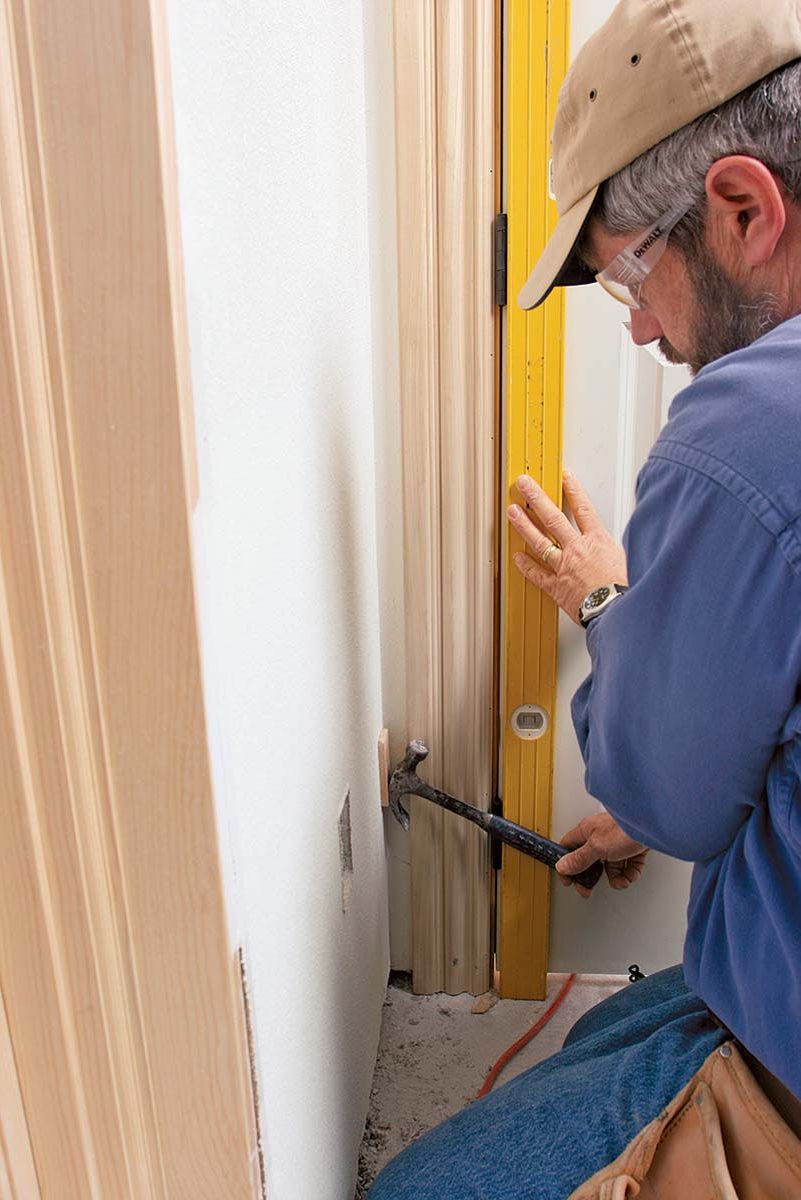
Shim The Hinge Side Plumb
Plumb the opening with one shim at each hinge location indicated by the black tape on a door-hanging level. Nail the bottom shim first, then the top, then the middle. Use long cedar shims, which are easier to handle and offer more adjustability because of their size.
 1. Starting at the bottom-hinge location, nail the shim in place so that the thick end will face the hinge knuckle. Orient all three shims this way. As the drawing (below) shows, when the jamb is installed, the nail to the right holds the jamb tight to the thick end of the shim. The nail to the left will push the jamb slightly, as indicated by the blue arrow. This will splay the jamb a bit, minimizing the possibility that the door will bind. The movement is so slight that the eye will never pick it up.
2. With the bottom shim nailed in place, slide the top shim between the level and the jamb until the level reads plumb.
3. Slide the third shim in until it just touches the level. If you push it in too far, you’re likely to nudge the level slightly out of plumb. Trim each shim once it’s nailed in place. If you’re installing doors directly on the subfloor, place a shim on the floor at the hinge side to raise the jamb slightly.
 |
 |
|
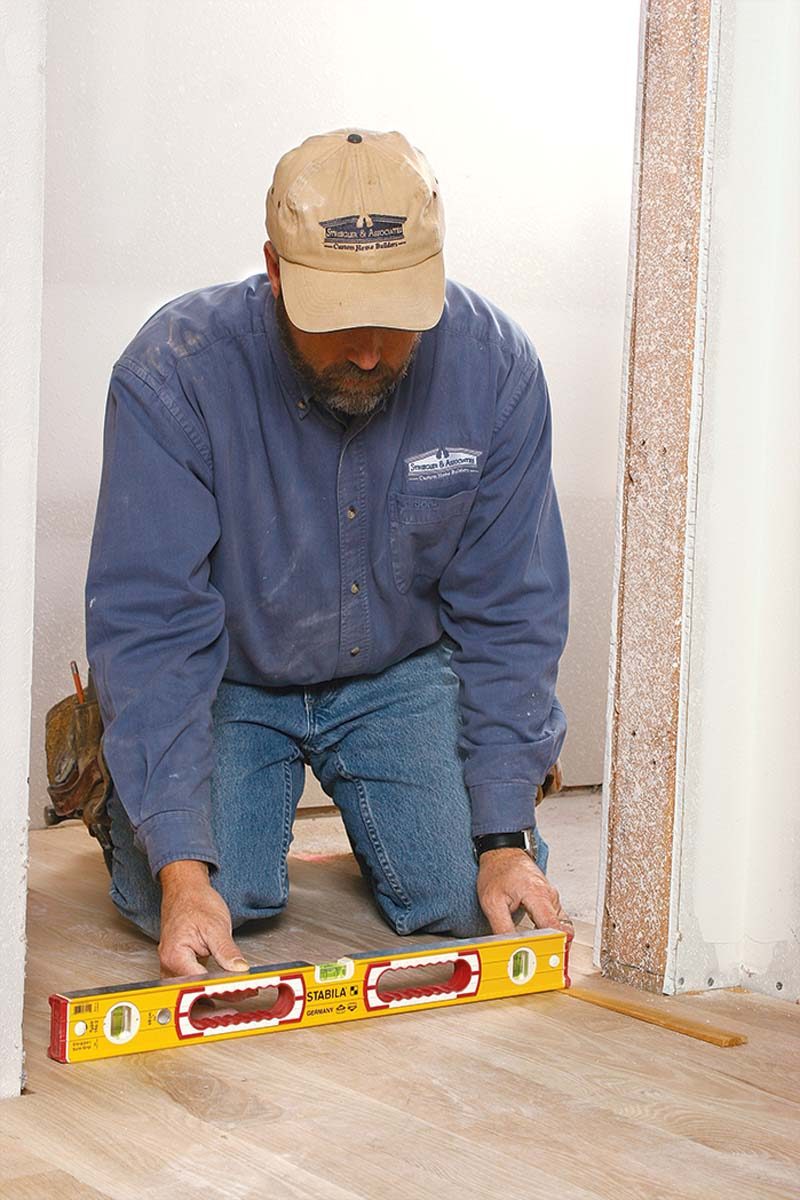
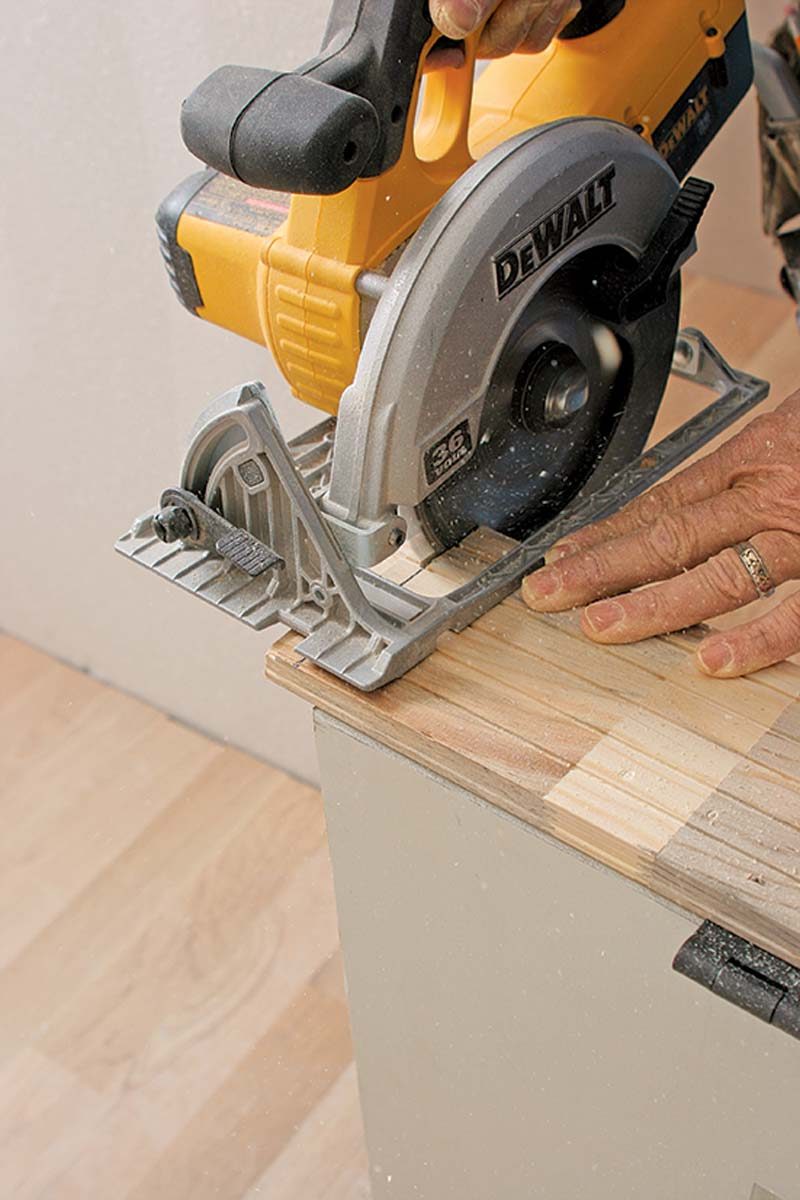
If the flooring is already installed, the jamb legs need to be cut. Using a level and a shim, determine the difference in height (if any) across the width of the opening. If the floor is level, trim both jamb legs so that the door will clear the finished floor by about 1⁄2 in. If the floor is out of level, trim that much more off the jamb leg on the high side. |
Shim And Nail, Then Repeat
Start by nailing the hinge side in place. Then shim and nail the latch side to create an even reveal (or space) between the door and the jamb, about the thickness of a nickel. Follow the sequence described below, adjust the door as needed, then finish the installation with one more nail through each shim. Don’t shim or nail the head jamb; the casing will keep it in place.
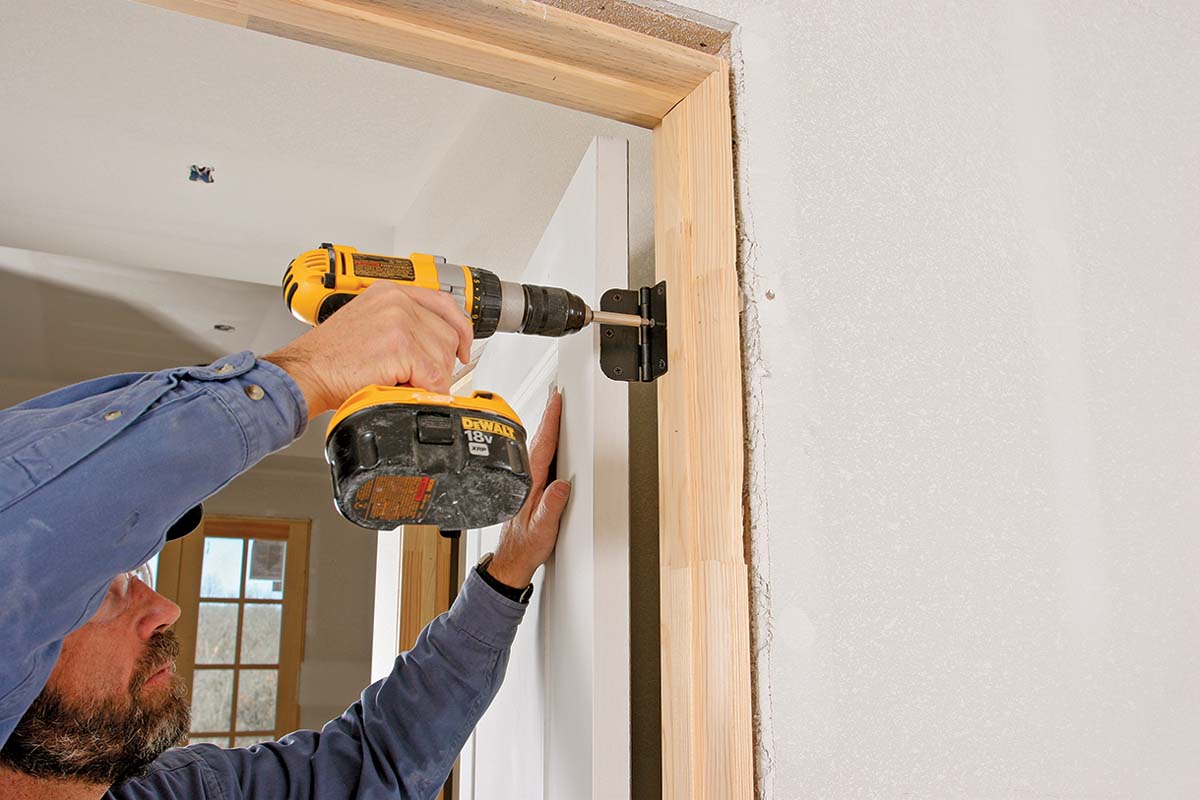
 1. Align the jamb so that it is centered between the drywall on both sides. Next, place one nail through the jamb and the shim just in front of the stop. Then replace the middle screw of the top hinge with one that’s 21⁄2 in. long. The top hinge bears much of the door’s weight; this screw solidly anchors the door to the framing. Be aware that overtightening this screw can compress the shim and kick out the bottom of the door, causing it to catch on the latch-side jamb leg. If the door needs adjusting, this corner of the jamb is the last thing to be adjusted.
2. Center the hinge-side jamb at the bottom; then nail through the jamb and the shim just in front of the stop.
3. Center the top latch side, place a shim near the head jamb, and close the door. Adjust the shim to create a reveal about the thickness of a nickel along the side and top of the door. If the reveal is too tight, the door will stick in this corner. Then place one nail in the jamb just above or below the shim. Nailing above or below the shim locks it in place but allows you to adjust it until everything is working perfectly. Add a shim from the other side of the door if the gap is too big for just one shim.
4. Center the jamb leg, and add a shim behind the bottom of the jamb leg about 6 in. up from the floor. Check the reveal, and nail the jamb above or below the shim.
5. Shim behind the latch to even the reveal, then tack the jamb in place above or below the shim.
6. Add one nail, then close the door and check the reveal one last time. Adjust the shims as needed to tune the reveal. Then move to the other side of the door and close it to make sure it meets the stop. If adjustments are needed here, make them in this order: at the bottom of the latch side, at the bottom of the hinge side, at the top of the latch side, and finally at the top of the hinge side. Remember to remove the long screw if making any adjustments there.
 |
 |
|
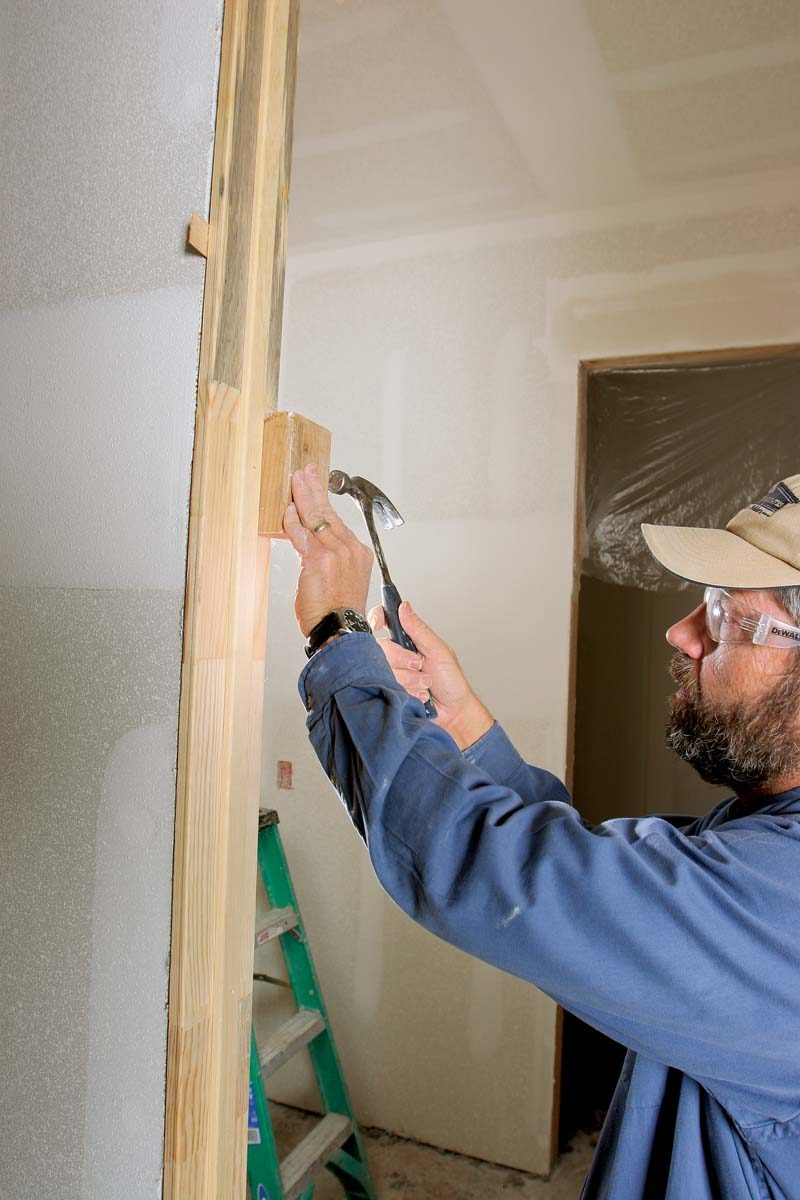
Move the doorstop as a last resort. If the door is slightly warped or if the jamb is slightly bowed, the only option might be to move the doorstop. Use a block of scrap 2x and knock the stop where a nail or staple attaches it to the jamb, not between them. Tapping the stop between nails or staples won’t move the stop sufficiently and could split it. |
 |
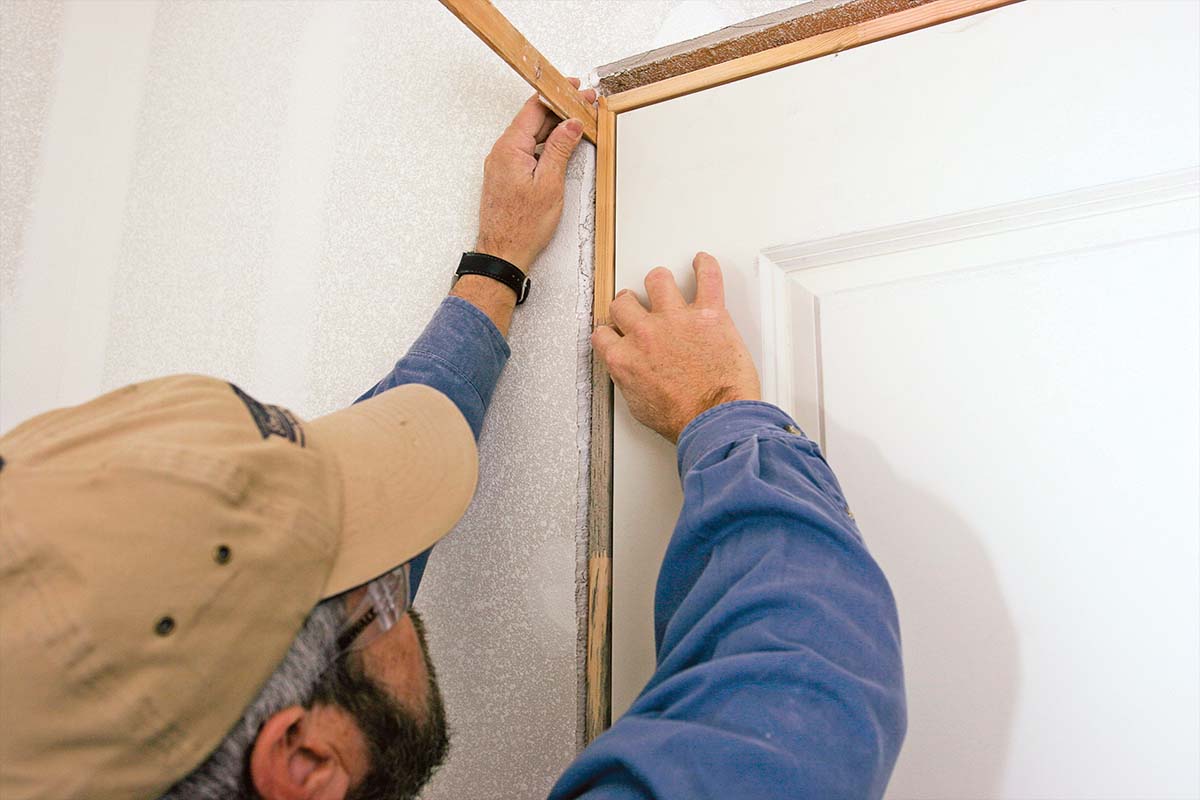
Centered The Easy Way
If a door is centered between two walls, as at the end of a hallway, there should be an even space between the casing and the drywall on both sides. It’s possible to hang the door as previously described by placing it in the opening and shimming it until it is perfectly centered, but that takes a lot of time. To save time and to ease installation, you can hang the door with the casing attached. This approach makes centering a tall door, like the one shown here, more convenient as well.
|
Attach the casing legs. After removing any nails that were holding the door in place for shipping, nail the casing to both jamb legs using 18-ga. brads. Make sure the casing is perfectly straight, and create an even reveal along the jamb. Leave the head casing off; it will be cut to fit once the door is hung. |
 |
 |
Center the tops first. Tip the door in place; then center it by measuring the space between the drywall and the casing. Next, place one 15-ga. finish nail through the casing and into the trimmer stud to the left of the top hinge. |
|
Plumb the hinges. With a long level tight to the hinges, adjust the bottom of the jamb until it’s plumb. Nail through the casing and into the trimmer stud. Adjust the latch side until the reveal is even, and nail it in place through the casing as well. Finally, install shims from the other side of the door, replace the top hinge screw, and nail the jamb as you go. Once the installation is complete, add the head casing. |
 |
For more photos, drawings, and details, click the View PDF button below:
