FHB Logo Facebook LinkedIn Email Pinterest Twitter X Instagram Tiktok YouTube Plus Icon Close Icon Navigation Search Icon Navigation Search Icon Arrow Down Icon Video Guide Icon Article Guide Icon Modal Close Icon Guide Search Icon Skip to content
Subscribe
Log In
  • How-To
  • Design
  • Tools & Materials
  • Restoration
  • Videos
  • Blogs
  • Forum
  • Magazine
  • Members
  • FHB House
  • Podcast
Log In

Fine Homebuilding Project Guides

Tiling

Guide Home
  • Selecting Tile
  • Tools & Techniques
  • Installation Materials
  • Preparation
  • Tiling Floors
  • Tiling Walls & Backsplashes
  • Tiling Showers
  • Grouting, Sealing & Caulking
  • Maintenance & Repair

Get Existing Floors Ready for Tile

Learn how to prep concrete slabs, plywood subfloors, and vinyl flooring before installing tile.

By Robin Nicholas, Michael Schweit

Prepping Concrete Floors

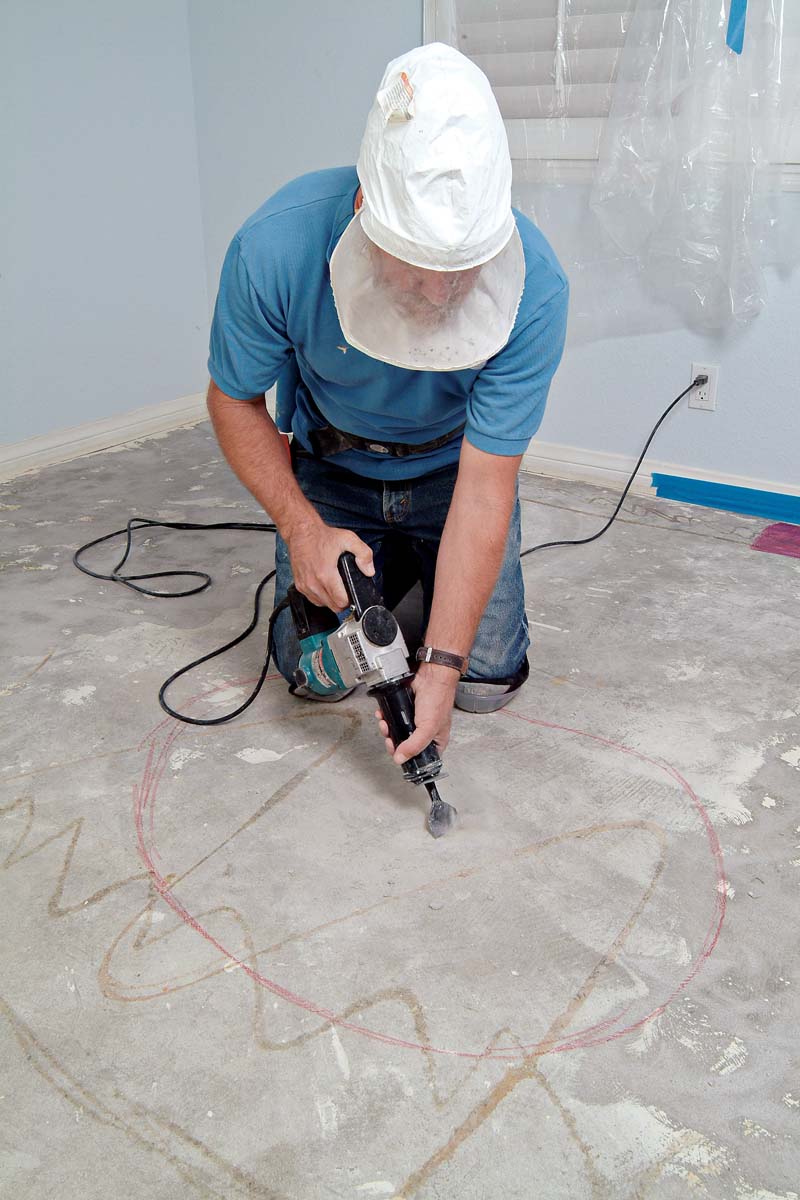
Once a floor has been taken down to bare concrete, it’s essential to remove all paint, glue, and other residue from the slab before installing tile. If the surface isn’t clean, you may end up with loose tiles that require removal and replacement 1. Scrape off old paint with a scraper fitted with a sharp blade. If you have trouble removing glue residue, try using a chemical stripper (preferably one of the newer, less-toxic types with a citric-acid base) 2. After stripping, rinse the floor to eliminate any remaining residue that may interfere with the tile adhesive bonding. Another way to remove old glue, vinyl backing, or other sticky stuff is by grinding it away with a port-able angle grinder fitted with a 4-in. carbide/diamond grinder cup wheel. If the machine has a dust port, connect it to a portable shop vacuum to reduce the dust 3. If you’d rather leave this dirty job to someone else, there are professional companies that will clean the surface for you.

Checking concrete for flatness

For a good installation, the concrete floor under the tile must be flat. Tiles don’t bend, and big tiles (16 in. sq. and larger) are very difficult to install properly on uneven concrete. Flatness is even more important when setting mosaic tiles and close-fitting large tiles. Small mosaic tiles follow every hill and dale of an uneven floor, creating a sand dune appearance. Large tiles set with narrow grout joints on an uneven floor will create lippage, meaning the tile edges aren’t flush with one another. Lippage not only looks bad, but it also can pose a significant tripping hazard.

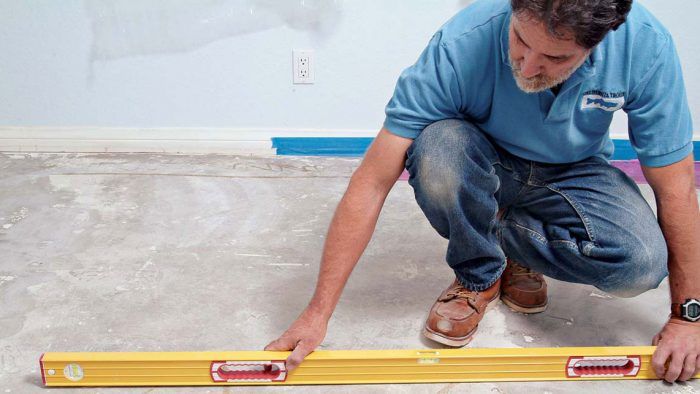
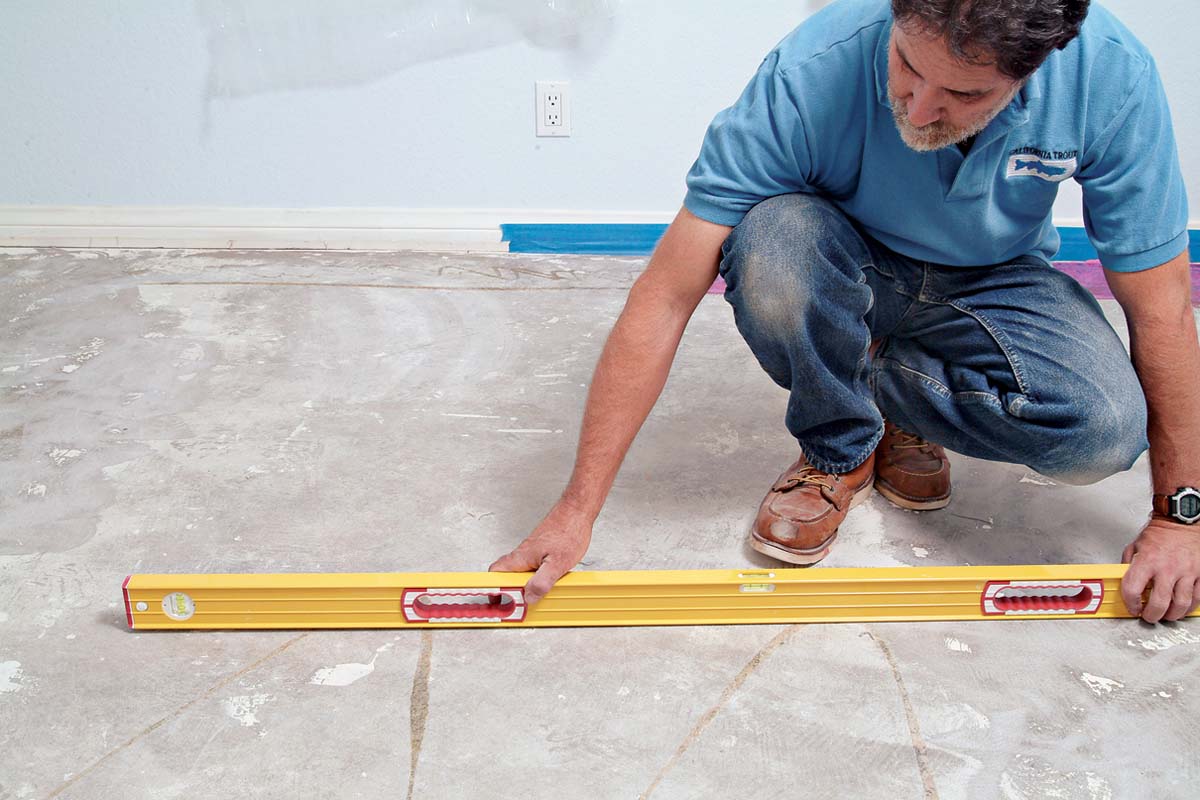
To check the floor for flatness, lay a long level or straightedge across different areas of the floor and mark any humps or valleys 4. Don’t worry if the level’s bubble shows that the floor isn’t perfectly level—flatness is more important. The easiest way to smooth an undulating floor is with a self-leveling compound.

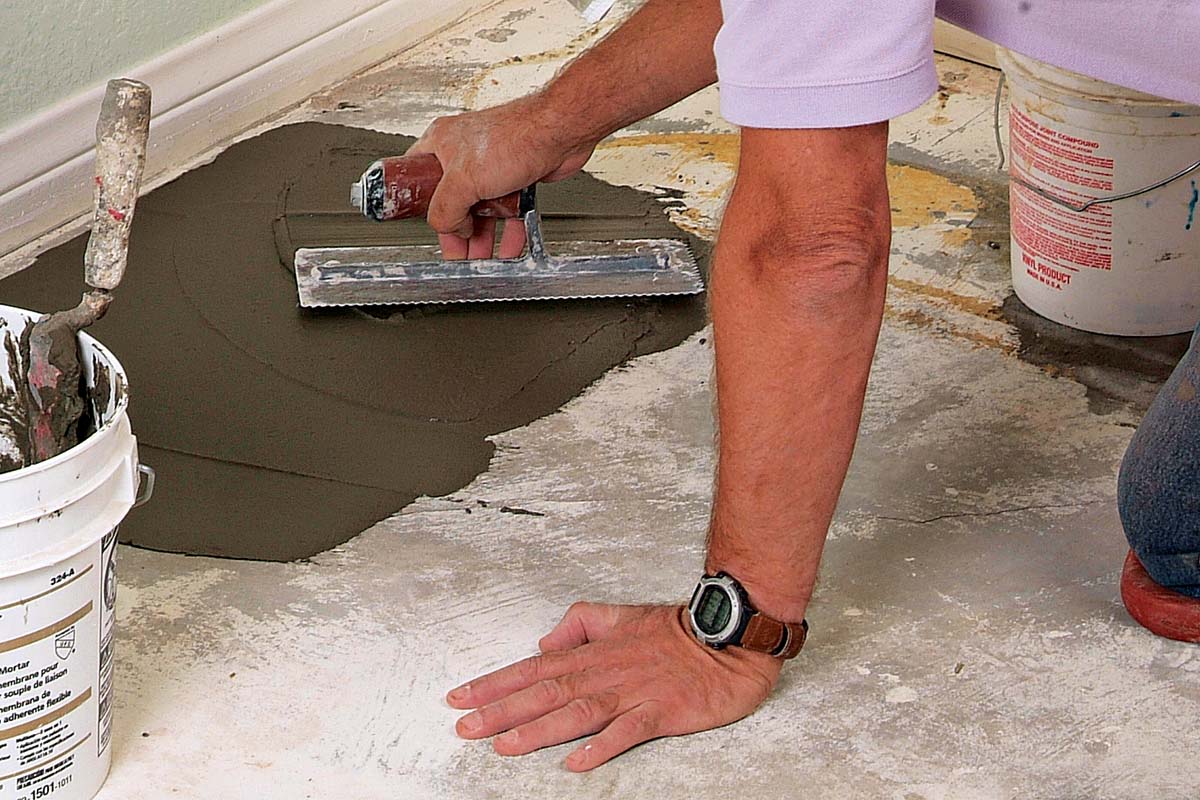
You can reduce small bumps and larger high spots with an angle grinder fitted with a masonry cup wheel or with a chipping hammer fitted with a flat-tipped chisel 5. Fill low spots with regular thinset, spreading and then feathering the material to create a smooth, even surface 6.

Tile installed on a concrete floor with old mastic left on it won’t bond properly and, eventually, will come loose. 1. Tile installed on a concrete floor with old mastic left on it won’t bond properly and, eventually, will come loose.
Chemical floor strippers make short work of removing glue and other debris from your floor to prepare for a new tile installation. 
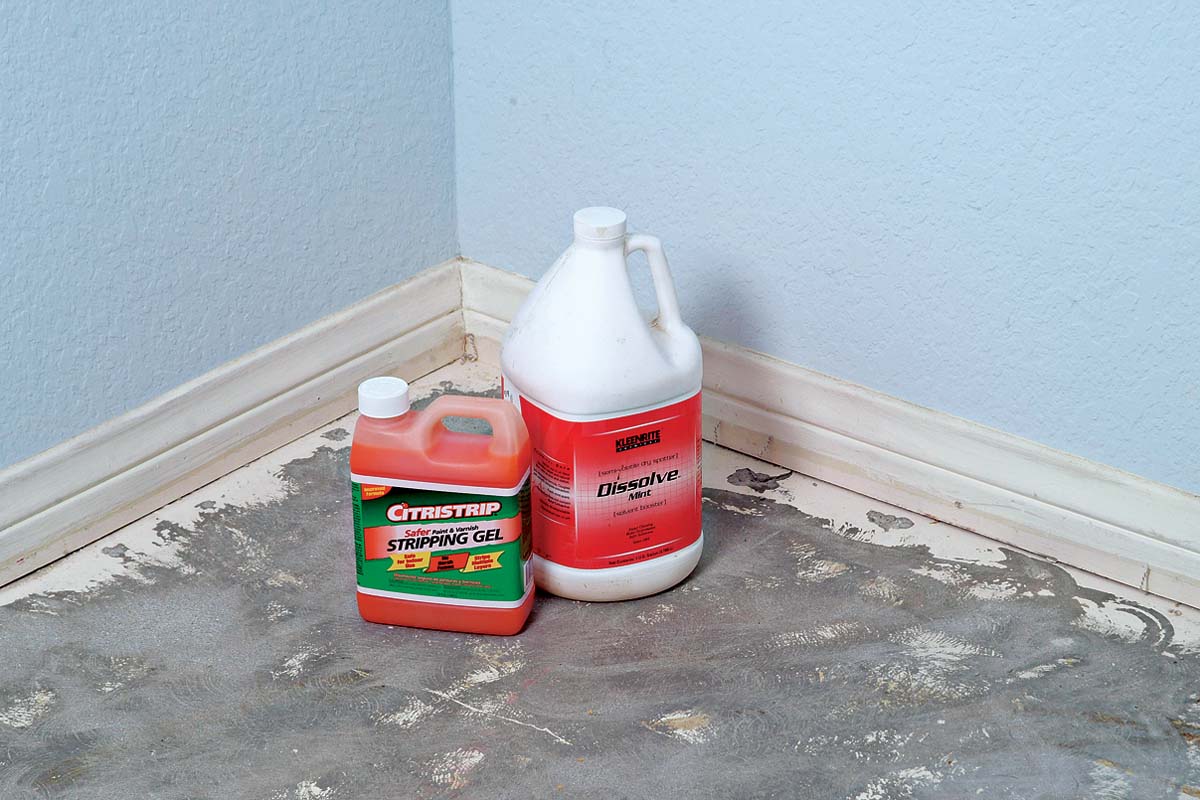
2. Chemical floor strippers make short work of removing glue and other debris from your floor to prepare for a new tile installation.
You can reduce small bumps in a concrete floor with a concrete grinder, connected to a shop vacuum to reduce dust output. 
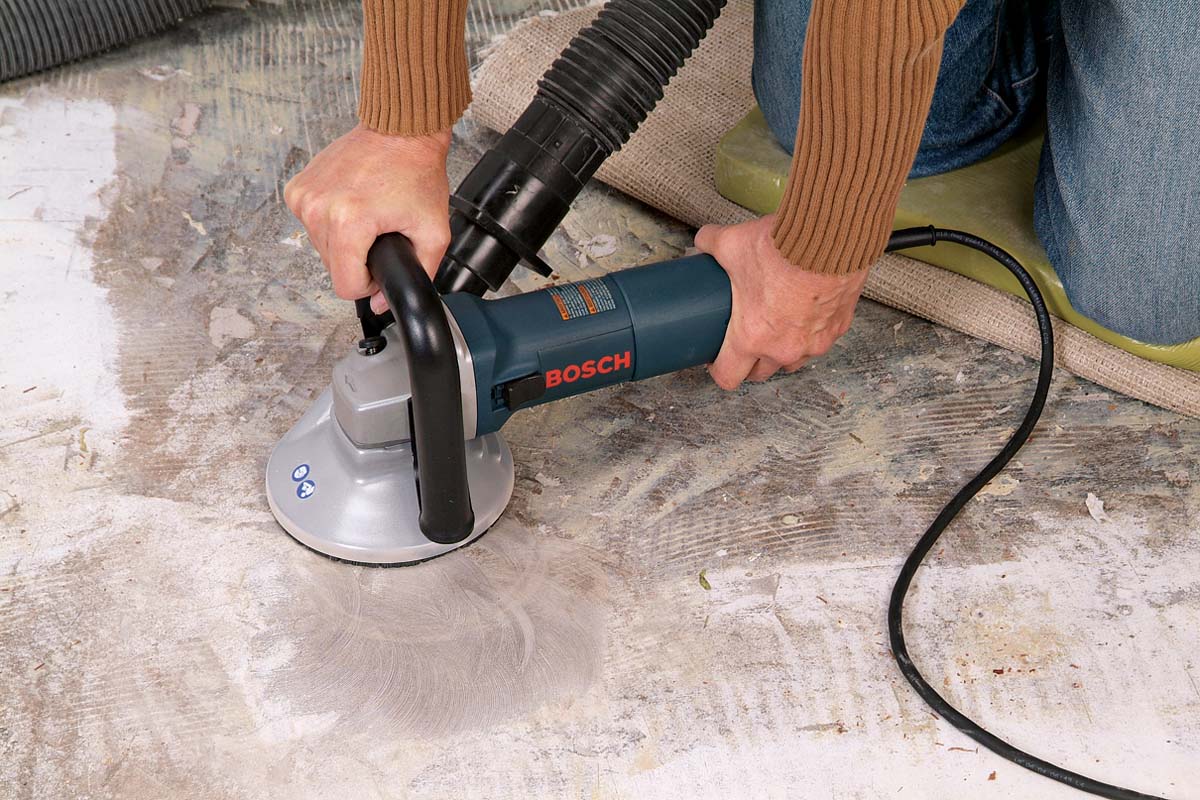
3. You can reduce small bumps in a concrete floor with a concrete grinder, connected to a shop vacuum to reduce dust output.
Use your level to check the concrete slab for hills or valleys before you start any tile work. 4. Use your level to check the concrete slab for hills or valleys before you start any tile work.
Use a chipping hammer to remove excess concrete from high spots or small hills. 5. Use a chipping hammer to remove excess concrete from high spots or small hills.
Fill and feather low spots with thinset. Spread with a flat trowel, then smooth and check with a straightedge. 6. Fill and feather low spots with thinset. Spread with a flat trowel, then smooth and check with a straightedge.

Prepping Plywood Subfloors

If the plywood subfloor that was underneath your carpet or finished flooring is still in good condition, you can use it again. But if you see evidence of damage (holes, water stain, rot) that affects the structural integrity of the wood, you need to replace the plywood in those areas. Use a circular saw to cut out a square or rectangle of plywood between two floor joists. Cut a new piece from the same thickness of plywood and nail it down to the floor joists.

If your floor has a few dips or large gouges, it’s a good idea to flatten them out by filling with a latex-modified thinset. Spread it across the defect area, then screed it off with a trowel or straightedge. If your floor is more seriously bumpy and out of level, you can flatten it using a self-leveling compound. Before you do, use caulk to fill any gaps between plywood sheets and to fill nail holes. Follow the manufacturer’s instructions, which may require you to prime the surface with a special primer and to reinforce the seams with thinset and mesh tape. After the self-leveling compound is applied and has cured, the surface is ready for setting tile—no need for backerboard.

Prepping Vinyl Flooring

You can lay tile over a vinyl floor, provided that there’s no asbestos in the flooring and the vinyl is a single thickness and of the rigid type.

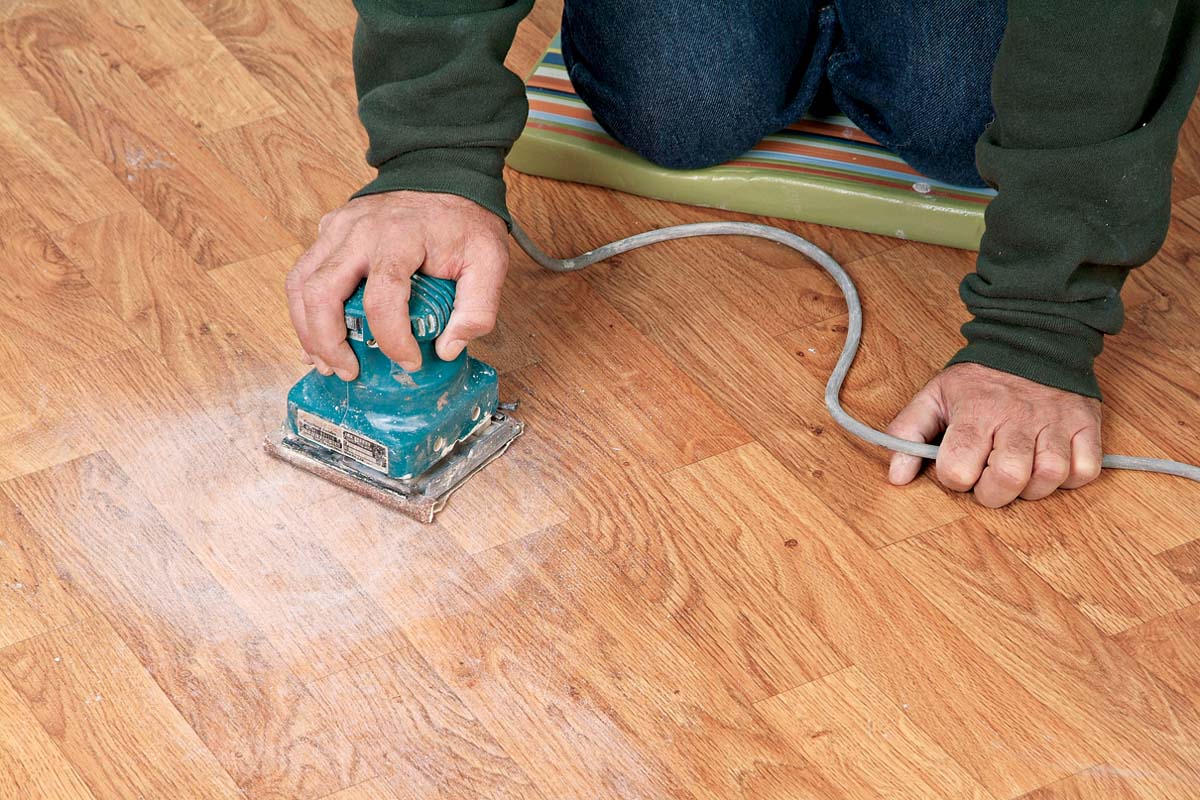
To prepare a vinyl flooring for a layer of backerboard substrate, you’ll need to sand the vinyl floor to rough it up. First, remove any vinyl cove baseboards by cutting the flooring with a razor knife, about 1-1/2 in. from the wall, all the way around the room. Lift the vinyl flooring next to the cove with a prybar, then pull out the wood cove strip that is underneath. Now rough up the entire vinyl floor with an electric orbital sander fitted with 60-grit sandpaper 1. Sanding gives the vinyl “tooth” for the thinset to adhere to. It also helps remove wax or dirt that may interfere with bonding. The surface is now ready for backerboard installation 2.

Sanding a vinyl floor with 60-grit sandpaper will give it the “tooth” it needs for adhering backerboard to it with thinset.1. Sanding a vinyl floor with 60-grit sandpaper will give it the “tooth” it needs for adhering backerboard to it with thinset. Comb the thinset and lay the backerboard over the sanded vinyl floor.2. Comb the thinset and lay the backerboard over the sanded vinyl floor.


Tiling Complete, 2nd EditionExcerpted from Tiling Complete, 2nd Edition by Robin Nicholas and Michael Schweit.

Available in the Taunton Store and at Amazon.com.

Sign up for eletters today and get the latest how-to from Fine Homebuilding, plus special offers.

Signing you up...

This site is protected by reCAPTCHA and the Google Privacy Policy and Terms of Service apply.
See all newsletters
See all newsletters
Previous: Removing Old Countertops and Backsplashes Next: Prep a Subfloor for Tile

Guide

Tiling

Chapter

Preparation

Log in or create an account to post a comment.

Sign up Log in

Become a member and get full access to FineHomebuilding.com

Tiling

Tiling

Trusted, comprehensive guidance from the pros for a great-looking tile job in any room of the house

View Project Guide

View All Project Guides »

Become a member and get unlimited site access, including the Tiling Project Guide.

Start Free Trial

Selecting Tile
  • The Basics
  • Tile Options
Tools & Techniques
  • Job-Preparation Tools
  • Cutting Tiles
  • Setting & Grouting Tools
Installation Materials
  • Membranes & Substrates
  • Adhesives & Mortars
  • Grout
  • Sealers & Caulk
  • Spacers, Hardware & Trim
Preparation
  • The Prep Job
  • Repairs & Surface Prep
  • Installing Backerboard
Tiling Floors
  • Layout & Installation
  • Setting Specialty Tiles
Tiling Walls & Backsplashes
  • Preparation
  • Backsplashes
  • Walls
Tiling Showers
  • Tile Shower Basics
  • Waterproofing
  • Shower Pans
  • Shower Drains
  • Shower Niches
  • Video Series: Tile a Shower
  • Video Series: Tile a Barrier-Free Bathroom
Grouting, Sealing & Caulking
  • Grouting
  • Caulking
  • Sealing
Maintenance & Repair
  • Maintenance
  • Tile Repair
  • Grout Repair

Fine Home Building

Newsletter Sign-up

  • Fine Homebuilding

    Home building tips, offers, and expert advice in your inbox.

  • Green Building Advisor

    Building science and energy efficiency advice, plus special offers, in your inbox.

  • Old House Journal

    Repair, renovation, and restoration tips, plus special offers, in your inbox.

Signing you up...

This site is protected by reCAPTCHA and the Google Privacy Policy and Terms of Service apply.
See all newsletters

Follow

  • Fine Homebuilding

    Dig into cutting-edge approaches and decades of proven solutions with total access to our experts and tradespeople.

    Start Free Trial Now
    • Facebook
    • Instagram
    • X
    • LinkedIn
  • GBA Prime

    Get instant access to the latest developments in green building, research, and reports from the field.

    Start Free Trial Now
    • Facebook
    • YouTube
  • Old House Journal

    Learn how to restore, repair, update, and decorate your home.

    Subscribe Now
    • Facebook
    • Instagram
    • X

Membership & Magazine

  • Online Archive
  • Start Free Trial
  • Magazine Subscription
  • Magazine Renewal
  • Gift a Subscription
  • Customer Support
  • Privacy Preferences
  • About
  • Contact
  • Advertise
  • Careers
  • Terms of Use
  • Site Map
  • Do not sell or share my information
  • Privacy Policy
  • Accessibility
  • California Privacy Rights

© 2025 Active Interest Media. All rights reserved.

Fine Homebuilding receives a commission for items purchased through links on this site, including Amazon Associates and other affiliate advertising programs.

X
X
This is a dialog window which overlays the main content of the page. The modal window is a 'site map' of the most critical areas of the site. Pressing the Escape (ESC) button will close the modal and bring you back to where you were on the page.

Main Menu

  • How-To
  • Design
  • Tools & Materials
  • Video
  • Blogs
  • Forum
  • Project Guides
  • Reader Projects
  • Magazine
  • Members
  • FHB House

Podcasts

  • FHB Podcast
  • ProTalk

Webinars

  • Upcoming and On-Demand

Podcasts

  • FHB Podcast
  • ProTalk

Webinars

  • Upcoming and On-Demand

Popular Topics

  • Kitchens
  • Business
  • Bedrooms
  • Roofs
  • Architecture and Design
  • Green Building
  • Decks
  • Framing
  • Safety
  • Remodeling
  • Bathrooms
  • Windows
  • Tilework
  • Ceilings
  • HVAC

Magazine

  • Current Issue
  • Past Issues
  • Magazine Index
  • Subscribe
  • Online Archive
  • Author Guidelines

All Access

  • Member Home
  • Start Free Trial
  • Gift Membership

Online Learning

  • Courses
  • Project Guides
  • Reader Projects
  • Podcast

More

  • FHB Ambassadors
  • FHB House
  • Customer Support

Account

  • Log In
  • Join

Newsletter

Get home building tips, offers, and expert advice in your inbox

Signing you up...

This site is protected by reCAPTCHA and the Google Privacy Policy and Terms of Service apply.
See all newsletters
See all newsletters

Follow

  • X
  • YouTube
  • instagram
  • facebook
  • pinterest
  • Tiktok

Join All Access

Become a member and get instant access to thousands of videos, how-tos, tool reviews, and design features.

Start Your Free Trial

Subscribe

FHB Magazine

Start your subscription today and save up to 70%

Subscribe

We hope you’ve enjoyed your free articles. To keep reading, become a member today.

Get complete site access to expert advice, how-to videos, Code Check, and more, plus the print magazine.

Start your FREE trial

Already a member? Log in