FHB Logo Facebook LinkedIn Email Pinterest Twitter X Instagram Tiktok YouTube Plus Icon Close Icon Navigation Search Icon Navigation Search Icon Arrow Down Icon Video Guide Icon Article Guide Icon Modal Close Icon Guide Search Icon Skip to content
Subscribe
Log In
  • How-To
  • Design
  • Tools & Materials
  • Restoration
  • Videos
  • Blogs
  • Forum
  • Magazine
  • Members
  • FHB House
  • Podcast
Log In

Fine Homebuilding Project Guides

Siding & Exterior Trim

Guide Home
  • Choosing Siding
  • Installing Siding
  • Choosing Exterior Trim
  • Installing Exterior Trim
  • Repairing Siding & Trim
How-To

Repairing Exterior Trim

Learn how to replace a rotted section of trim or make an in-place epoxy repair.

By Mike Litchfield, Chip Harley

Although it may be tempting to rip out entire pieces of badly weathered or rotted exterior trim, repair is often a better option if the original trim would be difficult to remove or if replacement trim is very expensive. Before deciding, survey the extent of the rot and address the root cause. Otherwise, you’ll only be treating the symptom.

Replacing rotted sections of trim

This is a reasonable option when the bottom of an otherwise sound trim board has rotted away. Flat and square trim is easier to replace and match than molded trim. Rotted bottoms of corner boards and splashboards are usually easy to cut free and replace, whereas punky doorsills or windowsills are probably best replaced or repaired in place using epoxy, as described in the next section.

Replacing the bottom end of a rotted board is straightforward. Draw a line across the face of the board, 6 in. above the bad section. After setting your circular-saw blade to the thickness of the board, use a Speed Square to guide the saw shoe, making a 90° cut. Wear safety glasses, and use a demo blade because there may be hidden nails. The replacement piece should be the same thickness, width, and—preferably—species as the original trim. To join the new section to the old, use a biscuit joiner to cut a biscuit slot in both board ends. Dry-fit everything, prime all surfaces with epoxy primer, and allow the primer to dry well. Then glue the pieces together with epoxy. Hold the boards in place with a piece of scrap screwed to both. Give the epoxy a day to cure (or whatever the manufacturer suggests), and you’re ready to sand and paint. Alternately, you could use polyurethane glue or Titebond III wood glue as long as both pieces of wood being joined are sound.

In-place epoxy trim repairs

Epoxy wood filler is appropriate to use when the rotted area is relatively small (epoxy is expensive) and the trim would be difficult or costly to replace. Rotted windowsills or sashes, for example, are tough to remove. Plus, because epoxy putty can conform to any shape and is easily carved, using it can be a much faster and easier option than carefully cutting, fitting, and gluing pieces of wood where the piece you’re replacing is complex or unusually shaped. Epoxy applications vary considerably, so visit manufacturers’ websites (try Abatron, ConServ Epoxy, and Advanced Repair Technology, for example) for specifics or get recommendations at your local home center.

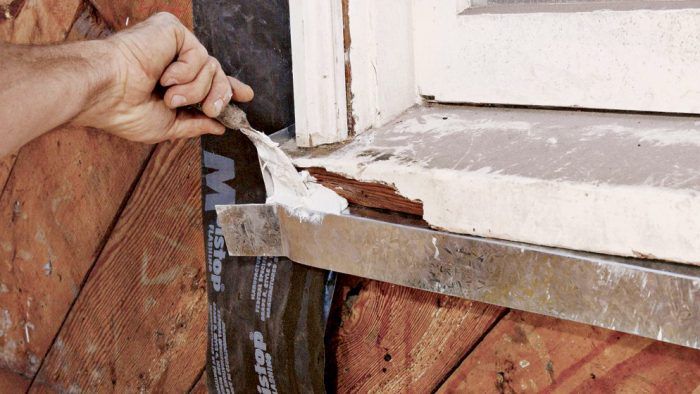
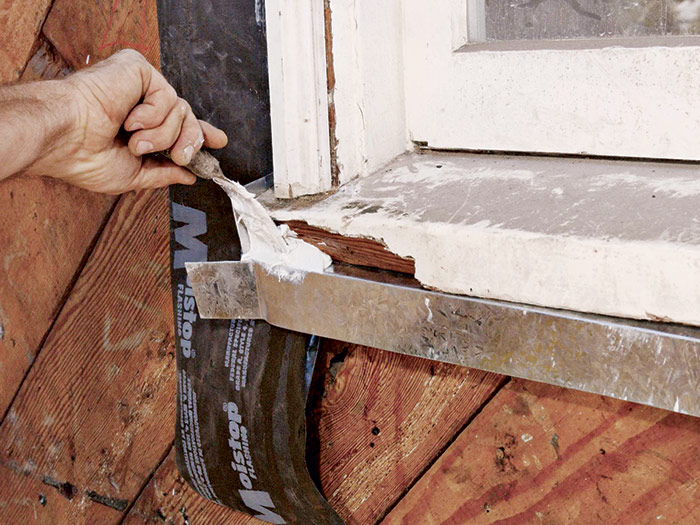
Use a chisel to dislodge loose, crumbling wood. Suck up debris with a shop vacuum. Allow the wood to dry thoroughly before proceeding. Although it’s often desirable to cut back to solid wood, soft, punky wood can be reinforced by impregnating it with liquid two-part epoxy. Typically, you’d drill a series of small-diameter holes into the wood and then inject liquid epoxy into them until the wood is clearly saturated. After the epoxy cures, the impregnated wood becomes as hard as a rock.

build up the damaged area
After wire-brushing away loose material, inject liquid consolidant into the wood until saturated. After allowing the the consolidant to set, apply the pastelike filler to build up the damaged area.

compress and smooth the filler
Use a taping knife to compress and smooth the filler. The galvanized metal tacked to the sill keeps the filler in place until it dries and doubles as a screed strip to which you can level the filler.

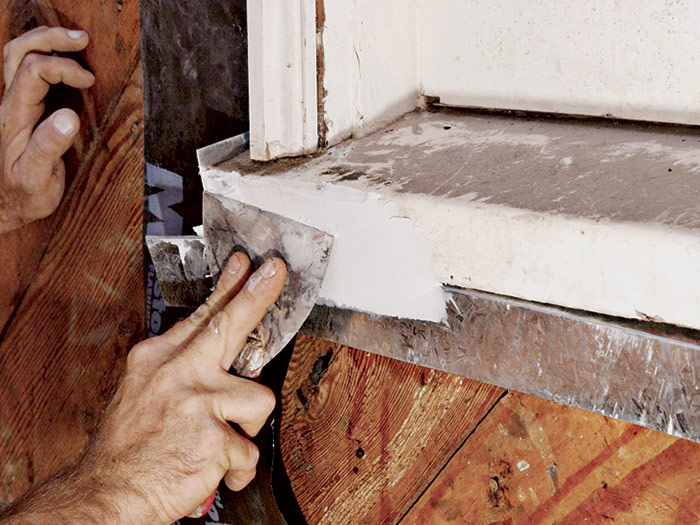
For the best bond, apply the puttylike filler while the consolidant is still tacky. Avoid getting epoxy on your skin, and by all means wear a respirator when applying or sanding it. After the filler dries and you’ve sanded it to its final shape, prime and paint it. Although otherwise tough, some epoxies are degraded by UV-rays, and whatever original wood remains still needs protection from the elements.

PRO TIP: Epoxy filler can be applied with a putty knife. But the filler is easier to shape to match existing contours by hand—hands protected by latex gloves, that is. Restorationist Tom O’Brien suggests donning three or four pairs of disposable latex gloves at the start of the job and peeling them off as they become gunked up.

Renovation 5th Edition

Excerpted from Renovation, 5th Edition (The Taunton Press, 2019) by Michael Litchfield and Chip Harley

Available at Amazon.com.

Sign up for eletters today and get the latest how-to from Fine Homebuilding, plus special offers.

Signing you up...

This site is protected by reCAPTCHA and the Google Privacy Policy and Terms of Service apply.
See all newsletters
See all newsletters
Previous: Repairing Rotten Trim Next: How to Replace a Window: Replacing the Exterior Trim

Guide

Siding & Exterior Trim

Chapter

Repairing Siding & Trim

View Comments

  1. bobbomax | Apr 19, 2025 09:32pm | #1

    The article discusses epoxy ("expensive") but doesn't mention Bondo. My impression is that epoxy is stronger, harder and adheres better, while Bondo is easier to work with and cheaper. Anybody know any reason not to use Bondo in non- or semi-structural applications?

Log in or create an account to post a comment.

Sign up Log in

Become a member and get full access to FineHomebuilding.com

Siding & Exterior Trim

Siding & Exterior Trim

Trusted, comprehensive guidance from the pros for choosing, installing, and repairing siding and exterior trim

View Project Guide

View All Project Guides »

Become a member and get unlimited site access, including the Siding & Exterior Trim Project Guide.

Start Free Trial

Choosing Siding
  • Materials
  • Design Options
Installing Siding
  • Siding Basics
  • Lap Siding
  • Shingle Siding
  • Board & Batten
  • Fiber Cement and Composite Siding
  • Vinyl Siding
  • Masonry Claddings
Choosing Exterior Trim
  • Trim Materials
  • Trim Design
Installing Exterior Trim
  • Trim Basics
  • Roof Eaves Trim
  • Corner Boards
  • Corbels & Brackets
  • Window & Door Trim
Repairing Siding & Trim
  • Trim Repairs
  • Siding Repairs

Fine Home Building

Newsletter Sign-up

  • Fine Homebuilding

    Home building tips, offers, and expert advice in your inbox.

  • Green Building Advisor

    Building science and energy efficiency advice, plus special offers, in your inbox.

  • Old House Journal

    Repair, renovation, and restoration tips, plus special offers, in your inbox.

Signing you up...

This site is protected by reCAPTCHA and the Google Privacy Policy and Terms of Service apply.
See all newsletters

Follow

  • Fine Homebuilding

    Dig into cutting-edge approaches and decades of proven solutions with total access to our experts and tradespeople.

    Start Free Trial Now
    • Facebook
    • Instagram
    • X
    • LinkedIn
  • GBA Prime

    Get instant access to the latest developments in green building, research, and reports from the field.

    Start Free Trial Now
    • Facebook
    • YouTube
  • Old House Journal

    Learn how to restore, repair, update, and decorate your home.

    Subscribe Now
    • Facebook
    • Instagram
    • X

Membership & Magazine

  • Online Archive
  • Start Free Trial
  • Magazine Subscription
  • Magazine Renewal
  • Gift a Subscription
  • Customer Support
  • Privacy Preferences
  • About
  • Contact
  • Advertise
  • Careers
  • Terms of Use
  • Site Map
  • Do not sell or share my information
  • Privacy Policy
  • Accessibility
  • California Privacy Rights

© 2025 Active Interest Media. All rights reserved.

Fine Homebuilding receives a commission for items purchased through links on this site, including Amazon Associates and other affiliate advertising programs.

X
X
This is a dialog window which overlays the main content of the page. The modal window is a 'site map' of the most critical areas of the site. Pressing the Escape (ESC) button will close the modal and bring you back to where you were on the page.

Main Menu

  • How-To
  • Design
  • Tools & Materials
  • Video
  • Blogs
  • Forum
  • Project Guides
  • Reader Projects
  • Magazine
  • Members
  • FHB House

Podcasts

  • FHB Podcast
  • ProTalk

Webinars

  • Upcoming and On-Demand

Podcasts

  • FHB Podcast
  • ProTalk

Webinars

  • Upcoming and On-Demand

Popular Topics

  • Kitchens
  • Business
  • Bedrooms
  • Roofs
  • Architecture and Design
  • Green Building
  • Decks
  • Framing
  • Safety
  • Remodeling
  • Bathrooms
  • Windows
  • Tilework
  • Ceilings
  • HVAC

Magazine

  • Current Issue
  • Past Issues
  • Magazine Index
  • Subscribe
  • Online Archive
  • Author Guidelines

All Access

  • Member Home
  • Start Free Trial
  • Gift Membership

Online Learning

  • Courses
  • Project Guides
  • Reader Projects
  • Podcast

More

  • FHB Ambassadors
  • FHB House
  • Customer Support

Account

  • Log In
  • Join

Newsletter

Get home building tips, offers, and expert advice in your inbox

Signing you up...

This site is protected by reCAPTCHA and the Google Privacy Policy and Terms of Service apply.
See all newsletters
See all newsletters

Follow

  • X
  • YouTube
  • instagram
  • facebook
  • pinterest
  • Tiktok

Join All Access

Become a member and get instant access to thousands of videos, how-tos, tool reviews, and design features.

Start Your Free Trial

Subscribe

FHB Magazine

Start your subscription today and save up to 70%

Subscribe

We hope you’ve enjoyed your free articles. To keep reading, become a member today.

Get complete site access to expert advice, how-to videos, Code Check, and more, plus the print magazine.

Start your FREE trial

Already a member? Log in