FHB Logo Facebook LinkedIn Email Pinterest Twitter X Instagram Tiktok YouTube Plus Icon Close Icon Navigation Search Icon Navigation Search Icon Arrow Down Icon Video Guide Icon Article Guide Icon Modal Close Icon Guide Search Icon Skip to content
Subscribe
Log In
  • How-To
  • Design
  • Tools & Materials
  • Restoration
  • Videos
  • Blogs
  • Forum
  • Magazine
  • Members
  • FHB House
  • Podcast
Log In

Fine Homebuilding Project Guides

Windows & Doors

Guide Home
  • Choosing Windows
  • Installing Windows In New Walls
  • Retrofitting Windows
  • Window Repairs
  • Door Basics
  • Interior Doors
  • Exterior Doors
Job Site Diaries

Replacing Windows on a 1980s Farmhouse Renovation

Remodeler Josh Oduin points out mistakes made on the previous window install and shows how to make an airtight and watertight replacement.
By Joshua Oduin

Remodeler Josh Oduin and his crew have been working on a renovation project in Oregon, and one of the first tasks they needed to tackle was replacing old aluminum windows with new, more efficient ones from Marvin.

There are a few reasons to replace the old windows on this old house. First, condensation is building up in between the window panes, which shows that the seals have failed and the argon gas has escaped. The second reason is that these windows are really poor performers to begin with. And the third reason is that they were not installed correctly to be properly air-sealed and waterproofed.

Window directly sitting on the house sheeting

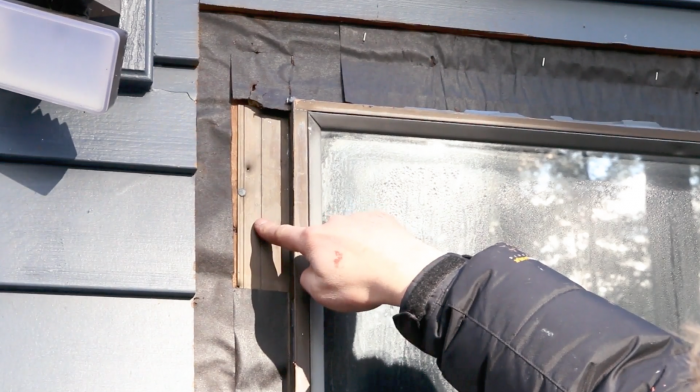
The first thing we noticed is that the previous installer set the windows directly on the house sheathing and did not apply any seal-in at all. That’s a great spot for air and water to get behind the window flange and leak into the house.

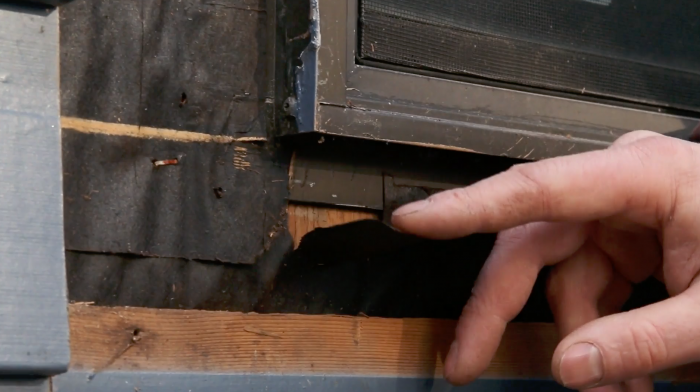
Paper sitting over the flange when it should be underneath.

The second and more important issue we saw was the way that the original builders lapped their housewrap over the flange. At the bottom of the window, the paper is sitting over the flange when it should be underneath. In that situation, if water penetrates into the trim or the siding, it will want to run down and get right behind the paper. To  properly flash a window, the bottom course of house wrap should be installed before the window and wrap into the sill. That way, when water gets behind the siding or trim, it’ll roll down and not get behind the housewrap.

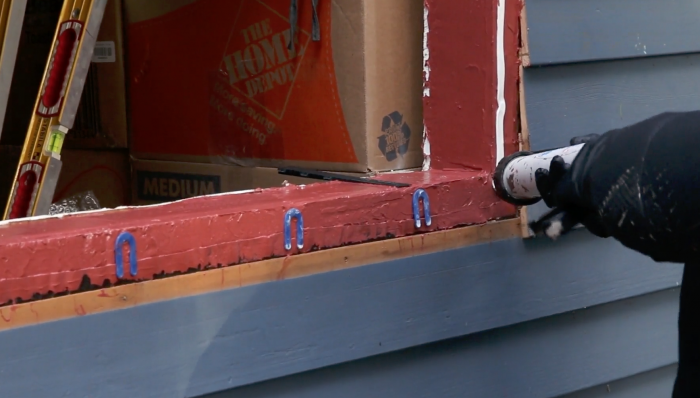
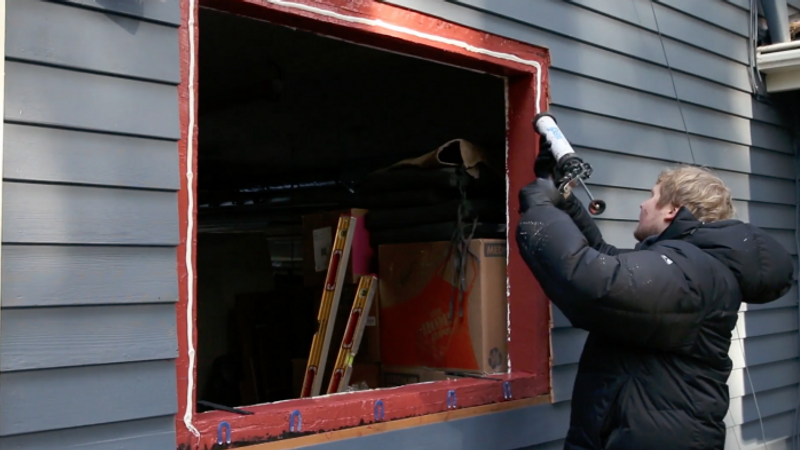
To remove the existing windows, the first thing we do is run a Skilsaw around the window to expose the window flange. Then we pull the siding, nails, and the window to prep the window opening. After making sure the opening is free of debris, we apply a liberal bead of Prosoco Fast Flash, making sure the sill has a slope to it. Once the Fast Flash is applied, we spray it down with a bit of water, which helps it set more quickly so the windows can be installed in a couple of hours.

blue horseshoe wedges create a gap at the bottom of the window so that the sill can drain if water is ever gets in.

Once the Fast Flash has set, we apply a bead of Prosoco AirDam sealant on three sides, but skip the bottom, and then use blue horseshoe wedges to create a gap at the bottom so that the sill can drain if water ever gets in.

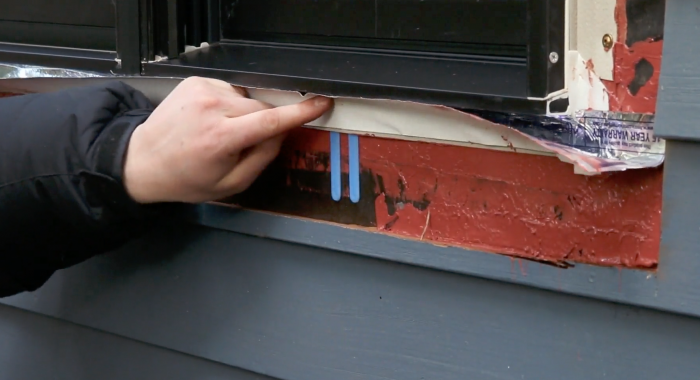
Henry FortiFlash 365 installed

After the window is installed, we work on the last bit of flashing details, which are crucial. First, we add a piece of Henry FortiFlash 365 peel-and-stick to create a little apron for the window to drain. We peeled the top part and bonded it to the flange, but left the backing on the lower part of the tape so it doesn’t bond to the housewrap. This allows a gap so if water ever pools underneath the window, it has a place to escape. The little blue horseshoe wedge creates a gap there for water to weep out. When we go ahead and put the trim on this piece, it’ll protect it from any wind-driven rain that gets underneath the sill and keep it from driving up and underneath the window, and it’ll allow it to drain out onto the old housewrap.

We aren’t replacing the siding, and we’re able to accommodate that by adding trim to the windows. Over the course of the project I made two cuts on the siding. The first cut was made with the short side of the Skilsaw base to get access to the flanges and remove the old window. The second cut was made with a wider side of the Skilsaw, which is conveniently just the right width to make space for our 5/4 x 4 trim.

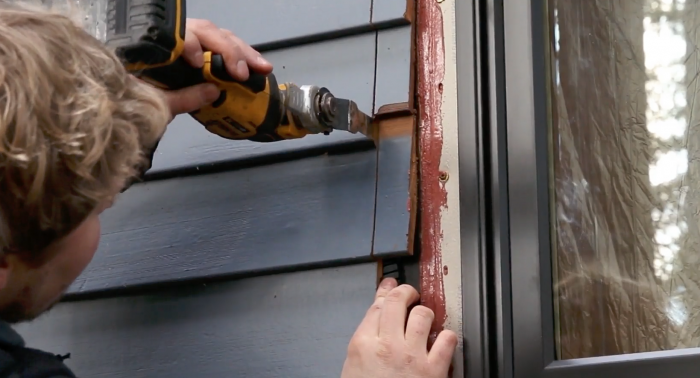
Ocillating tool finishes the cut

When cutting, it’s really important that the tar paper stays intact. First we make a shallow pass, less than the depth of the siding, with a Skilsaw. The siding is still intact after that pass, and to finish the cut without damaging the housewrap, we took a composite shim, slid it behind the piece of siding, and finished the cut with an oscillating multitool. To finish, we flashed the window flanges on the top and sided with more Prosoco and let that set before installing the new trim to complete the job.


RELATED LINKS

  • Fix for Poorly Installed Window Flashing
  • Flashing for Old Windows
  • How to Replace a Window: Flashing the New Window


Sign up for eletters today and get the latest how-to from Fine Homebuilding, plus special offers.

Signing you up...

This site is protected by reCAPTCHA and the Google Privacy Policy and Terms of Service apply.
See all newsletters
See all newsletters
Next: Should Your Old Wood Windows Be Saved?

Guide

Windows & Doors

Chapter

Retrofitting Windows

View Comments

  1. user-196571 | Jul 19, 2021 02:07pm | #1

    Where is the air seal at the bottom of the window? Yes, you need to allow for water to get out, but you were knocking the old window install for the very same thing. You have to account for the air sealing of the whole window or you still have air intrusion. You have to address it in some way.

  2. P_Vilefort | May 12, 2022 04:50am | #2

    Prosoco Air Dam is normally used to seal the back of the window frame to the rough opening. That will also prevent storm driven water from getting behind the inside portions of the window. It will also effectively seal the window from outside air intrusion and inside conditioned air from getting to the outside of the house. In addition I didn't see or read any description of taping the side flange (tape flashing) and then the top flange of the window or the addition of metal flashing that will go over the top of the window and behind the siding.
    Much of this looked like what I have seen Matt Risinger do but you left out many of the crucial details he incorporates.

Log in or create an account to post a comment.

Sign up Log in

Become a member and get full access to FineHomebuilding.com

Windows & Doors

Windows & Doors

Trusted, comprehensive guidance from the pros for choosing, installing, replacing, and repairing windows and doors on any house

View Project Guide

View All Project Guides »

Become a member and get unlimited site access, including the Windows & Doors Project Guide.

Start Free Trial

Choosing Windows
  • Window Types
  • Design and Materials
  • Energy-Efficient Windows
Installing Windows In New Walls
  • Installation, Start to Finish
  • Head Flashing for Windows
  • Video Series: Nail-Fin Window over Zip System Sheathing
  • Video Series: Nail-Fin Window over Exterior Rigid-Foam Insulation
  • Video Series: Nail-Fin Window over Housewrap
  • Video Series: Nail-Fin Window over Peel-and-Stick Housewrap
  • Video Series: Nail-Fin Window over a Fluid-Applied WRB
  • Video Series: Weatherproof Window Installation
Retrofitting Windows
  • Removing the Old, Installing the New
  • Video Series: How to Replace a Window
  • Video Series: Install a Full-Frame Replacement Window in a Brick Wall
  • Video Series: Install an Insert Replacement Window in a Brick Wall
  • Video Series: Retrofit a Flanged Window
Window Repairs
  • Restoring Old Windows
  • Repairs and Upgrades
Door Basics
  • Tools & Jigs for Door Hanging
  • How to Install Doors
  • Hinges
  • Handles, Knobs, and Locksets
  • Fixing Door Problems
Interior Doors
  • Prehung Doors
  • Pocket Doors
  • Other Types of Doors
  • Custom-Built Doors
Exterior Doors
  • Door Choices and Design
  • Installing Entry Doors
  • Building Exterior Doors
  • Installing French Doors
  • Replacing a Door
  • Adding Weatherstripping and Sweeps

Fine Home Building

Newsletter Sign-up

  • Fine Homebuilding

    Home building tips, offers, and expert advice in your inbox.

  • Green Building Advisor

    Building science and energy efficiency advice, plus special offers, in your inbox.

  • Old House Journal

    Repair, renovation, and restoration tips, plus special offers, in your inbox.

Signing you up...

This site is protected by reCAPTCHA and the Google Privacy Policy and Terms of Service apply.
See all newsletters

Follow

  • Fine Homebuilding

    Dig into cutting-edge approaches and decades of proven solutions with total access to our experts and tradespeople.

    Start Free Trial Now
    • Facebook
    • Instagram
    • X
    • LinkedIn
  • GBA Prime

    Get instant access to the latest developments in green building, research, and reports from the field.

    Start Free Trial Now
    • Facebook
    • YouTube
  • Old House Journal

    Learn how to restore, repair, update, and decorate your home.

    Subscribe Now
    • Facebook
    • Instagram
    • X

Membership & Magazine

  • Online Archive
  • Start Free Trial
  • Magazine Subscription
  • Magazine Renewal
  • Gift a Subscription
  • Customer Support
  • Privacy Preferences
  • About
  • Contact
  • Advertise
  • Careers
  • Terms of Use
  • Site Map
  • Do not sell or share my information
  • Privacy Policy
  • Accessibility
  • California Privacy Rights

© 2025 Active Interest Media. All rights reserved.

Fine Homebuilding receives a commission for items purchased through links on this site, including Amazon Associates and other affiliate advertising programs.

X
X
This is a dialog window which overlays the main content of the page. The modal window is a 'site map' of the most critical areas of the site. Pressing the Escape (ESC) button will close the modal and bring you back to where you were on the page.

Main Menu

  • How-To
  • Design
  • Tools & Materials
  • Video
  • Blogs
  • Forum
  • Project Guides
  • Reader Projects
  • Magazine
  • Members
  • FHB House

Podcasts

  • FHB Podcast
  • ProTalk

Webinars

  • Upcoming and On-Demand

Podcasts

  • FHB Podcast
  • ProTalk

Webinars

  • Upcoming and On-Demand

Popular Topics

  • Kitchens
  • Business
  • Bedrooms
  • Roofs
  • Architecture and Design
  • Green Building
  • Decks
  • Framing
  • Safety
  • Remodeling
  • Bathrooms
  • Windows
  • Tilework
  • Ceilings
  • HVAC

Magazine

  • Current Issue
  • Past Issues
  • Magazine Index
  • Subscribe
  • Online Archive
  • Author Guidelines

All Access

  • Member Home
  • Start Free Trial
  • Gift Membership

Online Learning

  • Courses
  • Project Guides
  • Reader Projects
  • Podcast

More

  • FHB Ambassadors
  • FHB House
  • Customer Support

Account

  • Log In
  • Join

Newsletter

Get home building tips, offers, and expert advice in your inbox

Signing you up...

This site is protected by reCAPTCHA and the Google Privacy Policy and Terms of Service apply.
See all newsletters
See all newsletters

Follow

  • X
  • YouTube
  • instagram
  • facebook
  • pinterest
  • Tiktok

Join All Access

Become a member and get instant access to thousands of videos, how-tos, tool reviews, and design features.

Start Your Free Trial

Subscribe

FHB Magazine

Start your subscription today and save up to 70%

Subscribe

We hope you’ve enjoyed your free articles. To keep reading, become a member today.

Get complete site access to expert advice, how-to videos, Code Check, and more, plus the print magazine.

Start your FREE trial

Already a member? Log in