FHB Logo Facebook LinkedIn Email Pinterest Twitter X Instagram Tiktok YouTube Plus Icon Close Icon Navigation Search Icon Navigation Search Icon Arrow Down Icon Video Guide Icon Article Guide Icon Modal Close Icon Guide Search Icon Skip to content
Subscribe
Log In
  • How-To
  • Design
  • Tools & Materials
  • Restoration
  • Videos
  • Blogs
  • Forum
  • Magazine
  • Members
  • FHB House
  • Podcast
Log In

Fine Homebuilding Project Guides

Tiling

Guide Home
  • Selecting Tile
  • Tools & Techniques
  • Installation Materials
  • Preparation
  • Tiling Floors
  • Tiling Walls & Backsplashes
  • Tiling Showers
  • Grouting, Sealing & Caulking
  • Maintenance & Repair
How-To

Setting Terra Cotta Pavers

Snap a chalkline grid across the floor to make laying irregular pavers easier.

By Robin Nicholas, Michael Schweit

A grid of chalklines snapped across the floor makes laying irregular tiles, such as terra-cotta Saltillos, much easier. The lines allow you to cover the floor by laying tile in one nine-tile grid at a time. The grid creates a regular, orderly looking floor, despite the irregularities of the individual tiles within each grid 1.

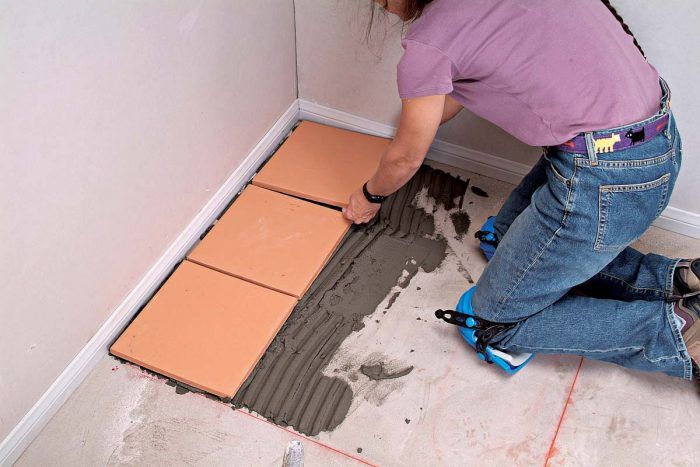
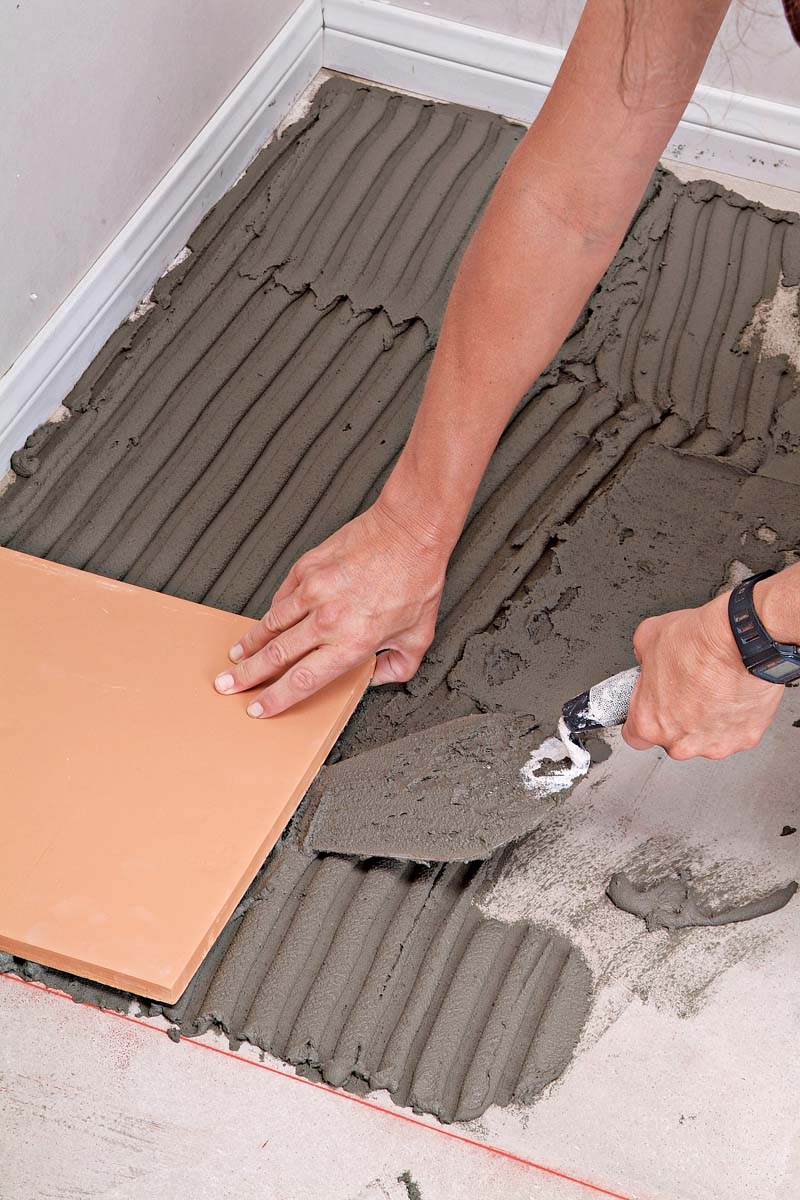
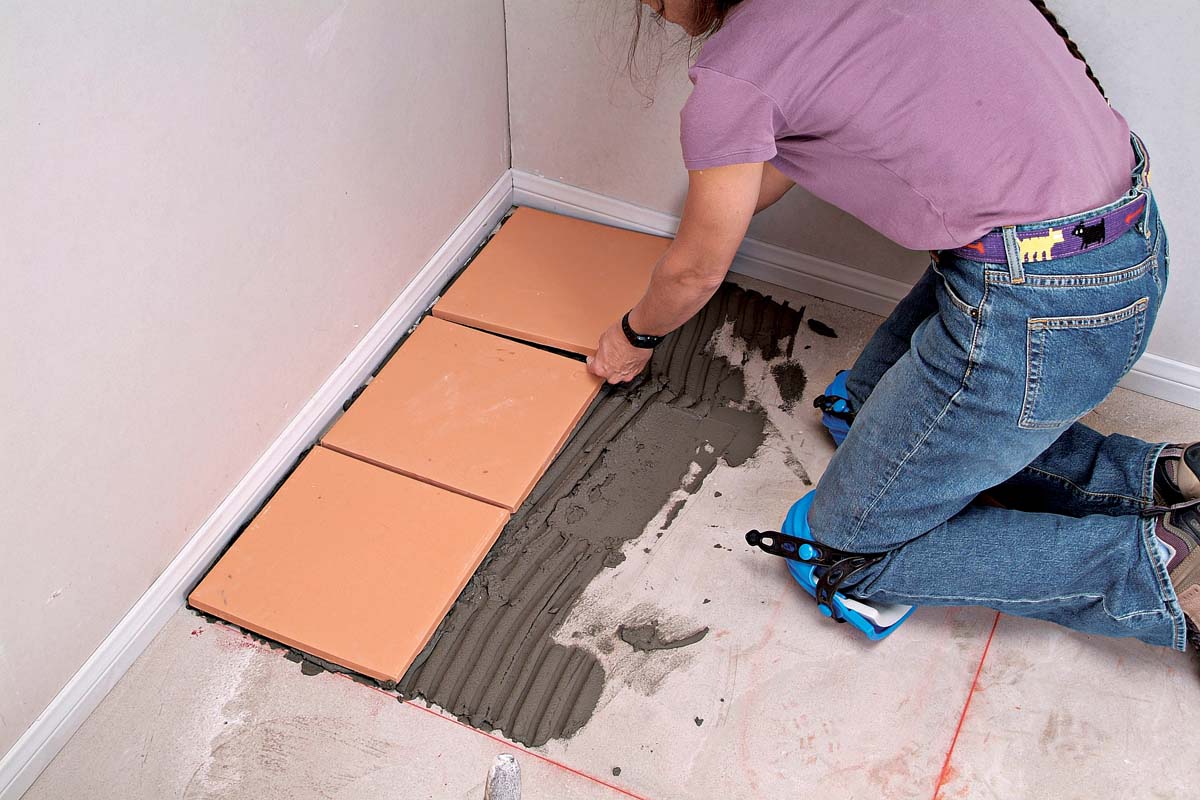
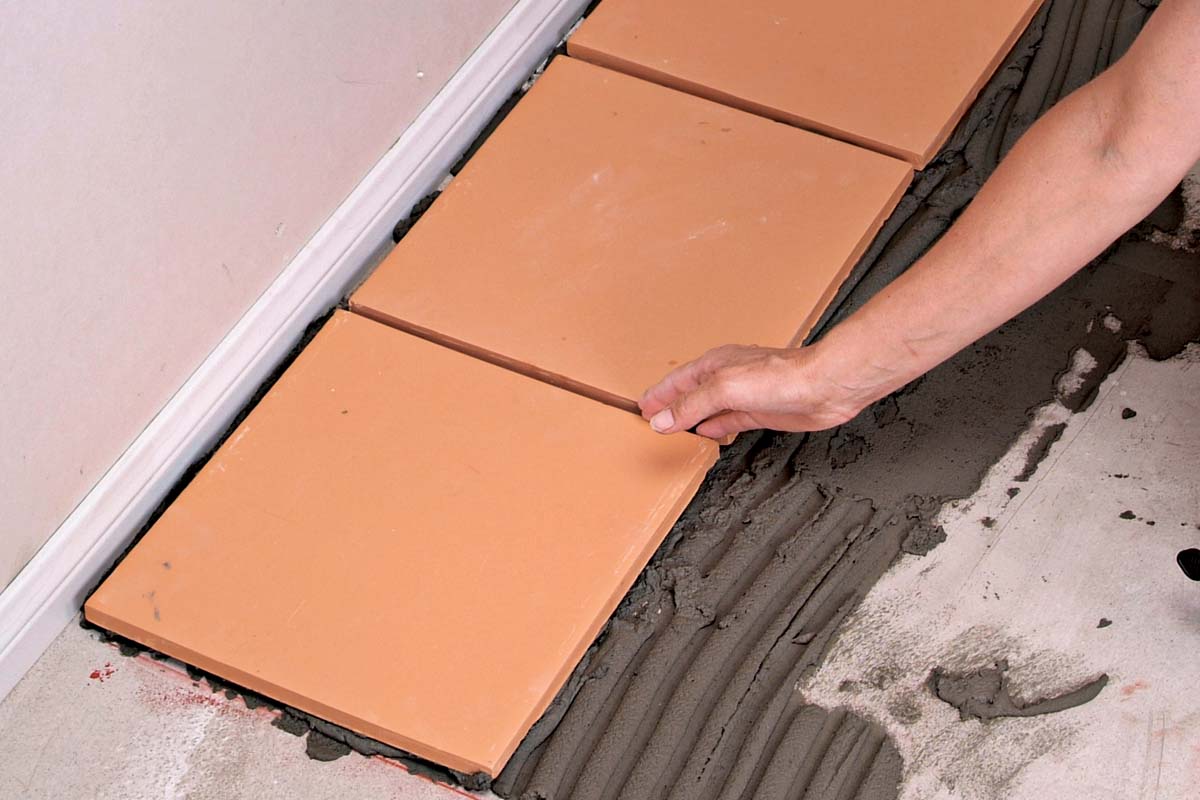
Clean the concrete (or substrate) with a damp sponge 2. Scoop a big pile of thinset onto the floor 3. Use a 1/2-in. by 1/2-in. square or half-moon notched trowel to spread and comb the thinset over the area you’re working on, making sure not to completely obscure your layout lines 4. Place the tile onto the floor, pressing it down and twisting it back and forth slightly to embed it thoroughly in the thinset 5. Make sure the edge of the tile lines up with the chalkline, but leaves enough room for the grout joint.

You’ll use more thinset to set pavers than with most other tiles. Because they’re rarely flat, it takes more material to fill the hollow spaces under their concave or convex surfaces 6. If a tile doesn’t feel fully seated when it’s set, use a margin trowel to lift it 7, then check to see if the underside is fully coated 8. If you have sparse coverage, add more thinset to fill any low areas or voids and reset the tile 9. Continue setting the tiles in the row of your grid 10. After you have filled each row, adjust the grout lines between the tiles 11. The grout joints won’t line up perfectly straight to one another, but after they are grouted, they will yield a consistent yet handmade look over the entire floor. Continue setting and adjusting tiles row by row, until the grid is full. Always wipe down the faces of the tiles before moving onto the next grid 12. Even if you preseal the tiles, it is imperative to clean the faces of each tile, because dried thinset stains can be impossible to remove. Spread thinset in the next grid and repeat the process 13. If your layout requires cut tiles, it’s best to set these last, after the tiles set in the grids have dried.

  Before setting tiles, lay down a grid line so that you can fit nine tiles within each grid. 
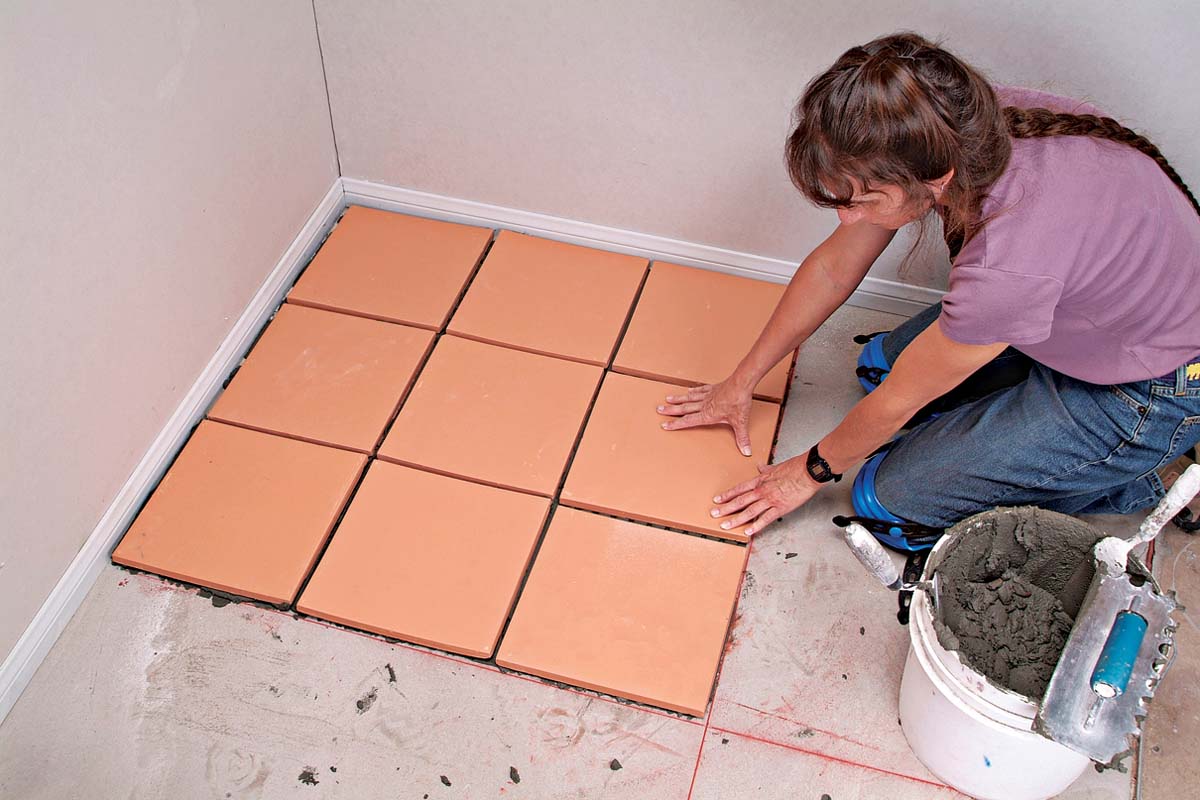
1.  Before setting tiles, lay down a grid line so that you can fit nine tiles within each grid.
2.  Wipe down your substrate with a damp sponge before spreading thinset.
Scoop a large amount of thinset onto the floor with a trowel. 
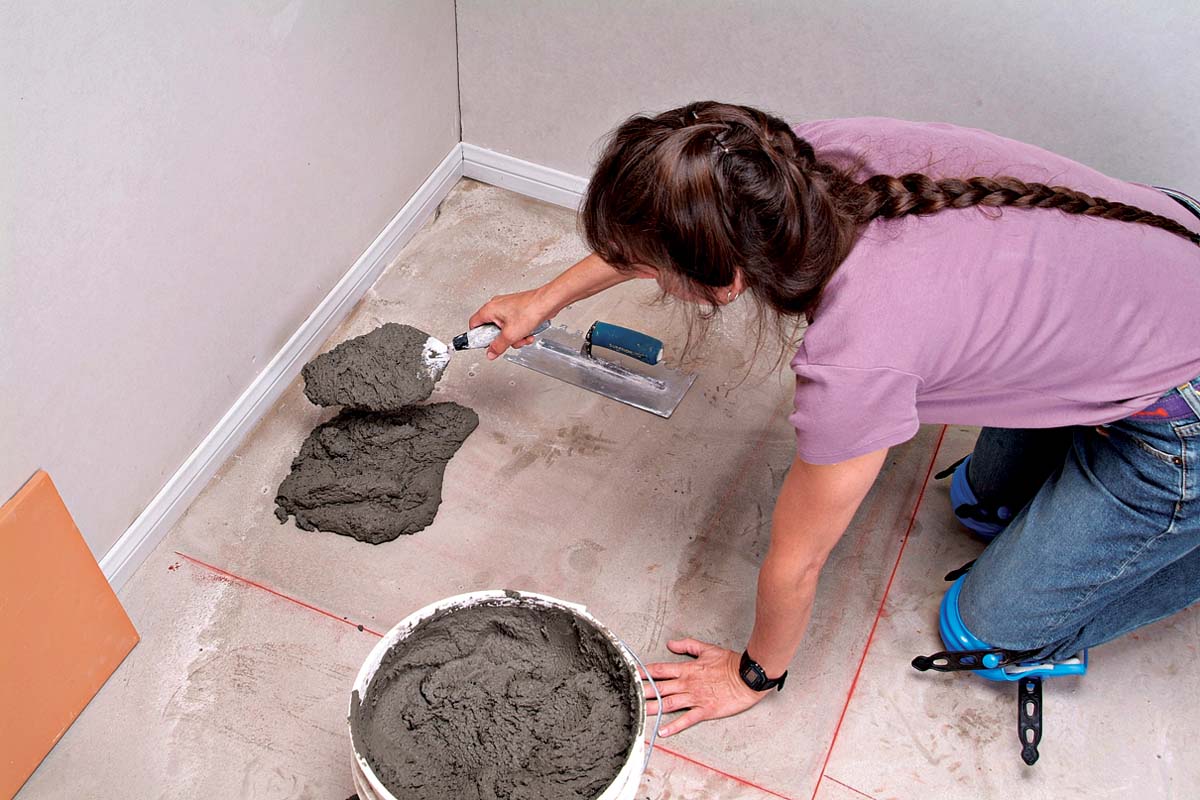
3.  Scoop a large amount of thinset onto the floor with a trowel.
Comb the thinset in one direction, using a 1/2-in. by 1/2-in. square or half-moon notched trowel. 
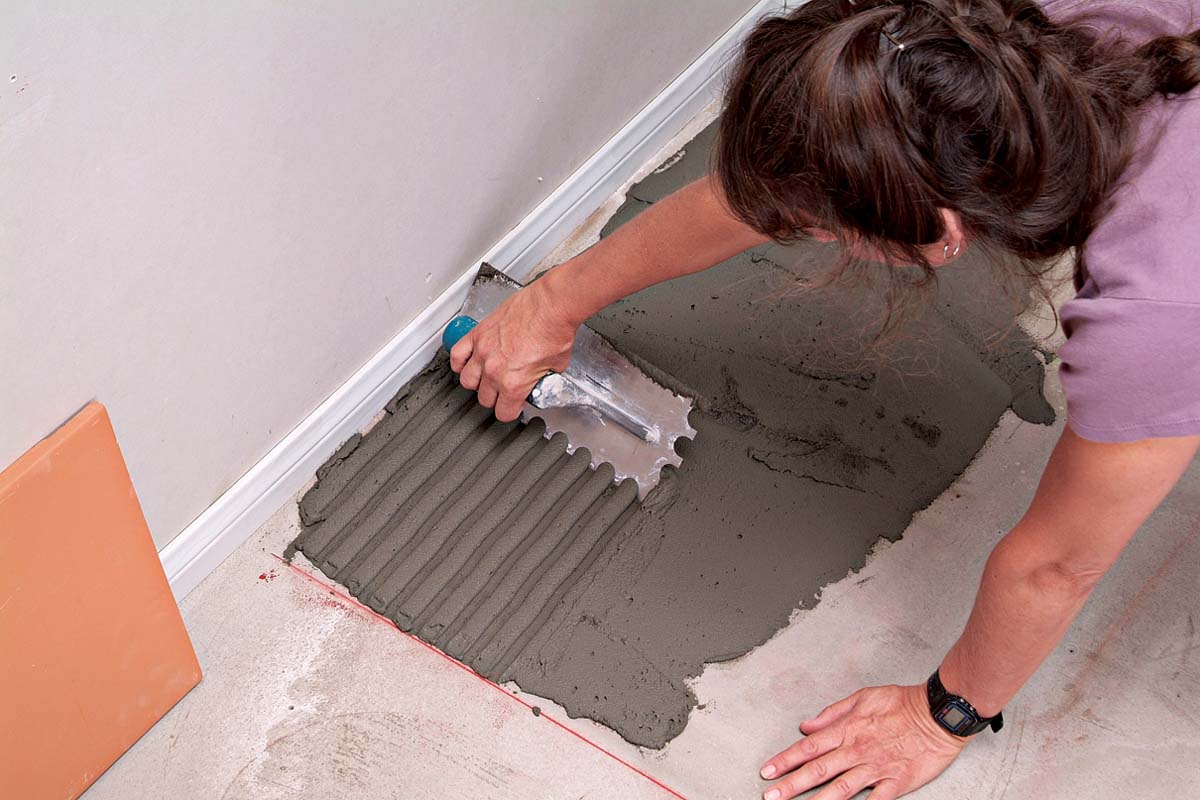
4.  Comb the thinset in one direction, using a 1/2-in. by 1/2-in. square or half-moon notched trowel.
Setting each tile with a back and forth twisting motion ensures that it’s well embedded in the thinset. 
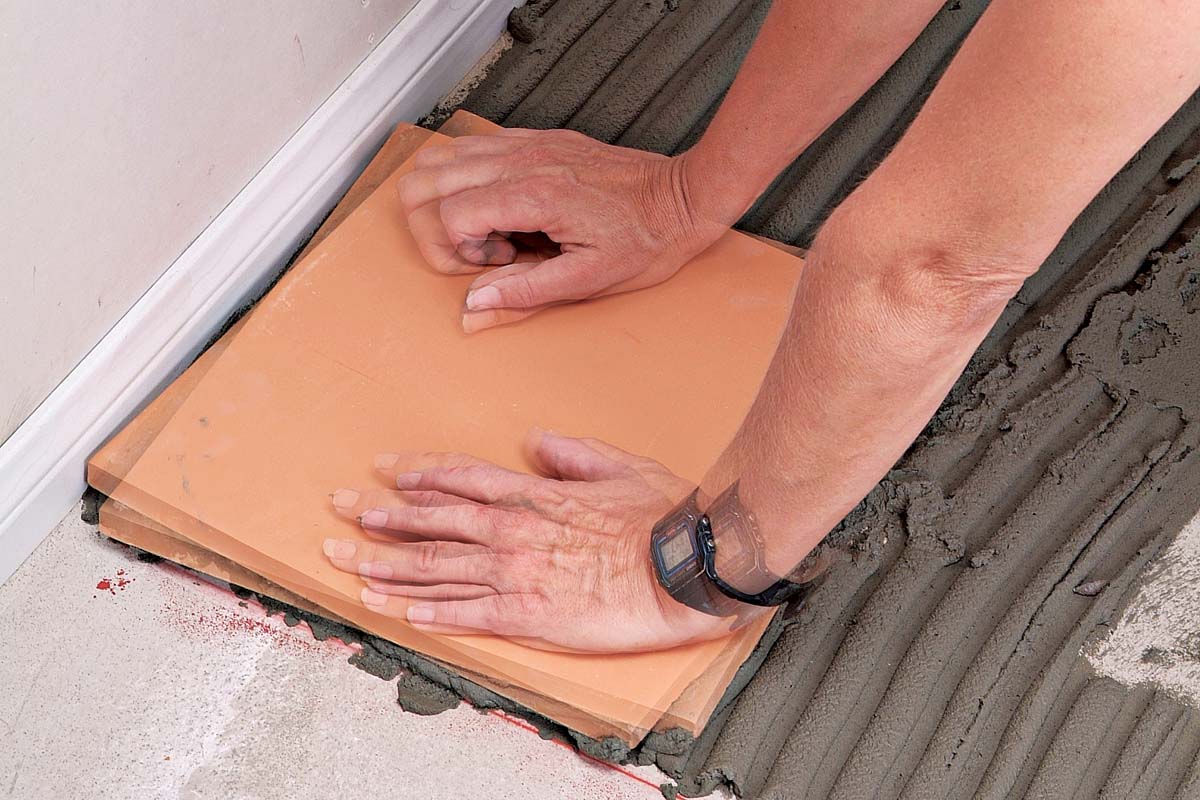
5.  Setting each tile with a back and forth twisting motion ensures that it’s well embedded in the thinset.
Pavers are often not flat and thus require more thinset under them for a proper bond. 6.  Pavers are often not flat and thus require more thinset under them for a proper bond.
Use a trowel or margin trowel to lift tiles that aren’t well seated in the thinset. 7.  Use a trowel or margin trowel to lift tiles that aren’t well seated in the thinset.
Uncoated areas on this tile show that it wasn’t properly bonded to the floor. 
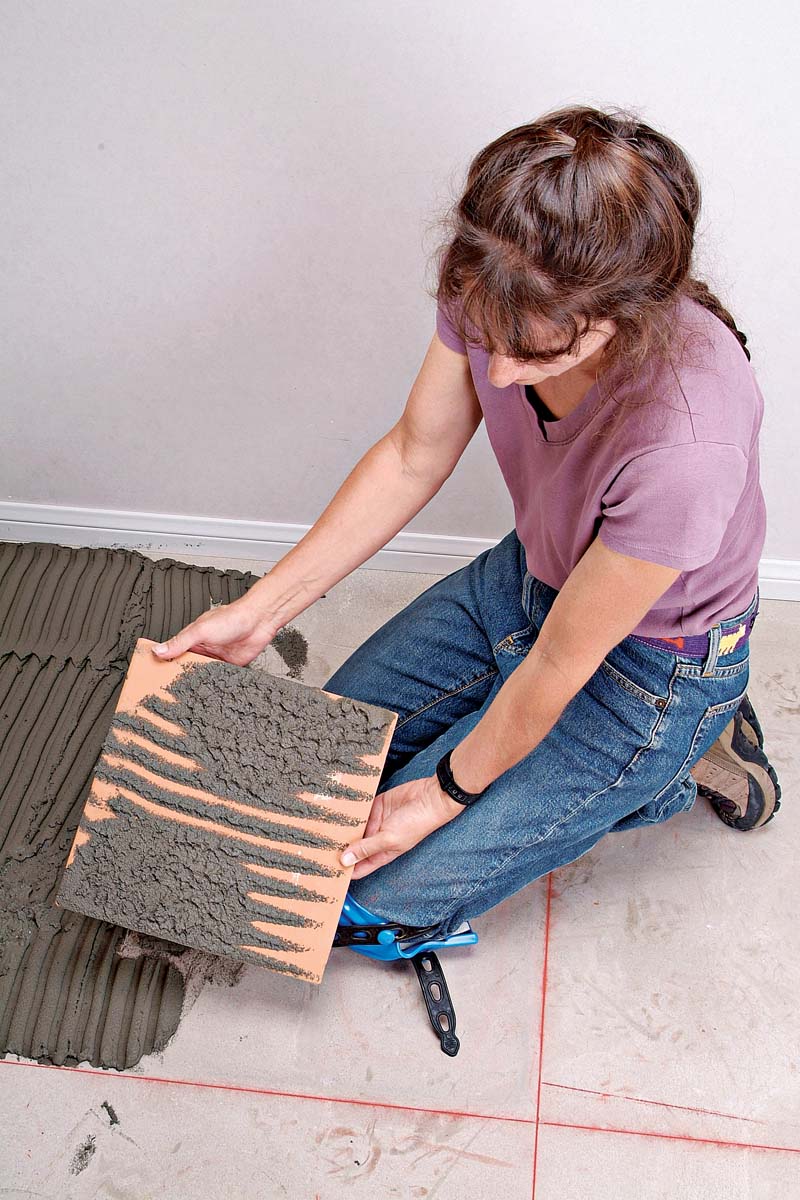
8.  Uncoated areas on this tile show that it wasn’t properly bonded to the floor.
Add more thinset to the underside of the tile, comb it, then reset it. 
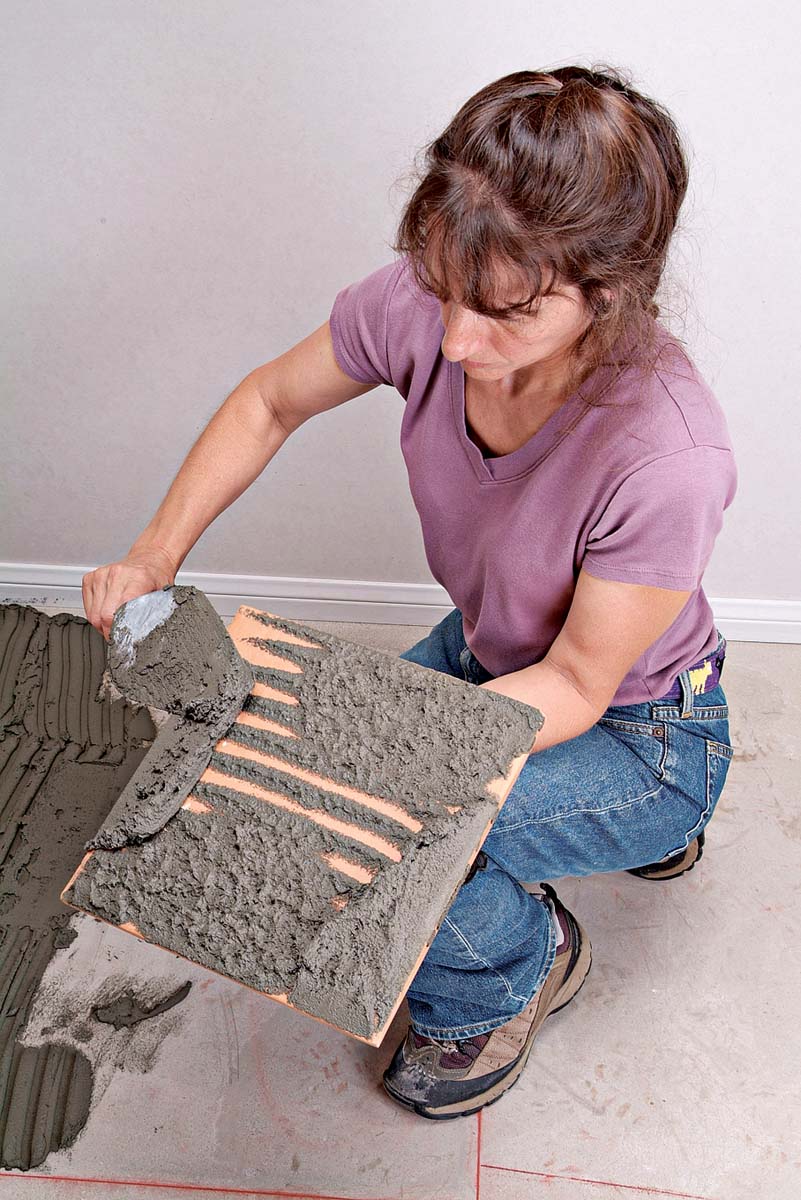
9.  Add more thinset to the underside of the tile, comb it, then reset it.
Continue to set tiles within the grid, one row at a time. 10.  Continue to set tiles within the grid, one row at a time.
Even up the space between tiles while the thinset is still wet. 11.  Even up the space between tiles while the thinset is still wet.
Use a damp sponge to immediately wipe away thinset drips from the face of the tile. 
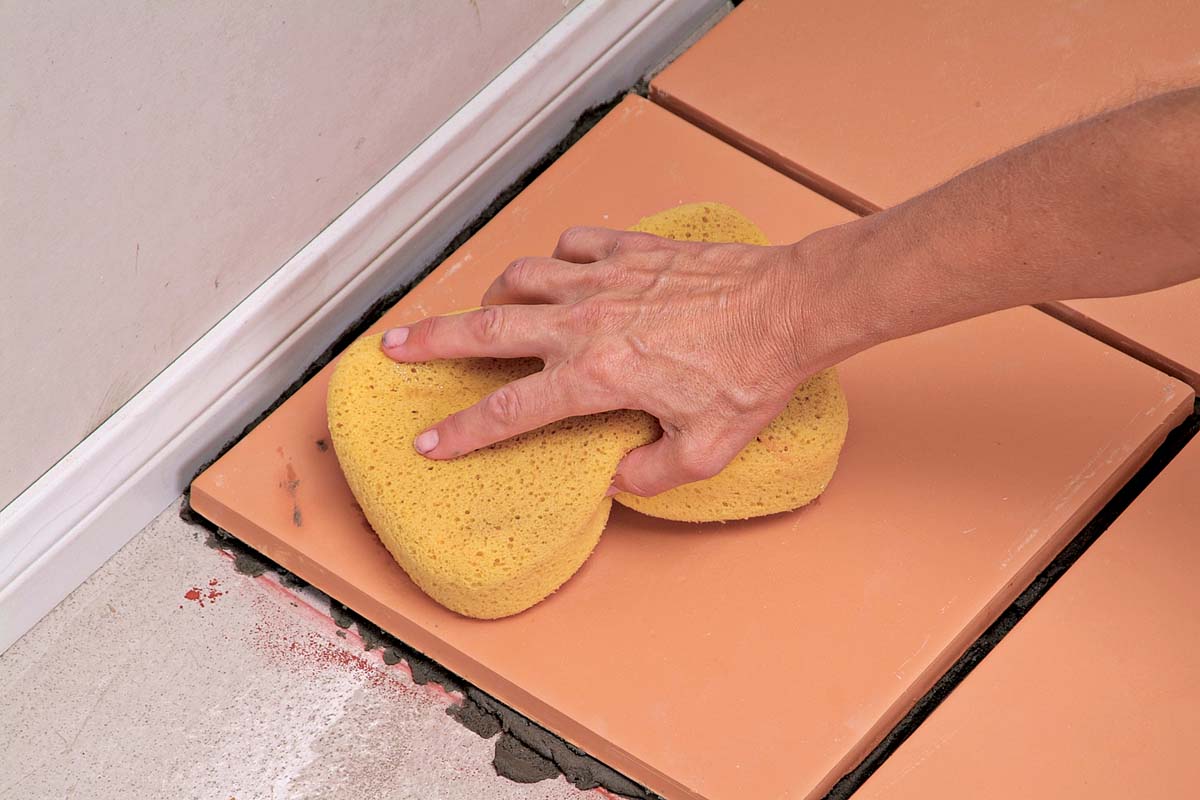
12.  Use a damp sponge to immediately wipe away thinset drips from the face of the tile.
  Continue spreading thinset and setting tiles grid by grid, aligning them with the tiles in the adjacent row. 
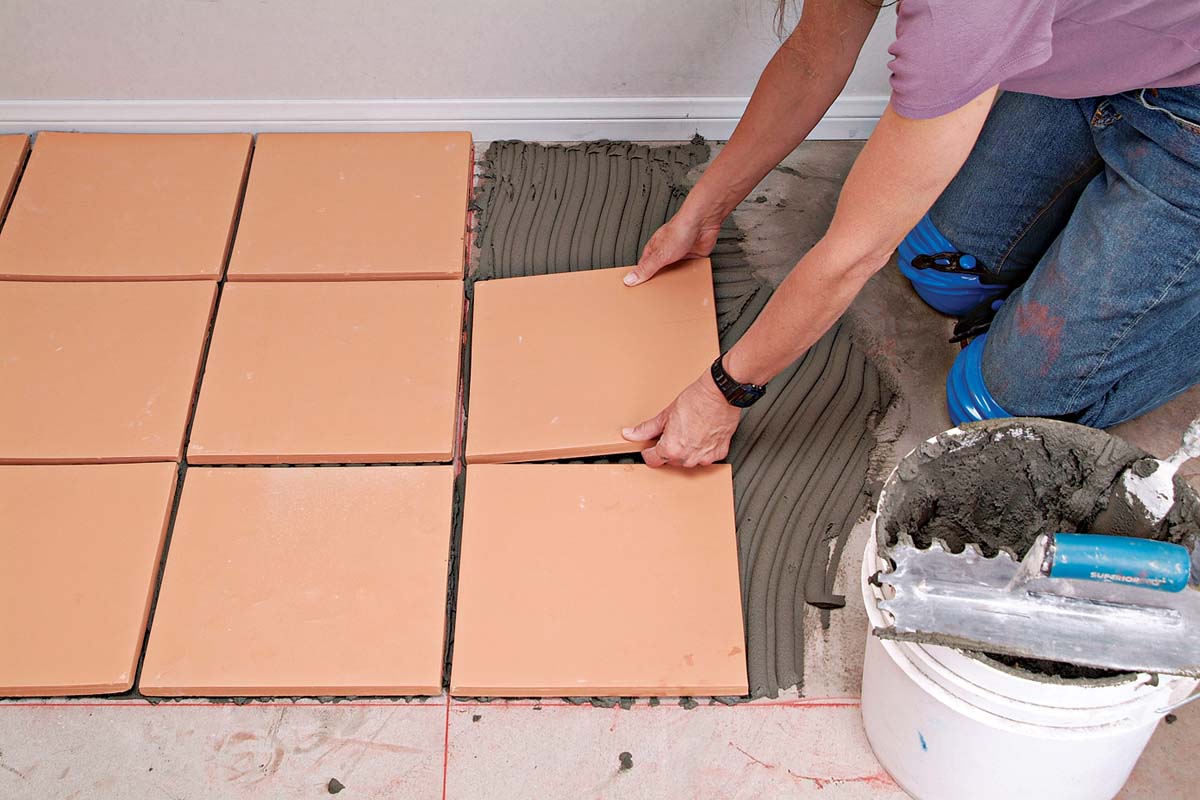
13. Continue spreading thinset and setting tiles grid by grid, aligning them with the tiles in the adjacent row.

Tiling Complete, 2nd EditionExcerpted from Tiling Complete, 2nd Edition by Robin Nicholas and Michael Schweit.

Available in the Taunton Store and at Amazon.com.

Sign up for eletters today and get the latest how-to from Fine Homebuilding, plus special offers.

Signing you up...

This site is protected by reCAPTCHA and the Google Privacy Policy and Terms of Service apply.
See all newsletters
See all newsletters
Previous: Installing Floor Trim Next: Setting Polished Stone

Guide

Tiling

Chapter

Tiling Floors

Log in or create an account to post a comment.

Sign up Log in

Become a member and get full access to FineHomebuilding.com

Tiling

Tiling

Trusted, comprehensive guidance from the pros for a great-looking tile job in any room of the house

View Project Guide

View All Project Guides »

Become a member and get unlimited site access, including the Tiling Project Guide.

Start Free Trial

Selecting Tile
  • The Basics
  • Tile Options
Tools & Techniques
  • Job-Preparation Tools
  • Cutting Tiles
  • Setting & Grouting Tools
Installation Materials
  • Membranes & Substrates
  • Adhesives & Mortars
  • Grout
  • Sealers & Caulk
  • Spacers, Hardware & Trim
Preparation
  • The Prep Job
  • Repairs & Surface Prep
  • Installing Backerboard
Tiling Floors
  • Layout & Installation
  • Setting Specialty Tiles
Tiling Walls & Backsplashes
  • Preparation
  • Backsplashes
  • Walls
Tiling Showers
  • Tile Shower Basics
  • Waterproofing
  • Shower Pans
  • Shower Drains
  • Shower Niches
  • Video Series: Tile a Shower
  • Video Series: Tile a Barrier-Free Bathroom
Grouting, Sealing & Caulking
  • Grouting
  • Caulking
  • Sealing
Maintenance & Repair
  • Maintenance
  • Tile Repair
  • Grout Repair

Fine Home Building

Newsletter Sign-up

  • Fine Homebuilding

    Home building tips, offers, and expert advice in your inbox.

  • Green Building Advisor

    Building science and energy efficiency advice, plus special offers, in your inbox.

  • Old House Journal

    Repair, renovation, and restoration tips, plus special offers, in your inbox.

Signing you up...

This site is protected by reCAPTCHA and the Google Privacy Policy and Terms of Service apply.
See all newsletters

Follow

  • Fine Homebuilding

    Dig into cutting-edge approaches and decades of proven solutions with total access to our experts and tradespeople.

    Start Free Trial Now
    • Facebook
    • Instagram
    • X
    • LinkedIn
  • GBA Prime

    Get instant access to the latest developments in green building, research, and reports from the field.

    Start Free Trial Now
    • Facebook
    • YouTube
  • Old House Journal

    Learn how to restore, repair, update, and decorate your home.

    Subscribe Now
    • Facebook
    • Instagram
    • X

Membership & Magazine

  • Online Archive
  • Start Free Trial
  • Magazine Subscription
  • Magazine Renewal
  • Gift a Subscription
  • Customer Support
  • Privacy Preferences
  • About
  • Contact
  • Advertise
  • Careers
  • Terms of Use
  • Site Map
  • Do not sell or share my information
  • Privacy Policy
  • Accessibility
  • California Privacy Rights

© 2025 Active Interest Media. All rights reserved.

Fine Homebuilding receives a commission for items purchased through links on this site, including Amazon Associates and other affiliate advertising programs.

X
X
This is a dialog window which overlays the main content of the page. The modal window is a 'site map' of the most critical areas of the site. Pressing the Escape (ESC) button will close the modal and bring you back to where you were on the page.

Main Menu

  • How-To
  • Design
  • Tools & Materials
  • Video
  • Blogs
  • Forum
  • Project Guides
  • Reader Projects
  • Magazine
  • Members
  • FHB House

Podcasts

  • FHB Podcast
  • ProTalk

Webinars

  • Upcoming and On-Demand

Podcasts

  • FHB Podcast
  • ProTalk

Webinars

  • Upcoming and On-Demand

Popular Topics

  • Kitchens
  • Business
  • Bedrooms
  • Roofs
  • Architecture and Design
  • Green Building
  • Decks
  • Framing
  • Safety
  • Remodeling
  • Bathrooms
  • Windows
  • Tilework
  • Ceilings
  • HVAC

Magazine

  • Current Issue
  • Past Issues
  • Magazine Index
  • Subscribe
  • Online Archive
  • Author Guidelines

All Access

  • Member Home
  • Start Free Trial
  • Gift Membership

Online Learning

  • Courses
  • Project Guides
  • Reader Projects
  • Podcast

More

  • FHB Ambassadors
  • FHB House
  • Customer Support

Account

  • Log In
  • Join

Newsletter

Get home building tips, offers, and expert advice in your inbox

Signing you up...

This site is protected by reCAPTCHA and the Google Privacy Policy and Terms of Service apply.
See all newsletters
See all newsletters

Follow

  • X
  • YouTube
  • instagram
  • facebook
  • pinterest
  • Tiktok

Join All Access

Become a member and get instant access to thousands of videos, how-tos, tool reviews, and design features.

Start Your Free Trial

Subscribe

FHB Magazine

Start your subscription today and save up to 70%

Subscribe

We hope you’ve enjoyed your free articles. To keep reading, become a member today.

Get complete site access to expert advice, how-to videos, Code Check, and more, plus the print magazine.

Start your FREE trial

Already a member? Log in