FHB Logo Facebook LinkedIn Email Pinterest Twitter X Instagram Tiktok YouTube Plus Icon Close Icon Navigation Search Icon Navigation Search Icon Arrow Down Icon Video Guide Icon Article Guide Icon Modal Close Icon Guide Search Icon Skip to content
Subscribe
Log In
  • How-To
  • Design
  • Tools & Materials
  • Restoration
  • Videos
  • Blogs
  • Forum
  • Magazine
  • Members
  • FHB House
  • Podcast
Log In
Design

The Rotproof Porch

Water management is the key to keeping a porch standing for decades.

By Chris Ermides Issue 212
Photo by Roe A. Osborn.

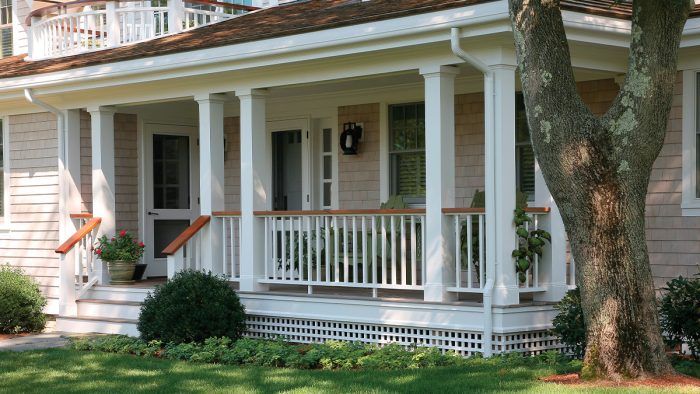
Like a deck, a front porch is a social space that enhances a house by providing an outdoor living area. Also like a deck, a front porch requires fastidious detailing to prevent rot and decay that can be brought on by poor water drainage. Chris Ermides takes a look at the details that the best builders use to make sure that front porches last for a long time.

He addresses nine important things when building a front porch: slope the stairs, isolate the framing, pitch the floor, protect the posts, cover the soil, flash the ledger, bevel the railings, vent the trim, and cap the newel. This article also includes information on the best ways to detail piers, flash the porch, lay the porch floor, and direct water movement.

Mitigating Moisture is Key

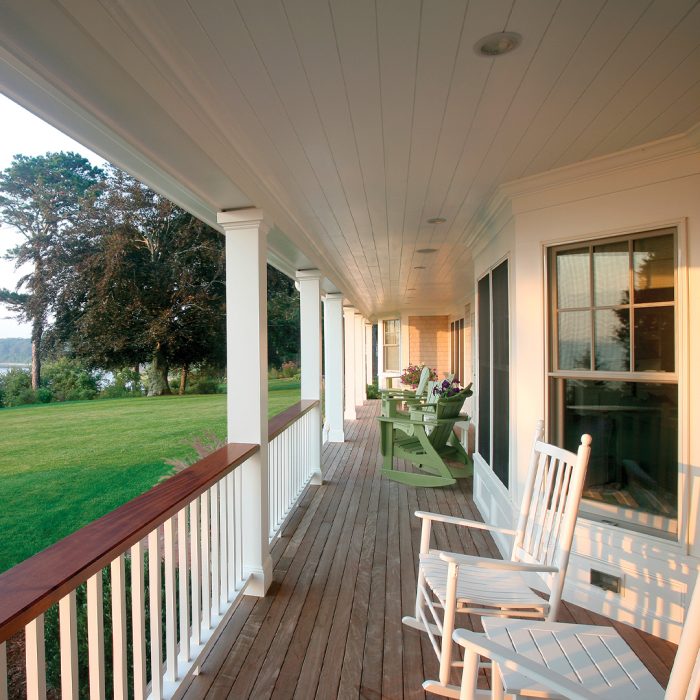
Covered front porches aren’t like decks. They’re both good places to enjoy the outdoors, but they don’t serve the same functions. Grills and dining tables don’t typically find themselves on front porches. Swings and rockers do, though. On the front of the house, a well-designed porch can set a welcoming tone; the porch’s purpose is as much architectural as practical.

Porches don’t take the same kind of beating that decks do, either, but they do take a significant amount of abuse from the elements. Rain, snow, and humid air can wreak havoc. No matter what part of the country, moisture is a porch’s worst enemy.

To learn the best building practices for porches and to discover where the most troublesome details lie, I spoke with builders in Rhode Island, Louisiana, Arkansas, and North Carolina. What follows is a compilation of the most meticulous details I could find.

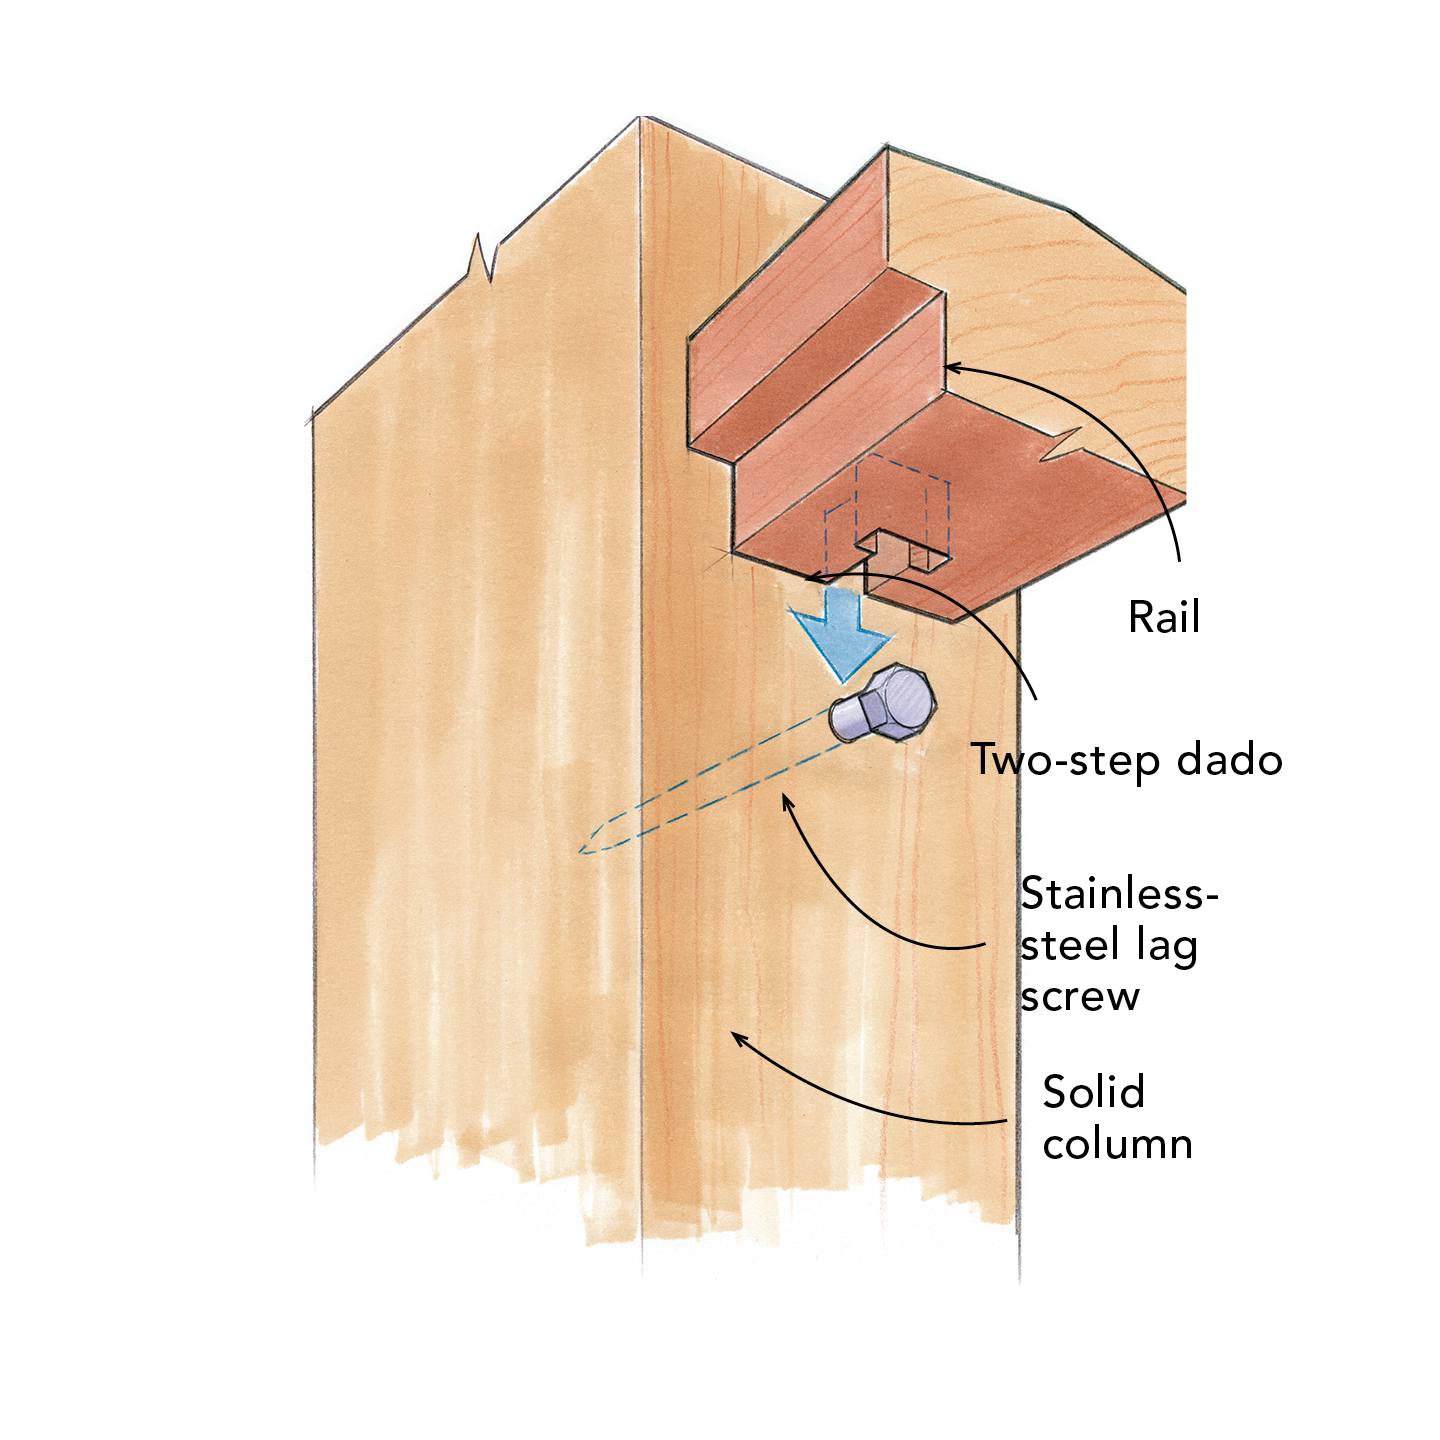
One builder, Mike Davis in New Orleans, takes a particularly aggressive approach to creating a rotproof porch and has devised a way of connecting a railing to a column that is as practical as it is strong. Much depends on the design of the porch, but the principles are the same. As Davis likes to say, “Think marine—and I mean boats, not military.”

9 Trouble Spots

Many elements of a covered porch are protected by the roof, but they still take a lot of abuse from the elements. Moisture is the biggest offender. Depending on the climate, rain and snow can result in trapped moisture and can promote rot. Taking steps to ensure drainage and to facilitate air movement can go a long way toward keeping a porch around for decades. Here is a look at the most vulnerable parts of a porch and some tips on how to protect them.

1.) Slope the Stairs: Avoid single-board stair treads when possible. Two-board or three-board treads spaced slightly apart allow water to drain to a pitched concrete pad below the stringers and keep water moving.

2.) Isolate the Framing: No matter what type of pier design you use, isolate the framing. When wood and concrete touch, rot happens, no matter how well the lumber is treated.

3.) Pitch the Floor: Traditionally, porch flooring runs perpendi-cular to the house and con-sists of tongue-and groove Douglas fir. Priming all six sides and pitching the floor frame to drain water are keys to longevity. Flooring that runs parallel to the house should have gaps for water drainage.

4.) Protect the Posts: Keep water moving around (or through) the column bottom, and facilitate air movement via weep holes or vents. Seal and pitch exposed column tops and applied trim.

5.) Cover the Soil: Make sure the grade below the porch pitches away from the house at least 1⁄4 in. per ft. Porches that sit close to the ground should be protected from rising ground moisture with a polyurethane vapor barrier over the soil. It’s important to allow air circulation below the deck as well.

6.) Flash the Ledger: Despite the roof, wind-driven rain and snow can creep behind the flooring and siding. Flash the ledgers into the housewrap and siding using peel-and-stick and metal flashing.

7.) Bevel the Railings: Railing tops and bottoms should be pitched to shed water. Seal all end cuts, and attach balusters through the tops and bottoms. Use rot-resistant lumber and epoxy coatings, especially when the railings are flat.

8.) Vent the Trim: Fur trim details like the fascia and stair skirting 1⁄2 in. away from framing they attach to. This promotes air movement, which allows drying.

9.) Cap the Newel: Protect the newel with an applied cap. Newel caps should be well pitched for drainage.

Two Ways to Detail Piers

Like piers for decks, porch piers support loads from floor framing. Unlike most deck piers, however, they also have to support the roof. Brick piers were common in old homes, but they aren’t ideal. Both brick and mortar absorb water, so they’re prone to deterioration from ground moisture.

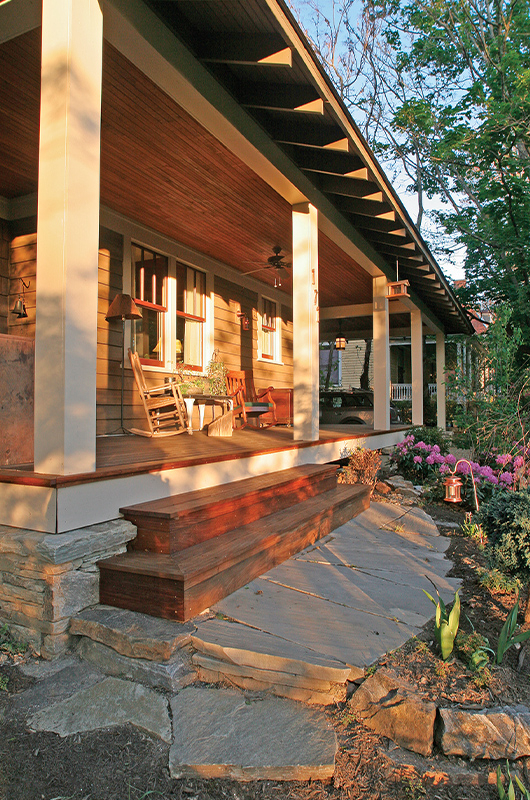
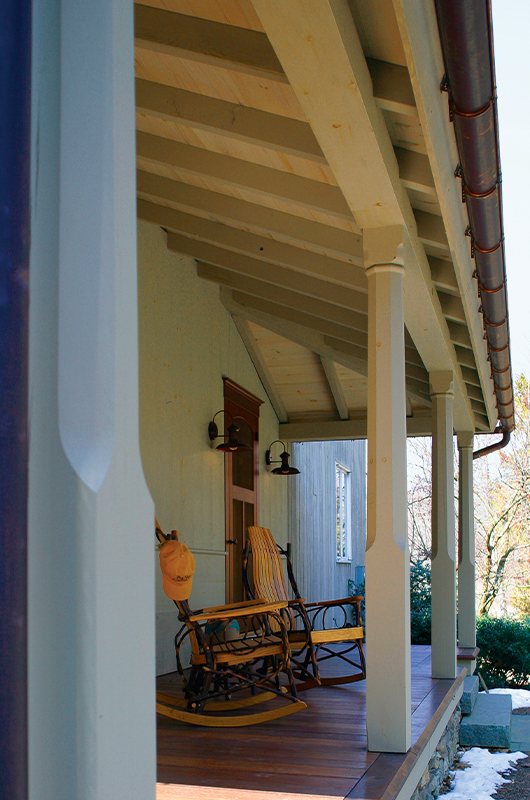
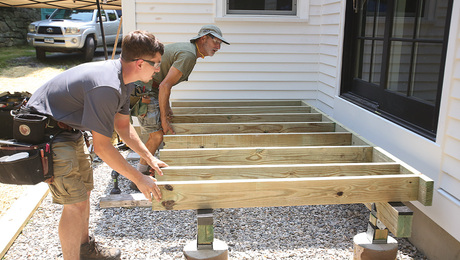
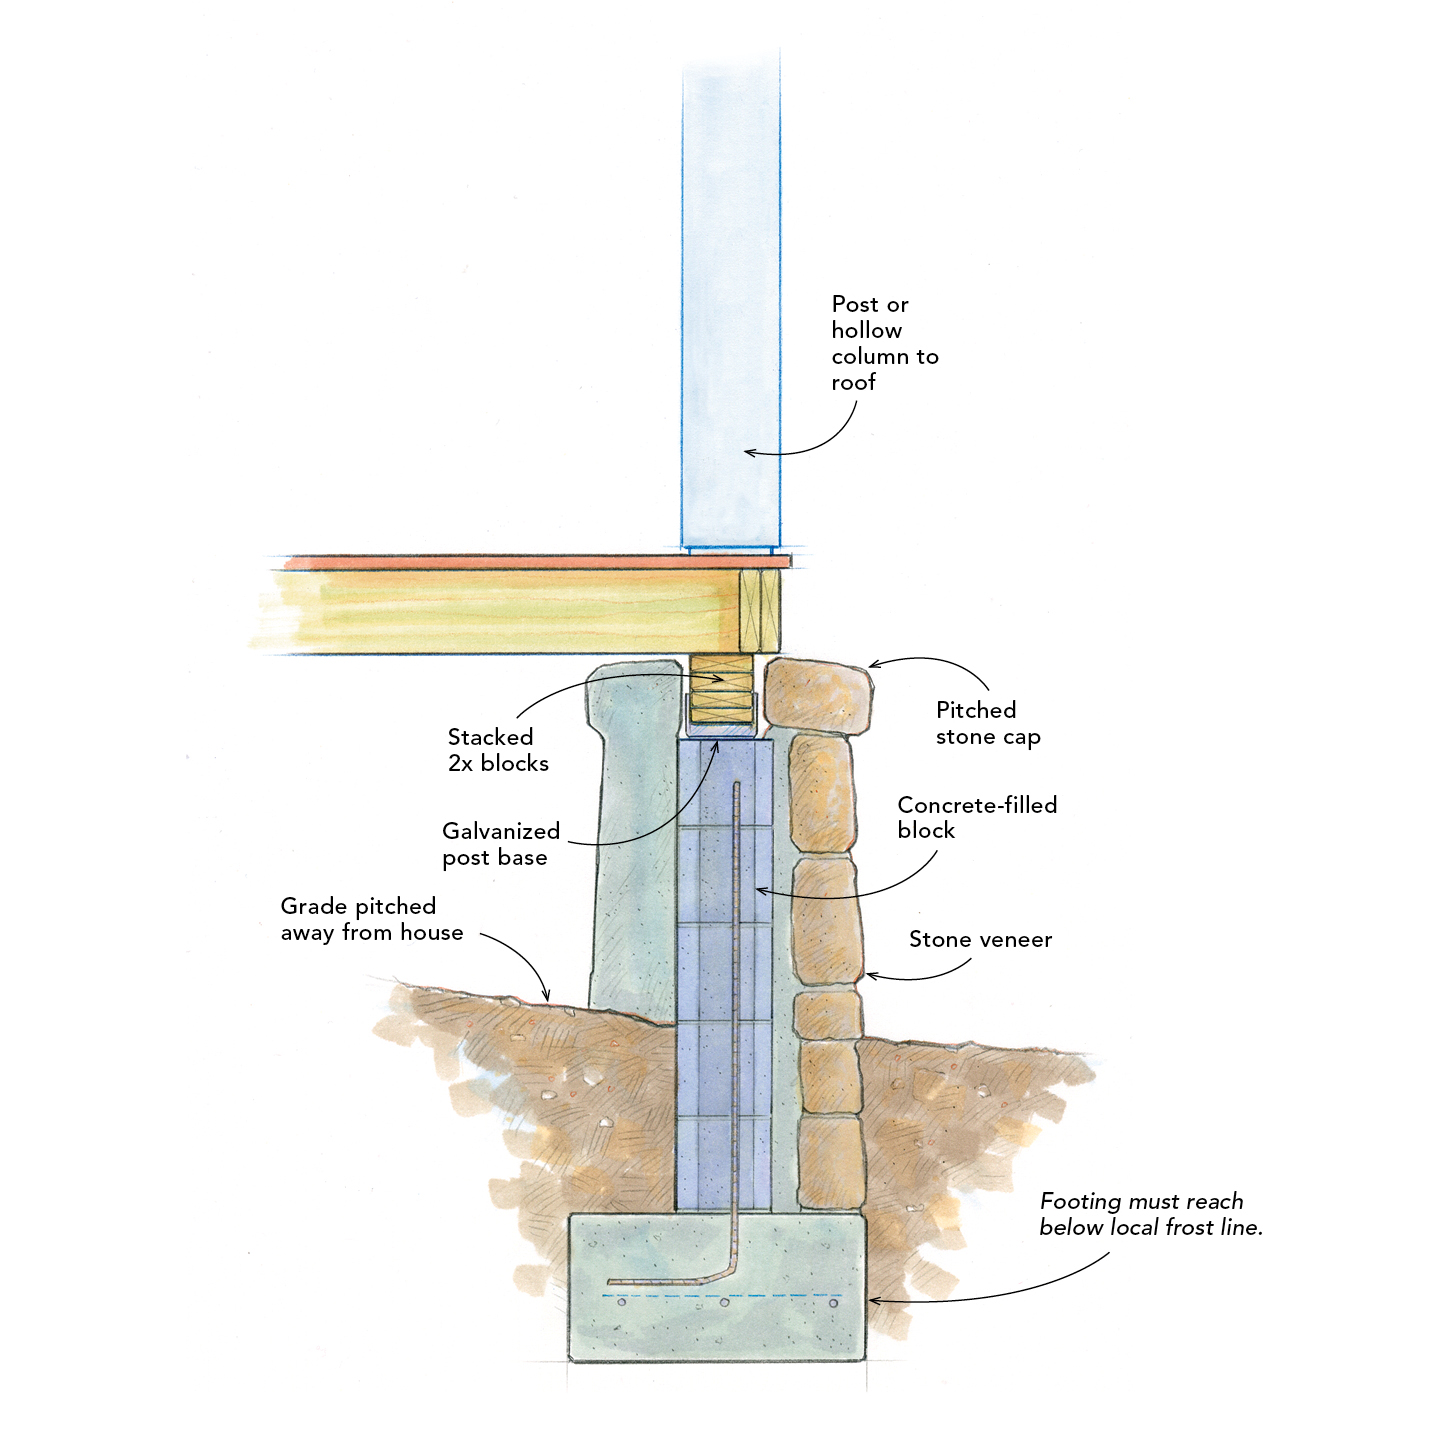
While concrete-filled builders’ tubes are the obvious choice for decks, they’re not necessarily the first choice for porches. Many builders use concrete blocks and chimney blocks for porch piers because they’re often part of the porch’s design, as seen in the photo at left and in the drawing below left.

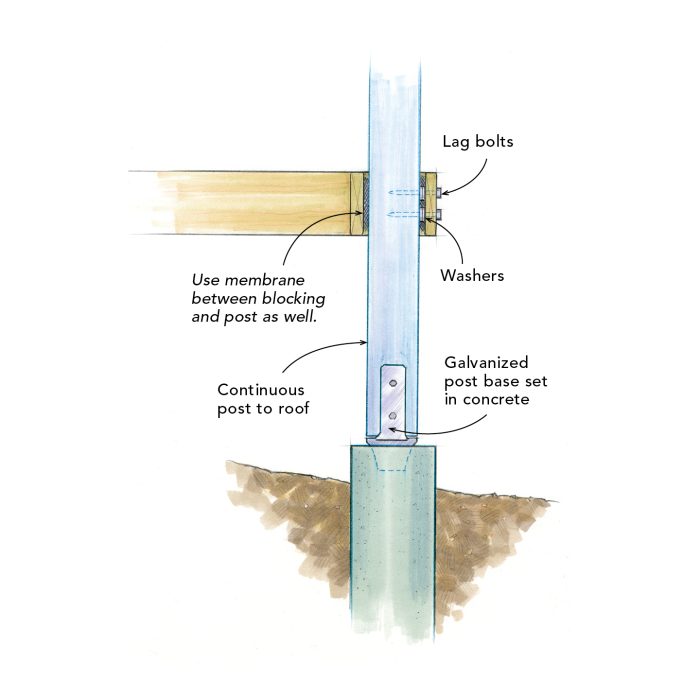
Set on a concrete footing below the frost line, concrete-filled block provides a substantial foundation—visually and practically—on which floor framing can be built. Wrapping the block with stone or brick dresses it up. A pitched cap should be used if the veneered stone or brick sits proud of the porch’s fascia.

Forming a capillary break between the concrete and the framing material is the key to avoiding moisture damage. Use metal anchors to connect piers and framing lumber. Areas where wind uplift is a concern often require posts to run continuously from pier to roof and are fastened with hurricane-rated metal connectors, as seen in the drawing below right. Piers should be isolated from freeze-thaw cycles, which can cause frost heave.

Dress Up the Block: The concrete block and footing carry the roof and floor loads. They also make a good substrate for stone veneer. Stacked 2x blocks set in a post base support the transfer of loads from above. A pitched cap sheds water away from the pier. Click here to enlarge drawing.

Frame Around a Column: Code-approved galvanized post bases set in concrete resist wind uplift. Stainless-steel lag bolts secure the floor frame to the columns. Framing is held off the post with washers and a drainage membrane. Floorboards held 1⁄4 in. back from the columns allow for drainage. Click here to enlarge drawing.

Photo by Chris Ermides.

Photo by James West / Jwest Productions.

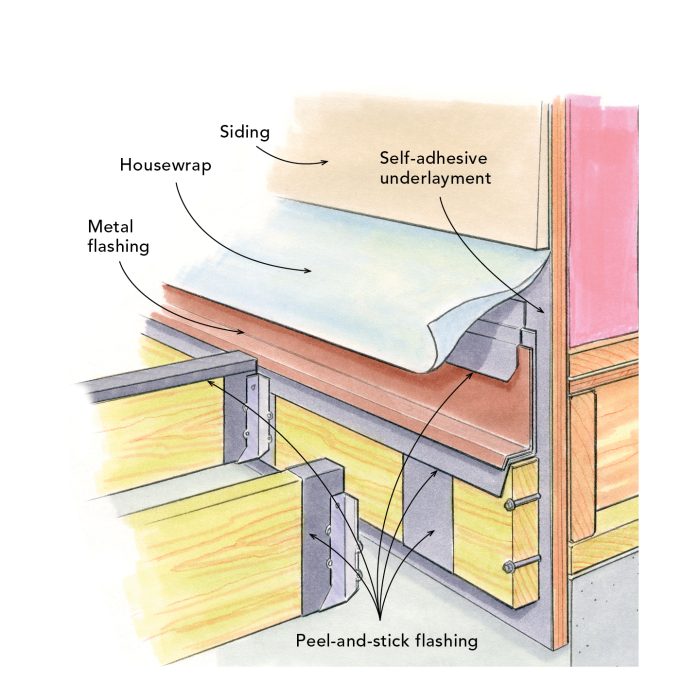
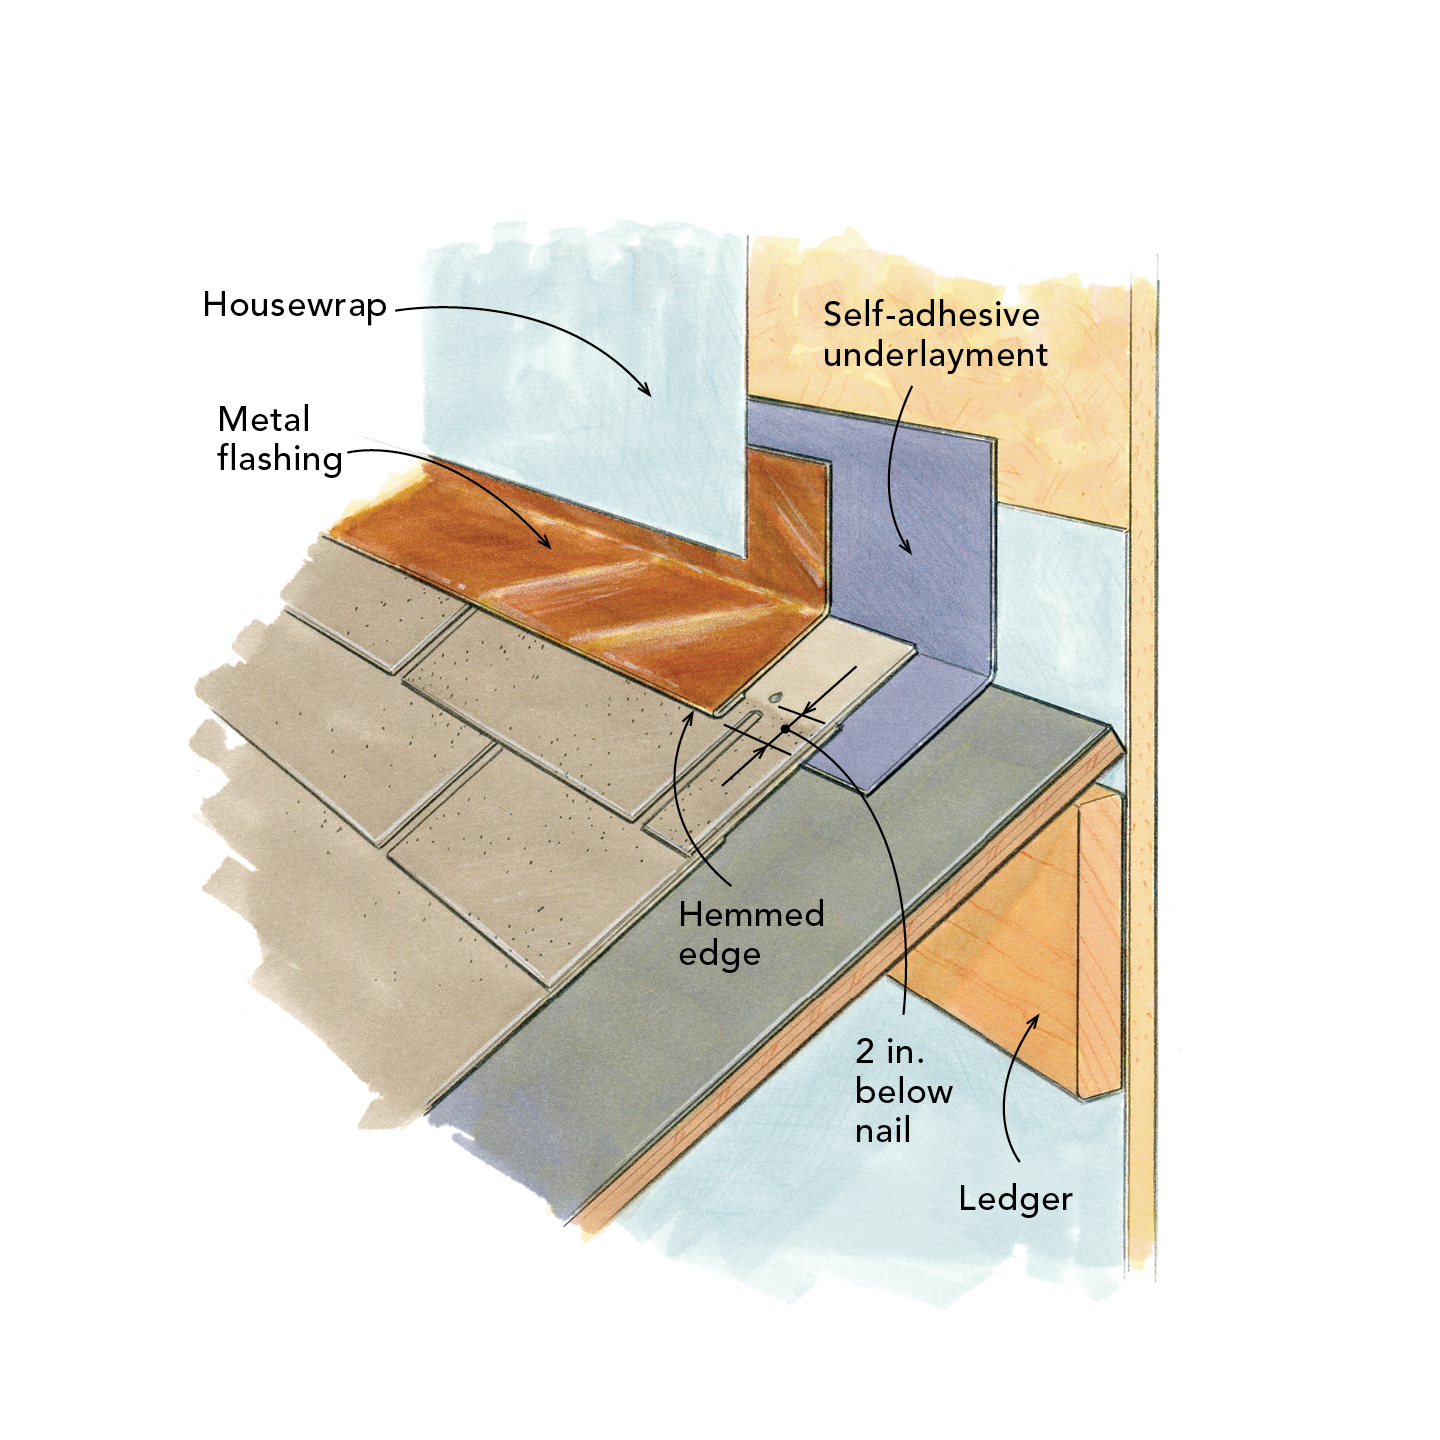
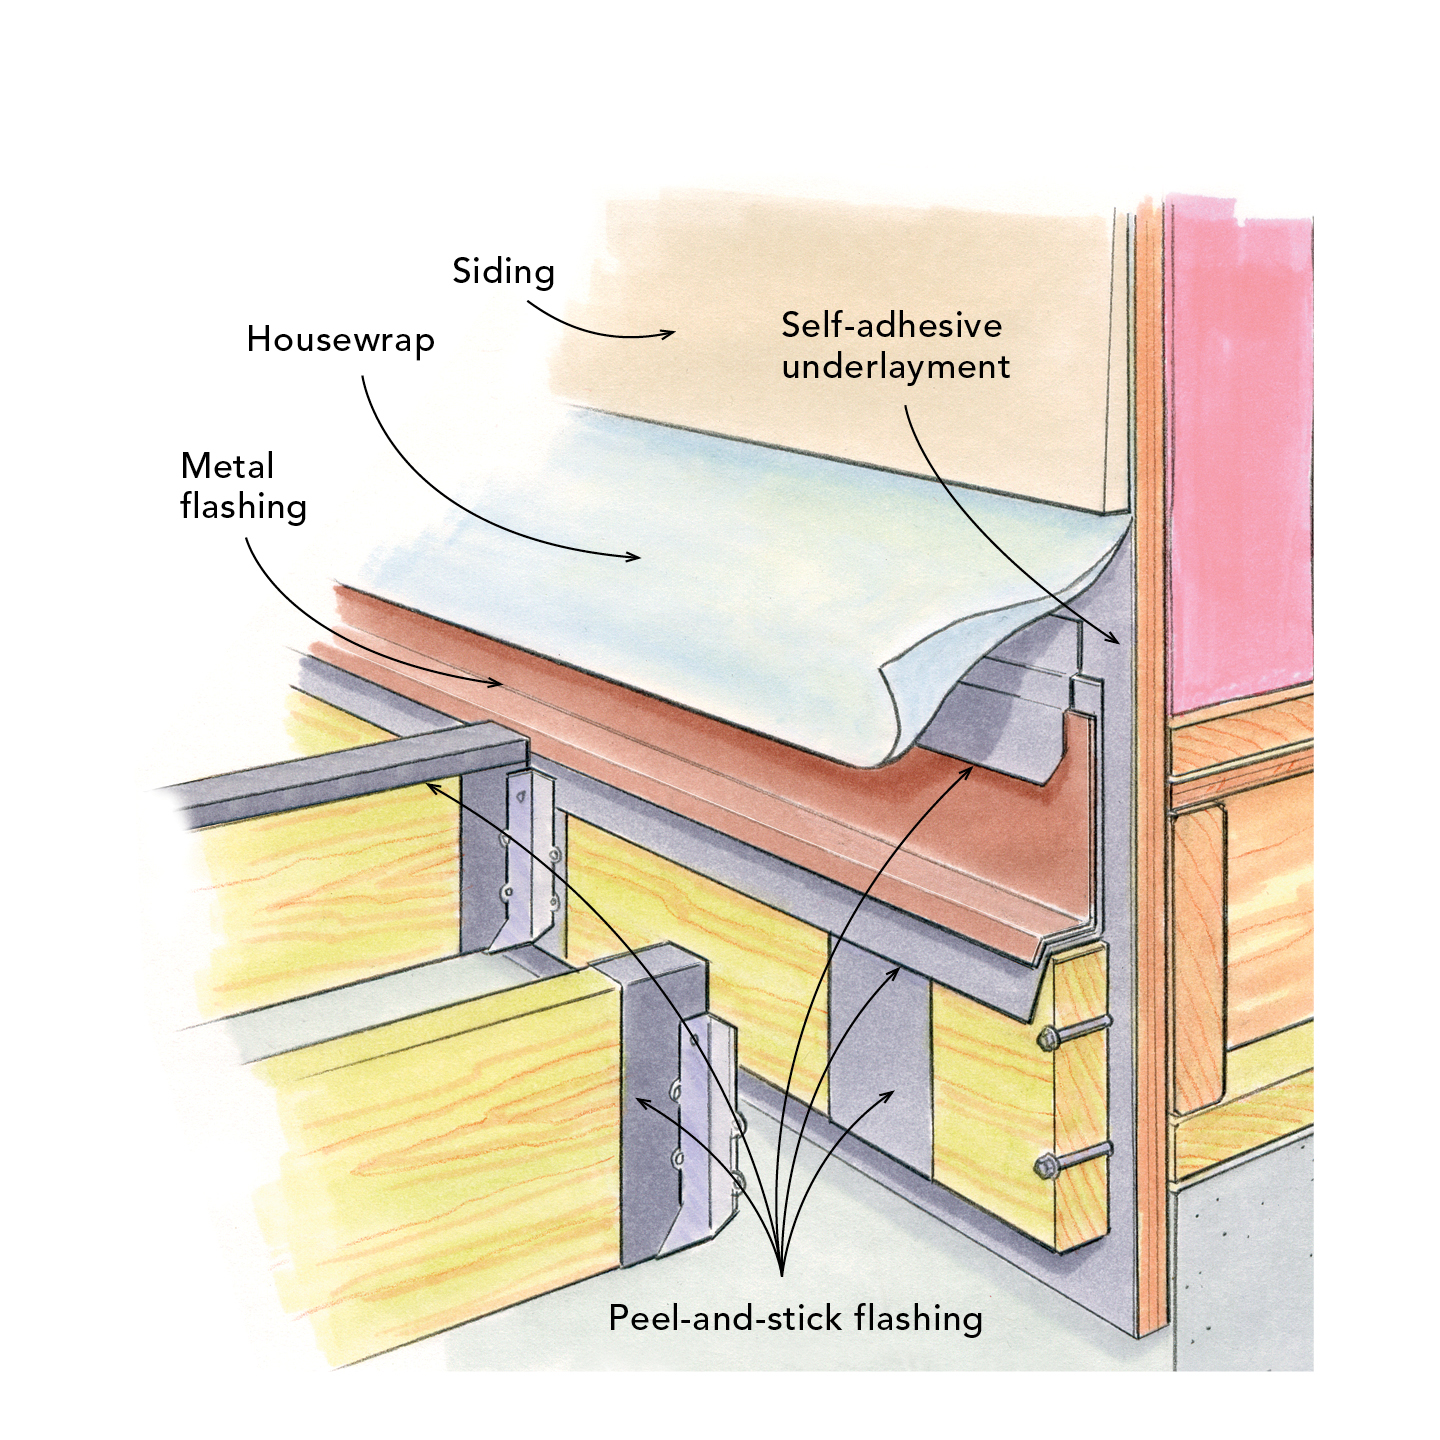
Flashing Protects the Framing

Protect the framing beneath the roof and the floor of the porch with a combination of peel-and-stick and metal flashings. The process for each location is slightly different, but the results are the same: a continuous drainage plane that keeps the ledgers dry and moisture at bay.

While most treated-wood manufacturers have addressed the corrosion issues associated with galvanized-hanger-and-wood contact, the potential for a reaction still exists. Choose stainless-steel hangers and fasteners if possible. Or wrap joist ends with peel-and-stick flashing. Covering the tops of joists with peel-and-stick flashing prevents water intrusion around the fasteners.

Flash the Roof, Not the Ledger: A ledger attached to the wall framing carries the rafters. Peel-and-stick flashing or tar paper seals the house-to-sheathing joint. Metal flashing woven behind the layer of housewrap kicks out moisture behind the siding. Click here to enlarge drawing.

Flash the Ledger, Not the Decking: Self-adhesive underlayment attached to the house sheathing protects the wall from wind-driven rain. Attach the ledger to the house with LedgerLok screws, carriage bolts, or lag bolts. Cap the ledger with both peel-and-stick and metal flashings. Run all flashing shingle style in conjunction with the housewrap to maintain a continuous drainage plane. Click here to enlarge drawing.

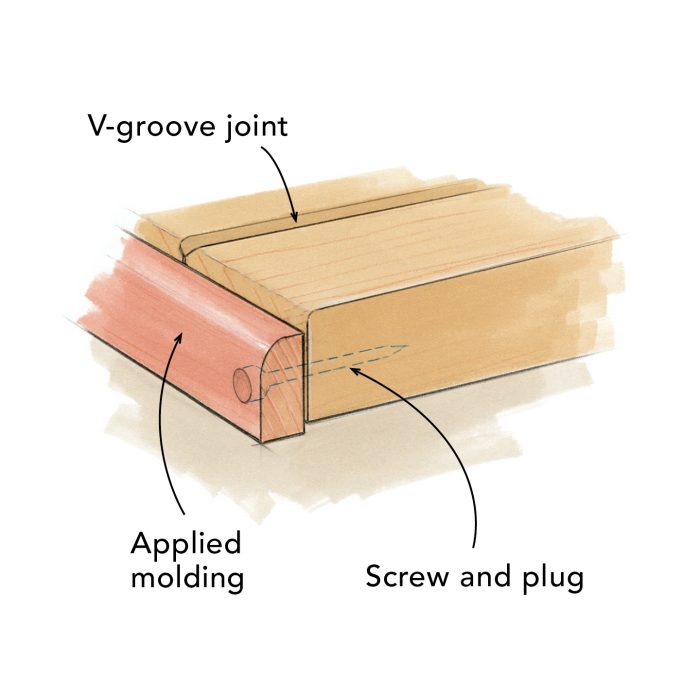
Perpendicular or Parallel?

Traditional porch floors consist of tongue-and-groove flooring run perpendicular to the house. When laid this way, priming all six sides is essential. Running a board parallel to the house at the edge of the porch can help to protect the otherwise exposed end grain of the porch floor. When running flooring perpendicular to the house, space the boards and use hidden fasteners. The best reason for using hidden fasteners is the same for tongue-and-groove flooring: The untarnished finished surface is more durable and smooth.

Photo by Roe A. Osborn.

Photo by Roe A. Osborn.

Protect and Drain: An applied molding secured with epoxy and stainless-steel screws seals the end grain. A V-groove at each joint channels heavy water flows away from the house. Click here to enlarge drawing.

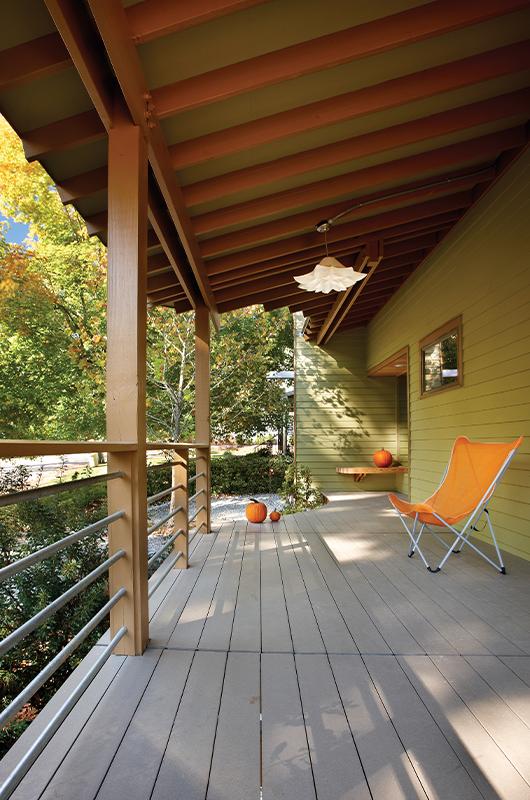
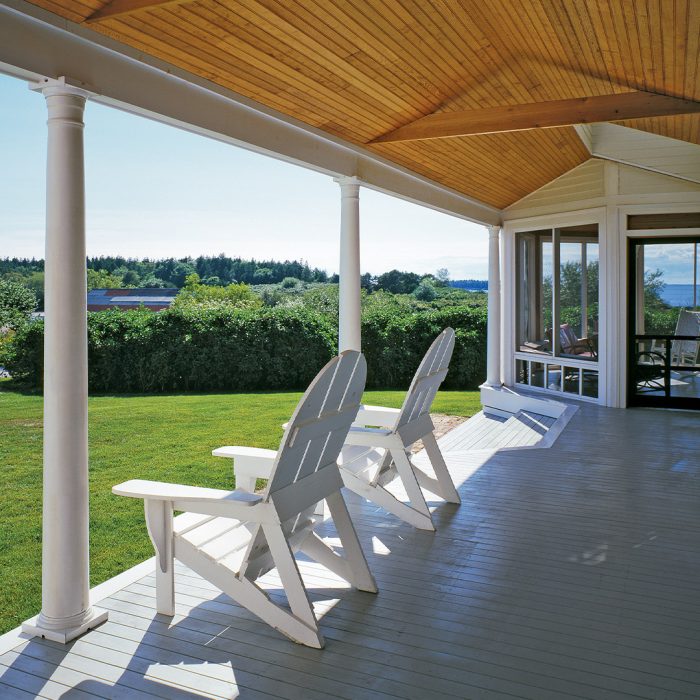
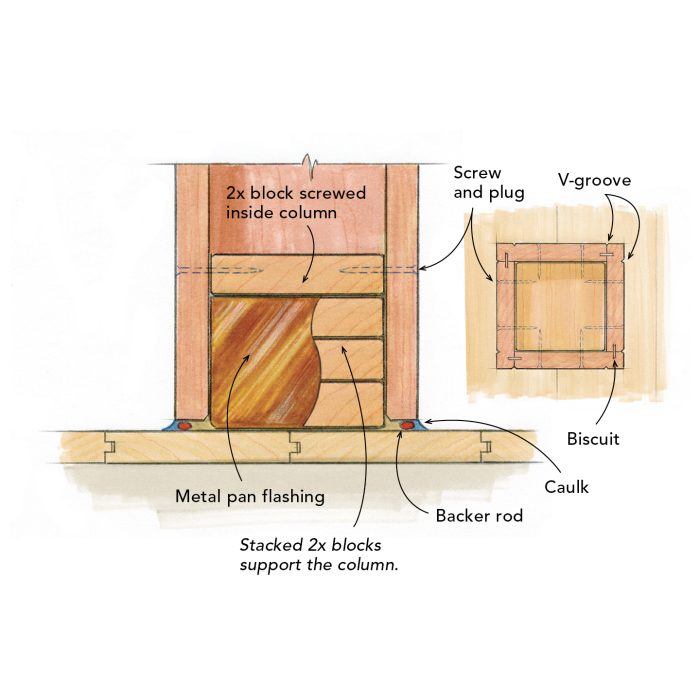
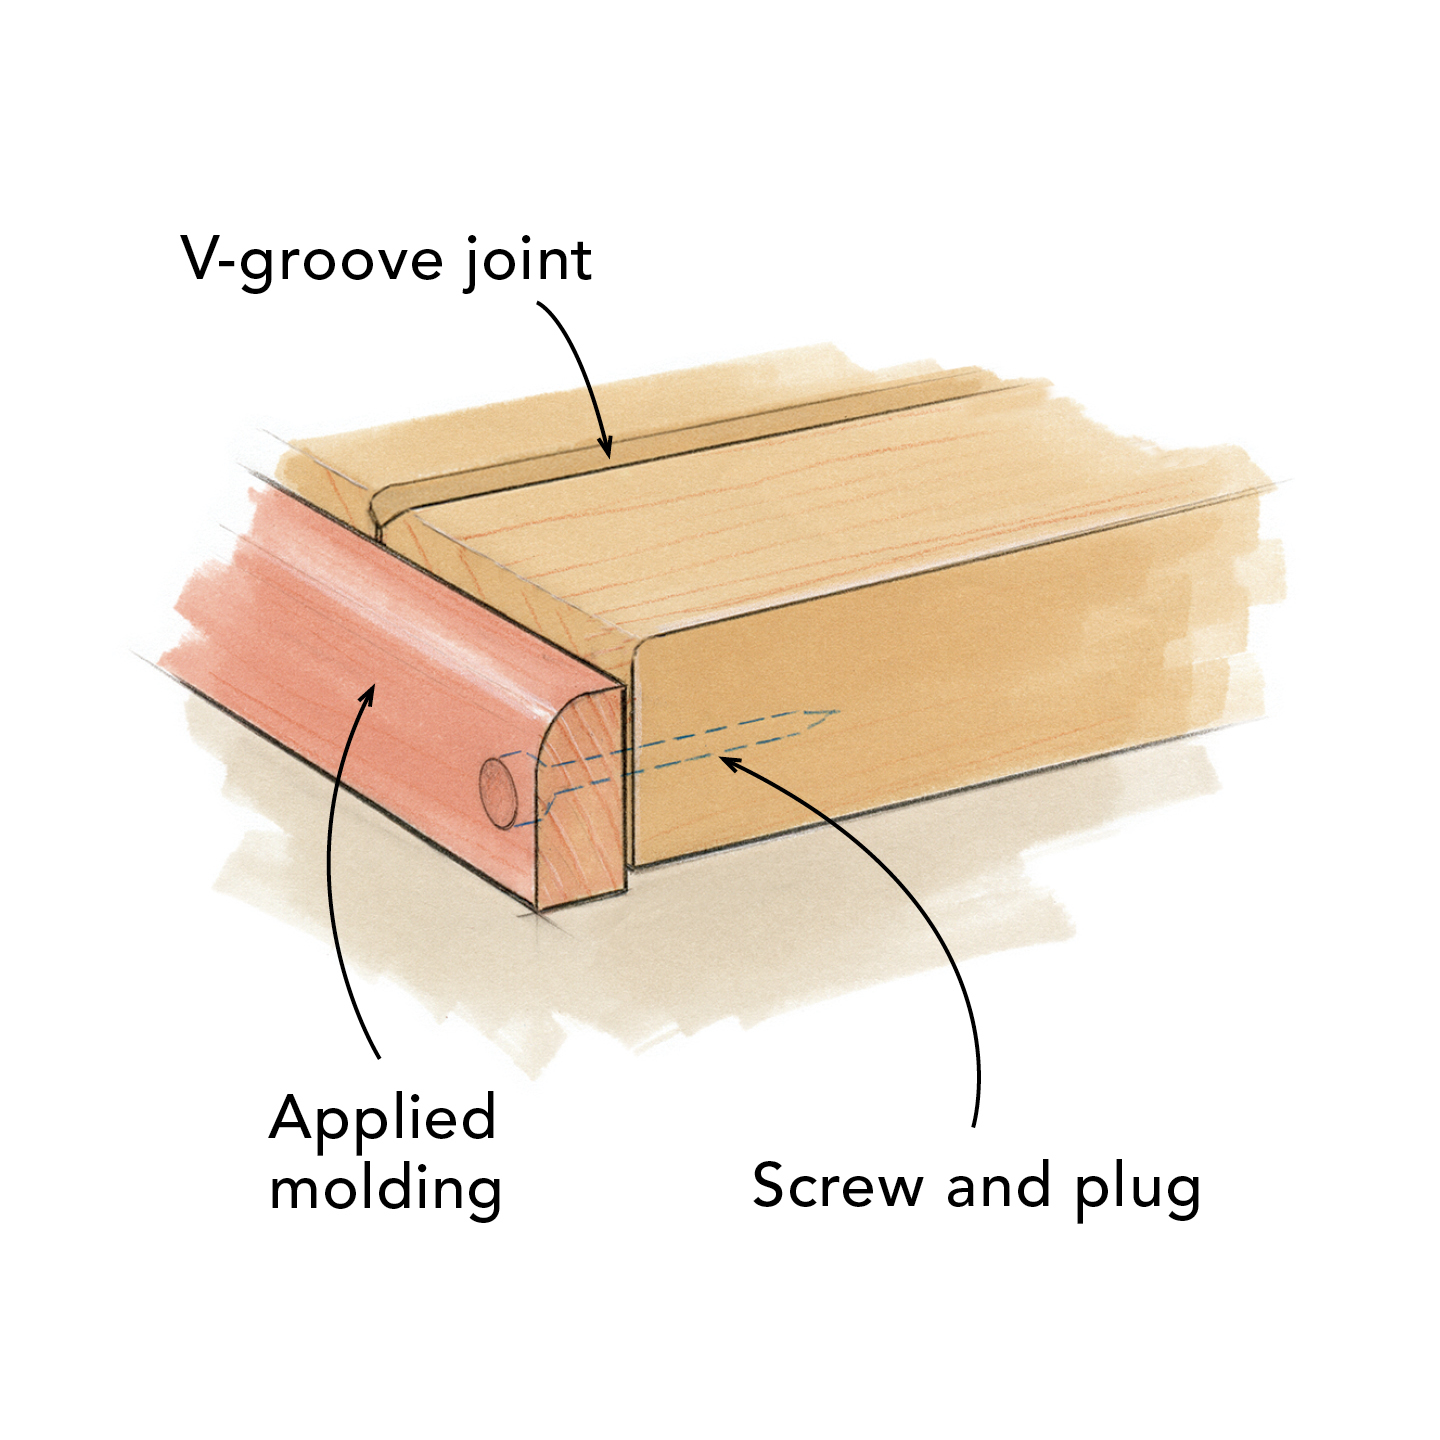
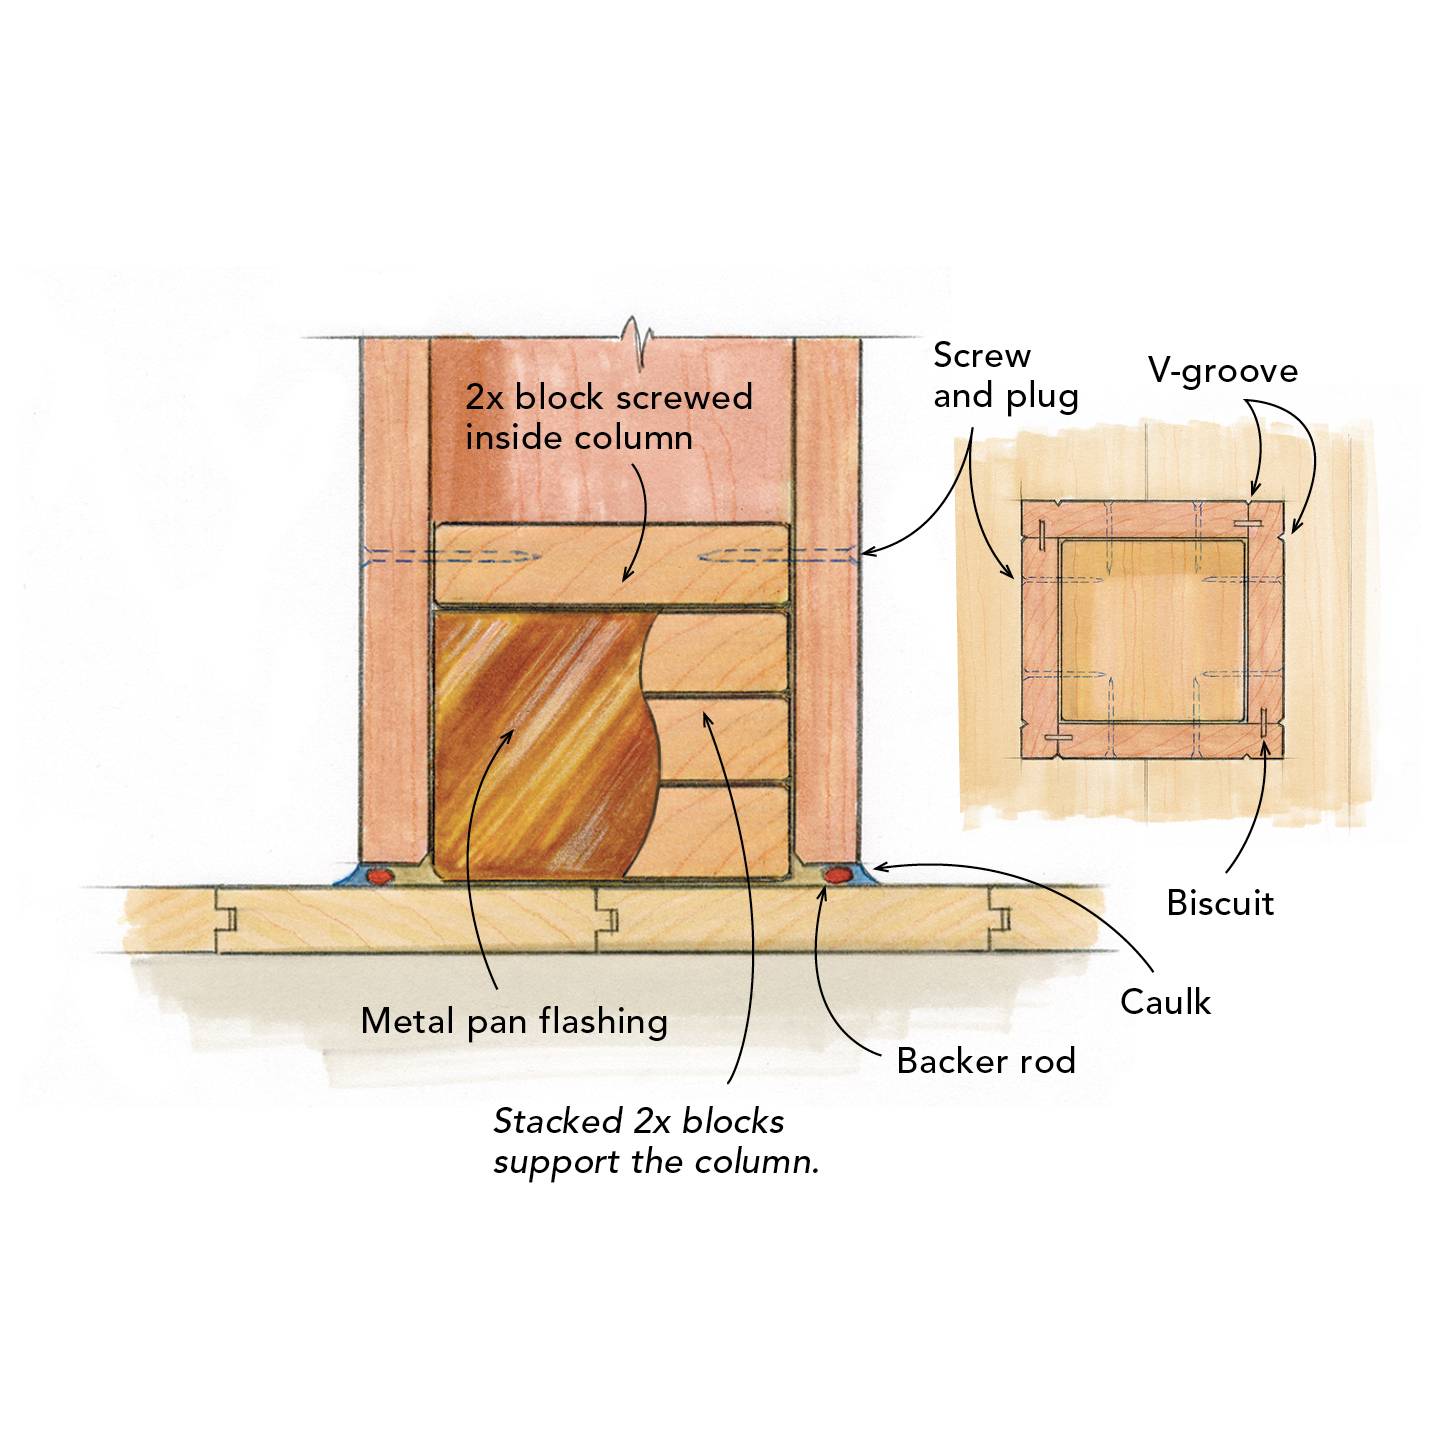
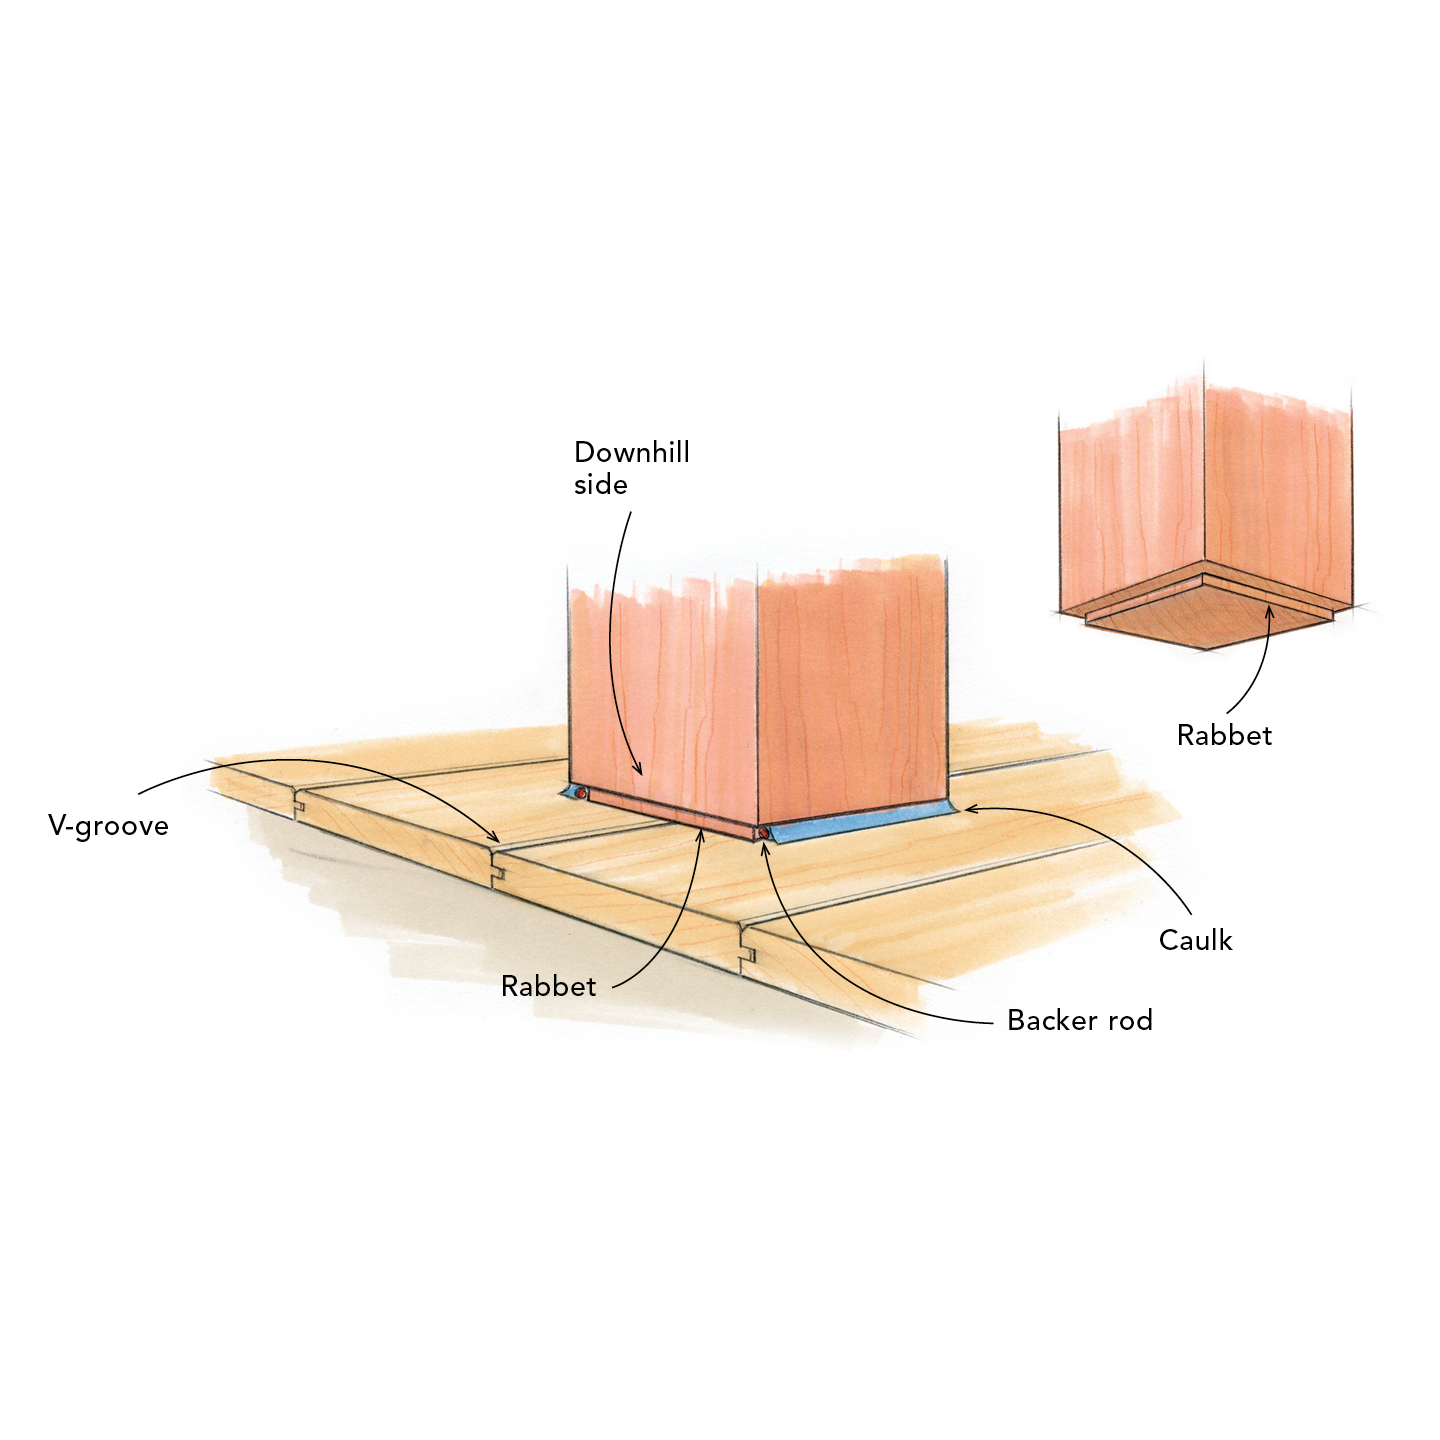
Let Water Move Through or Around the Column

Whether solid or hollow, porch columns are highly susceptible to moisture damage. On a pitched floor, water can build up behind the column and eventually penetrate the end grain. Sealing the end grain with a high-quality primer is key, but providing a path for water to travel is an often-overlooked detail.

Photo by Brian Vanden Brink.

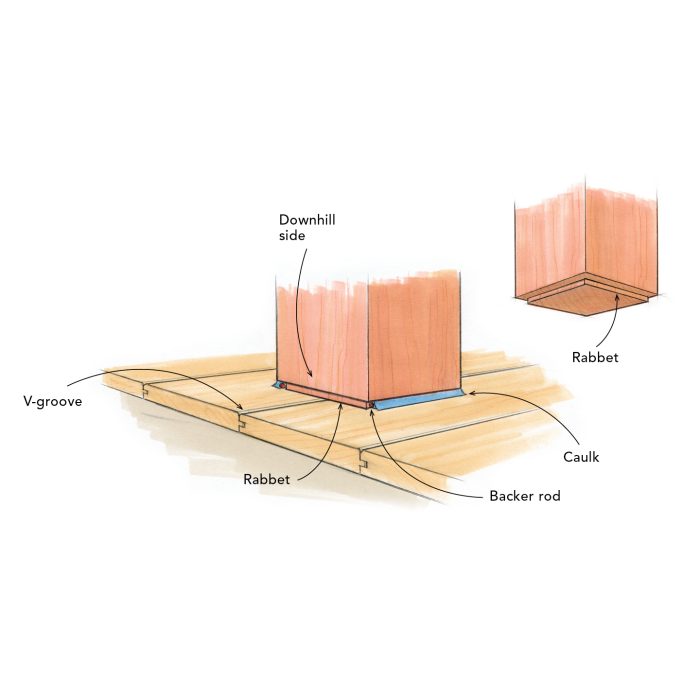
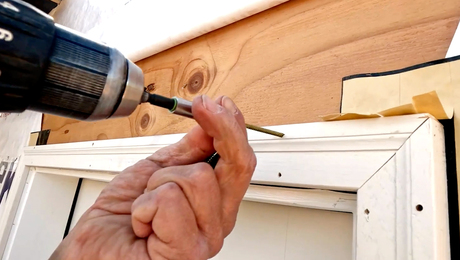
When the porch design calls for a wide column, wrapping a structural post with 1x trim is a common practice. But building a hollow column that is both structural and aesthetic makes venting the post easier. On solid columns, rout drainage channels on post bottoms to provide a tunnel for moisture to travel through and to allow air movement. Cutting a shallow rabbet around the bottom, then filling it with caulk, serves a similar purpose.

Stout and Hollow: Butt joints create the most stable joint, especially when assembled with epoxy, biscuits, and screws. Restoration carpenter Mike Davis hides the joint with a V-groove, followed by polyurethane caulk. He sets the column over a stack of 2xs set in metal pan flashing and bolted to the frame below. The column’s end grain is kept 1⁄4 in. off the floor by a 2x block screwed inside the column. Click here to enlarge drawing.

Wick-Free Base: Unprotected post bases can wick moisture up like a dry sponge. A rabbet cut around the post base provides a channel for backer rod and caulk. Seal the end grain with Primkote or an oil-based primer. Fill the uphill and sides with backer rod and polyurethane caulk. Leave the downhill side open to allow moisture to escape. A V-groove channels water away from the house. Click here to enlarge drawing.

Hang the Top and Bottom Rail: Mike Davis devised a system that is sturdy and slick. He locks the top and bottom rail to a stainless-steel lag bolt left 1 in. proud of the column. Using a plunge router and jigs, he routs two slots in the bottom of each rail: one for the lag bolt’s shank, the other for its head. The railing slips over the lags. He leaves a 1⁄4-in. gap between the rail and the column. Using backer rod and polyurethane caulk, he seals the top and sides of the rail-to-column joint. The bottom again remains open to allow for drainage. Click here to enlarge drawing.

— Chris Ermides; former FHB associate editor. All drawings by Dan Thornton.

From Fine Homebuilding #212

RELATED STORIES

  • 9 Trouble Spots on a Covered Porch
  • How to Make Wooden Porch Posts Last
  • 2 Ways to Detail Durable Porch Piers

Sign up for eletters today and get the latest how-to from Fine Homebuilding, plus special offers.

Signing you up...

This site is protected by reCAPTCHA and the Google Privacy Policy and Terms of Service apply.
See all newsletters
See all newsletters
×

Get home building tips, offers, and expert advice in your inbox

Signing you up...

This site is protected by reCAPTCHA and the Google Privacy Policy and Terms of Service apply.
See all newsletters
See all newsletters
View PDF

New Feature

Fine Homebuilding Forums

Ask questions, offer advice, and share your work

Log in or create an account to post a comment.

Sign up Log in

Become a member and get full access to FineHomebuilding.com

Up Next

Video Shorts

Featured Story

Podcast Episode 685: Patching Drywall, Adding Air Barriers, and Rotted Walls

Listeners write in about running a profitable contracting business and ask questions about patching drywall, adding air barriers, and fixing a patio poured against the house.

Featured Video

Video: Build a Fireplace, Brick by Brick

Watch mason Mike Mehaffey construct a traditional-style fireplace that burns well and meets current building codes.

Related Stories

  • FHB Podcast Segment: Repairing an Old Home While Maintaining Its Integrity
  • Tall Deck on a Sloped Lot
  • Ranch Redux
  • English Arts & Crafts Sensibility at Rumford Hall

Discussion Forum

Recent Posts and Replies

  • |
  • |
  • |
  • |
  • |
  • |
View More Create Post

Highlights

Fine Homebuilding All Access
Fine Homebuilding Podcast
Tool Tech
Plus, get an extra 20% off with code GIFT20

"I have learned so much thanks to the searchable articles on the FHB website. I can confidently say that I expect to be a life-long subscriber." - M.K.

Get home building tips, offers, and expert advice in your inbox

Signing you up...

This site is protected by reCAPTCHA and the Google Privacy Policy and Terms of Service apply.
See all newsletters
See all newsletters

Video

View All Videos
  • Fastening an Exterior Door With Brick Mold
  • How to Space and Install Pergola Rafters
  • How to Lay Out Post Bases for a Pergola
  • Angle Bracing for a Pergola
View All

Outdoor Spaces

View All Outdoor Spaces Articles
  • Hazard-Free Hot Tubs
  • Deck Details for Durability
  • The Best Way to Protect Heat Pumps from Rain and Snow
  • A Modern Texture With Historical Roots
View All Outdoor Spaces Articles

Fine Homebuilding Magazine

  • Issue 331 - June 2025
    • A More Resilient Roof
    • Tool Test: You Need a Drywall Sander
    • Ducted vs. Ductless Heat Pumps
  • Issue 330 - April/May 2025
    • Deck Details for Durability
    • FAQs on HPWHs
    • 10 Tips for a Long-Lasting Paint Job
  • Issue 329 - Feb/Mar 2025
    • Smart Foundation for a Small Addition
    • A Kominka Comes West
    • Making Small Kitchens Work
  • Issue 328 - Dec/Jan 2024
    • How a Pro Replaces Columns
    • Passive House 3.0
    • Tool Test: Compact Line Lasers
  • Issue 327 - November 2024
    • Repairing Damaged Walls and Ceilings
    • Plumbing Protection
    • Talking Shop

Fine Home Building

Newsletter Sign-up

  • Fine Homebuilding

    Home building tips, offers, and expert advice in your inbox.

  • Green Building Advisor

    Building science and energy efficiency advice, plus special offers, in your inbox.

  • Old House Journal

    Repair, renovation, and restoration tips, plus special offers, in your inbox.

Signing you up...

This site is protected by reCAPTCHA and the Google Privacy Policy and Terms of Service apply.
See all newsletters

Follow

  • Fine Homebuilding

    Dig into cutting-edge approaches and decades of proven solutions with total access to our experts and tradespeople.

    Start Free Trial Now
    • Facebook
    • Instagram
    • X
    • LinkedIn
  • GBA Prime

    Get instant access to the latest developments in green building, research, and reports from the field.

    Start Free Trial Now
    • Facebook
    • YouTube
  • Old House Journal

    Learn how to restore, repair, update, and decorate your home.

    Subscribe Now
    • Facebook
    • Instagram
    • X

Membership & Magazine

  • Online Archive
  • Start Free Trial
  • Magazine Subscription
  • Magazine Renewal
  • Gift a Subscription
  • Customer Support
  • Privacy Preferences
  • About
  • Contact
  • Advertise
  • Careers
  • Terms of Use
  • Site Map
  • Do not sell or share my information
  • Privacy Policy
  • Accessibility
  • California Privacy Rights

© 2025 Active Interest Media. All rights reserved.

Fine Homebuilding receives a commission for items purchased through links on this site, including Amazon Associates and other affiliate advertising programs.

X
X
This is a dialog window which overlays the main content of the page. The modal window is a 'site map' of the most critical areas of the site. Pressing the Escape (ESC) button will close the modal and bring you back to where you were on the page.

Main Menu

  • How-To
  • Design
  • Tools & Materials
  • Video
  • Blogs
  • Forum
  • Project Guides
  • Reader Projects
  • Magazine
  • Members
  • FHB House

Podcasts

  • FHB Podcast
  • ProTalk

Webinars

  • Upcoming and On-Demand

Podcasts

  • FHB Podcast
  • ProTalk

Webinars

  • Upcoming and On-Demand

Popular Topics

  • Kitchens
  • Business
  • Bedrooms
  • Roofs
  • Architecture and Design
  • Green Building
  • Decks
  • Framing
  • Safety
  • Remodeling
  • Bathrooms
  • Windows
  • Tilework
  • Ceilings
  • HVAC

Magazine

  • Current Issue
  • Past Issues
  • Magazine Index
  • Subscribe
  • Online Archive
  • Author Guidelines

All Access

  • Member Home
  • Start Free Trial
  • Gift Membership

Online Learning

  • Courses
  • Project Guides
  • Reader Projects
  • Podcast

More

  • FHB Ambassadors
  • FHB House
  • Customer Support

Account

  • Log In
  • Join

Newsletter

Get home building tips, offers, and expert advice in your inbox

Signing you up...

This site is protected by reCAPTCHA and the Google Privacy Policy and Terms of Service apply.
See all newsletters
See all newsletters

Follow

  • X
  • YouTube
  • instagram
  • facebook
  • pinterest
  • Tiktok

Join All Access

Become a member and get instant access to thousands of videos, how-tos, tool reviews, and design features.

Start Your Free Trial

Subscribe

FHB Magazine

Start your subscription today and save up to 70%

Subscribe

We hope you’ve enjoyed your free articles. To keep reading, become a member today.

Get complete site access to expert advice, how-to videos, Code Check, and more, plus the print magazine.

Start your FREE trial

Already a member? Log in