FHB Logo Facebook LinkedIn Email Pinterest Twitter X Instagram Tiktok YouTube Plus Icon Close Icon Navigation Search Icon Navigation Search Icon Arrow Down Icon Video Guide Icon Article Guide Icon Modal Close Icon Guide Search Icon Skip to content
Subscribe
Log In
  • How-To
  • Design
  • Tools & Materials
  • Restoration
  • Videos
  • Blogs
  • Forum
  • Magazine
  • Members
  • FHB House
  • Podcast
Log In
Video

Wrapping PVC Box Beams

Learn how Justin Cline builds out box beams with VERSATEX PVC trimboards in the shop before installing them on-site.

By Justin Cline

Sponsored by VERSATEX

In this video we revisit the rear-porch remodel where Justin Cline, lead carpenter at Eldon Builders, is wrapping box beams using VERSATEX 1x trimboards. On the day we showed up it was raining, so Justin sorted some material, loaded the truck, and moved the operation to the shop so he could mill up the parts and walk us through the assembly before returning to the job site for installation.

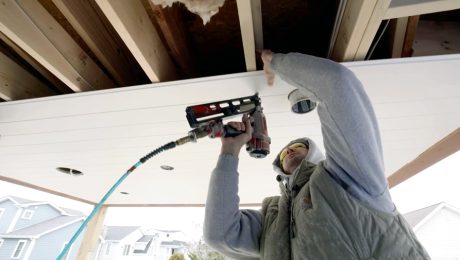
Justin: So here I have a real-life, full-scale drawing of the cross section of the beam that we’re making. This is our VERSATEX 1×12. This is what we’re using to construct the beam face. Underneath we have what we call a belly board, which is just a piece of 1x that we use to finish off the underside, and we have our dado slot to accept this belly board.

Box beam sketch

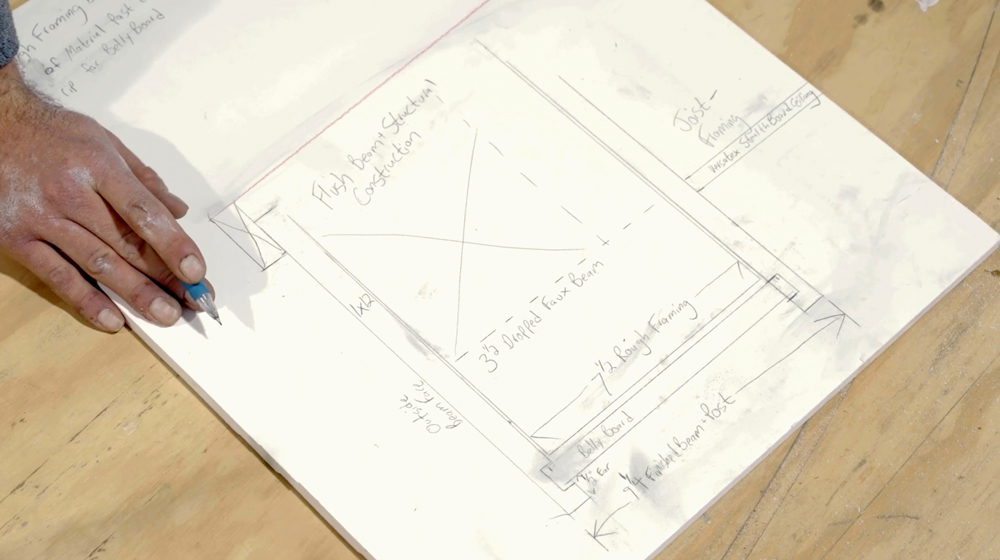
The dado slot allows us to have a nice clean corner right inside here. And then again on the other side we just use a VERSATEX 1x product ripped down to size, our universal figure here, and that’s the full joinery of how that goes together. So, in this instance, I’m doing a 3-1/2-in. faux beam. You can apply this to any sort of framing detail where you have a drop beam or a flush beam. In this case we have a flush beam. The outside is the full 1×12. On the other side this will be ripped down on the job site to our ceiling.

Narration: For manageability inside the shop, Justin cuts the PVC to rough lengths using measurements from the job site before setting up the tablesaw.

Justin: What I’m doing now is locking up our dado stack and this will create our plough. That data puts us right at three-quarters there and that’s perfect, exactly what we’re looking for. So now the only adjustment we need is our distance here for what I call the ear, which is full, our plow, and our extra. Here we’re going to put our factory edge against the fence. We’re going to mark out a half. That’s going to set a reveal on the underside of the beam, and from there 3/4 in., that is the width of our plough or dado. I like to go right about half of the material thickness. If you go too thin here, you end up getting a lot of cracking and breaking right along this face. Then we also have our height that we’ll set, so it only takes out what we need out of what will be the back of the board. It is always a good idea after you make your first cut to get a test piece. So here we have a piece of VERSATEX 1x fitting inside that dado slot.

Personally, I like a little bit of slop in the back there. If you have any issues with your rough framing, that allows you to get your board nice and flat and a nice crisp reveal underneath. So here just for efficiency, I put a dado on each side that has the factory edge along the full VERSATEX 1×12. I make notes to myself to rip this in half. On the job site, I’ll be able to rip this down to height. It’s the inside face of a beam, so it’s a little bit less tall than it would be on the outside of the beam, which in this case over here is a full 1×12.

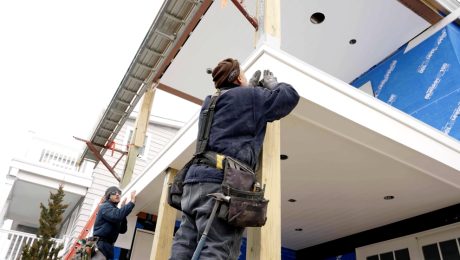
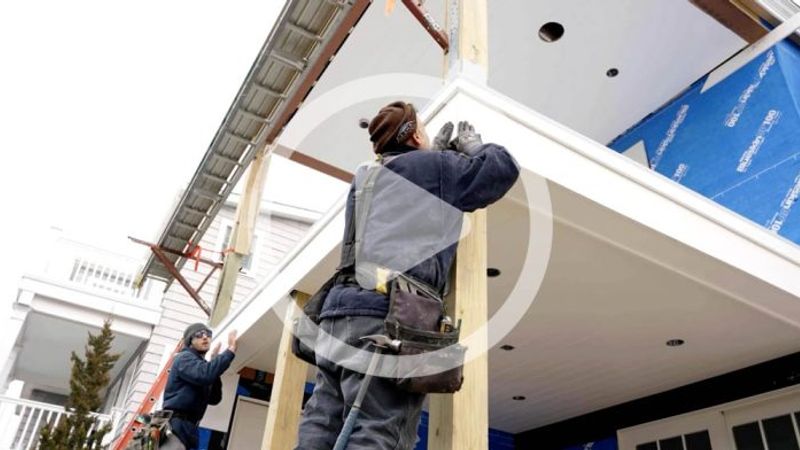
Justin: Now we’re on the back porch and we’re going to be wrapping these beams with the VERSATEX 1x product. The architect has one contiguous band which spans from the top of that window head all the way through, and that creates the height for our beam. Our beam face will be as such. The belly board is left a little bit wider so that it will tuck inside of that dado slot.

Narration: Once cut to length they position the board tight to the siding while leaving a gap at the post for expansion and contraction.

Justin: We use our pencil as a 1/4-in. gauge for our width. Then, I’m going to use this Christy’s Red Hot vinyl adhesive. I use my pencil again as my gauge for 1/4-in. past and I fasten it with my DA Nailer. Now I have a nice watertight connection. I’m going to leave a little space off this post and a 1/4-in. pass with my pencil, and I mark for any notches. So now I have my belly board installed. It’s flat and it’s straight. We’ll work on the inside beam face with the dado slot we have produced out front.

Here’s where some of the prep work in the shop comes to play. I have my piece with a dado on each side coming off the factory end. Now we just got to rip it to its width. I measure from here. It was 3-7/8 in., pretty tight, and I have a little bit of room for space. I’m going to go 3-3/4 in. to there, and then I reference that same factory edge. We can make our rip 4-1/2 in.

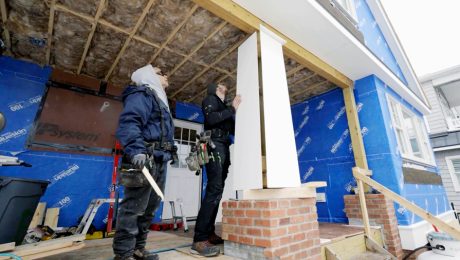
Where the belly board is left wide of the framing, it’s going to contact here. So, I take a little notch out and when the other corner piece on the inside touches, it covers up any slop you have inside of that cut. All right, let’s put it up.

Narration: They tack the center of the board to hold its position so Justin can apply a healthy bead of vinyl adhesive to the joint. Then he nails off the board using the 2-in. 15-ga. stainless finish nails.

Justin: So, these spaces up at the top here were left intentionally. We’re going to have a bed molding run around the perimeter of this porch ceiling just like that, which covers all the way through. So now I have my belly board installed. I have the inside face of the beam wrapped. All that’s left is the outside beam face. I got this VERSATEX 1×12 with our dado that we made in the shop. Got that to accept our belly board. I give myself 3/4 in. to go up behind this edge of the deck above for watershed.

Narration: Just like we saw previously where boards butt PVC siding, they use adhesive.

Justin: I’m going to line it up there like that, nice and tight. I’m going to glue this miter joint. That will bond these two pieces together as one. So, these nails are a good holding power, kind of like a clamp until the glue cures to 100%. I’m going to push that nice and tight to my dado—that connects the belly board and this whole beam assembly. Then, I look around to make sure everything’s good. I got my groove all locked in, so now it’s just a matter of nailing it on.

RELATED STORIES

  • Building Decorative Box Beams
  • Add Character with a Box-Beam Ceiling
  • Manage PVC Trim Expansion

Sign up for eletters today and get the latest how-to from Fine Homebuilding, plus special offers.

Signing you up...

This site is protected by reCAPTCHA and the Google Privacy Policy and Terms of Service apply.
See all newsletters
See all newsletters
×

Get home building tips, offers, and expert advice in your inbox

Signing you up...

This site is protected by reCAPTCHA and the Google Privacy Policy and Terms of Service apply.
See all newsletters
See all newsletters

Videos in the Series

  • Installing a PVC Porch Ceiling

    Justin Cline of Eldon Builders demonstrates the process of installing VERSATEX Stealth Beadboard on a porch ceiling during a comprehensive house remodel .

  • Wrapping PVC Box Beams

    Learn how Justin Cline builds out box beams with VERSATEX PVC trimboards in the shop before installing them on-site.

  • Creating and Installing PVC Tapered Columns

    Watch Justin Cline demonstrate how to craft tapered columns using PVC VERSATEX sheets for a clean and symmetrical finish.

New Feature

Fine Homebuilding Forums

Ask questions, offer advice, and share your work

About This Video Series

Sponsored by VERSATEX In this job-site video series, Justin Cline of Eldon Builders walks through the process of trimming out a porch remodel on the coast of New Jersey. Watch Justin demonstrate installation tips, techniques, and best practices to join and install VERSATEX PVC trim to combat expansion and contraction in a coastal environment with quality craftsmanship.   More about this Video Series

Log in or create an account to post a comment.

Sign up Log in

Become a member and get full access to FineHomebuilding.com

Up Next

Video Shorts

Featured Story

FHB Podcast Segment: Patching Drywall Near a Shower

Learn how to patch drywall above a fiberglass shower without totally redoing everything.

Featured Video

Video: Build a Fireplace, Brick by Brick

Watch mason Mike Mehaffey construct a traditional-style fireplace that burns well and meets current building codes.

Related Stories

  • FHB Podcast Segment: Repairing an Old Home While Maintaining Its Integrity
  • Ranch Redux
  • English Arts & Crafts Sensibility at Rumford Hall
  • Fastening an Exterior Door With Brick Mold

Discussion Forum

Recent Posts and Replies

  • |
  • |
  • |
  • |
  • |
  • |
View More Create Post

Highlights

Fine Homebuilding All Access
Fine Homebuilding Podcast
Tool Tech
Plus, get an extra 20% off with code GIFT20

"I have learned so much thanks to the searchable articles on the FHB website. I can confidently say that I expect to be a life-long subscriber." - M.K.

Get home building tips, offers, and expert advice in your inbox

Signing you up...

This site is protected by reCAPTCHA and the Google Privacy Policy and Terms of Service apply.
See all newsletters
See all newsletters

Video

View All Videos
  • FHB Podcast Segment: When to Use Coil Stock on Fascia and Rake Trim
  • Wrapping PVC Box Beams
  • Installing a PVC Porch Ceiling
  • Creating and Installing PVC Tapered Columns
View All

Porches and Patios

View All Porches and Patios Articles
  • Hazard-Free Hot Tubs
  • Guard Posts for Angled Deck Corners
  • Angle Bracing for a Pergola
View All Porches and Patios Articles

Fine Homebuilding Magazine

  • Issue 331 - June 2025
    • A More Resilient Roof
    • Tool Test: You Need a Drywall Sander
    • Ducted vs. Ductless Heat Pumps
  • Issue 330 - April/May 2025
    • Deck Details for Durability
    • FAQs on HPWHs
    • 10 Tips for a Long-Lasting Paint Job
  • Issue 329 - Feb/Mar 2025
    • Smart Foundation for a Small Addition
    • A Kominka Comes West
    • Making Small Kitchens Work
  • Issue 328 - Dec/Jan 2024
    • How a Pro Replaces Columns
    • Passive House 3.0
    • Tool Test: Compact Line Lasers
  • Issue 327 - November 2024
    • Repairing Damaged Walls and Ceilings
    • Plumbing Protection
    • Talking Shop

Fine Home Building

Newsletter Sign-up

  • Fine Homebuilding

    Home building tips, offers, and expert advice in your inbox.

  • Green Building Advisor

    Building science and energy efficiency advice, plus special offers, in your inbox.

  • Old House Journal

    Repair, renovation, and restoration tips, plus special offers, in your inbox.

Signing you up...

This site is protected by reCAPTCHA and the Google Privacy Policy and Terms of Service apply.
See all newsletters

Follow

  • Fine Homebuilding

    Dig into cutting-edge approaches and decades of proven solutions with total access to our experts and tradespeople.

    Start Free Trial Now
    • Facebook
    • Instagram
    • X
    • LinkedIn
  • GBA Prime

    Get instant access to the latest developments in green building, research, and reports from the field.

    Start Free Trial Now
    • Facebook
    • YouTube
  • Old House Journal

    Learn how to restore, repair, update, and decorate your home.

    Subscribe Now
    • Facebook
    • Instagram
    • X

Membership & Magazine

  • Online Archive
  • Start Free Trial
  • Magazine Subscription
  • Magazine Renewal
  • Gift a Subscription
  • Customer Support
  • Privacy Preferences
  • About
  • Contact
  • Advertise
  • Careers
  • Terms of Use
  • Site Map
  • Do not sell or share my information
  • Privacy Policy
  • Accessibility
  • California Privacy Rights

© 2025 Active Interest Media. All rights reserved.

Fine Homebuilding receives a commission for items purchased through links on this site, including Amazon Associates and other affiliate advertising programs.

X
X
This is a dialog window which overlays the main content of the page. The modal window is a 'site map' of the most critical areas of the site. Pressing the Escape (ESC) button will close the modal and bring you back to where you were on the page.

Main Menu

  • How-To
  • Design
  • Tools & Materials
  • Video
  • Blogs
  • Forum
  • Project Guides
  • Reader Projects
  • Magazine
  • Members
  • FHB House

Podcasts

  • FHB Podcast
  • ProTalk

Webinars

  • Upcoming and On-Demand

Podcasts

  • FHB Podcast
  • ProTalk

Webinars

  • Upcoming and On-Demand

Popular Topics

  • Kitchens
  • Business
  • Bedrooms
  • Roofs
  • Architecture and Design
  • Green Building
  • Decks
  • Framing
  • Safety
  • Remodeling
  • Bathrooms
  • Windows
  • Tilework
  • Ceilings
  • HVAC

Magazine

  • Current Issue
  • Past Issues
  • Magazine Index
  • Subscribe
  • Online Archive
  • Author Guidelines

All Access

  • Member Home
  • Start Free Trial
  • Gift Membership

Online Learning

  • Courses
  • Project Guides
  • Reader Projects
  • Podcast

More

  • FHB Ambassadors
  • FHB House
  • Customer Support

Account

  • Log In
  • Join

Newsletter

Get home building tips, offers, and expert advice in your inbox

Signing you up...

This site is protected by reCAPTCHA and the Google Privacy Policy and Terms of Service apply.
See all newsletters
See all newsletters

Follow

  • X
  • YouTube
  • instagram
  • facebook
  • pinterest
  • Tiktok

Join All Access

Become a member and get instant access to thousands of videos, how-tos, tool reviews, and design features.

Start Your Free Trial

Subscribe

FHB Magazine

Start your subscription today and save up to 70%

Subscribe

We hope you’ve enjoyed your free articles. To keep reading, become a member today.

Get complete site access to expert advice, how-to videos, Code Check, and more, plus the print magazine.

Start your FREE trial

Already a member? Log in